Uploading and Tagging Files
For users with the permission to upload to CORE, uploading files is fast and simple, and can manage high volumes of data and files. Uploading the actual files is just the first step in the uploading process. Categorizing the files is the next step. Both are outlined here, along with navigating the Transfers Module where you can track and monitor your uploads.
Choose an Upload Mode
There are two modes to upload files to CORE.
- Aspera - This is the primary uploader and downloader of files in CORE. Aspera provides high speed data transfer solutions to send, share, stream and sync large files and data sets. * Requires downloading Aspera to your computer.

- HTTPs - Is a simpler, slower, speed alternative to Aspera, and is useful in lower bandwidth wifi situations and if Aspera use is blocked by your company firewall.

To choose your preferred mode, click the icon next to the Upload icon in the upper right corner of the Top Navigation Bar.

We recommend using Aspera to upload, for faster speeds and greater reliability.
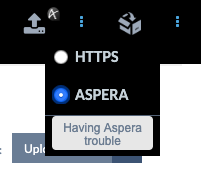
Use of Aspera requires installation. When first selected, you will be prompted to download the Aspera Connect plugin. The plugin link can also be accessed here: https://downloads.asperasoft.com/en/downloads/8?list
When Aspera mode is enabled, the gray Aspera logo will appear next to the Upload icon. 
Start an Upload
There are two ways to start an upload:
- By selecting the Upload icon in any number of places throughout the CORE platform.
- By dragging and dropping Files into File Search
Upload Files Using the Upload Icon
To begin uploading,
- Click on the Upload icon in the upper right corner of the Top Navigation Bar anywhere on the site.
![]()
- A File dialog window will open. Select as many files as you would like to upload. To select multiple files, hold Ctrl (Command on MacOS) as you click. To select a range of files, hold Shift as you click to extend your selection.
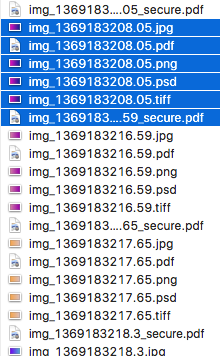
- Select “Open.”
- The dialog box will automatically close.
- A pop-up confirming you are uploading files will appear. Select Allow. The files will initiate uploading, and the Upload Details View will open in Upload Mode.
- Important: If you are in HTTPS mode - Once you have initiated an upload, you must keep your browser window open until the upload has finished. The upload cannot continue if the window is closed.
Upload Files Using Drag and Drop
To begin uploading using drag and drop,

Go to File Search in the Left Navigation Bar.
Select a file from your desktop or file viewer
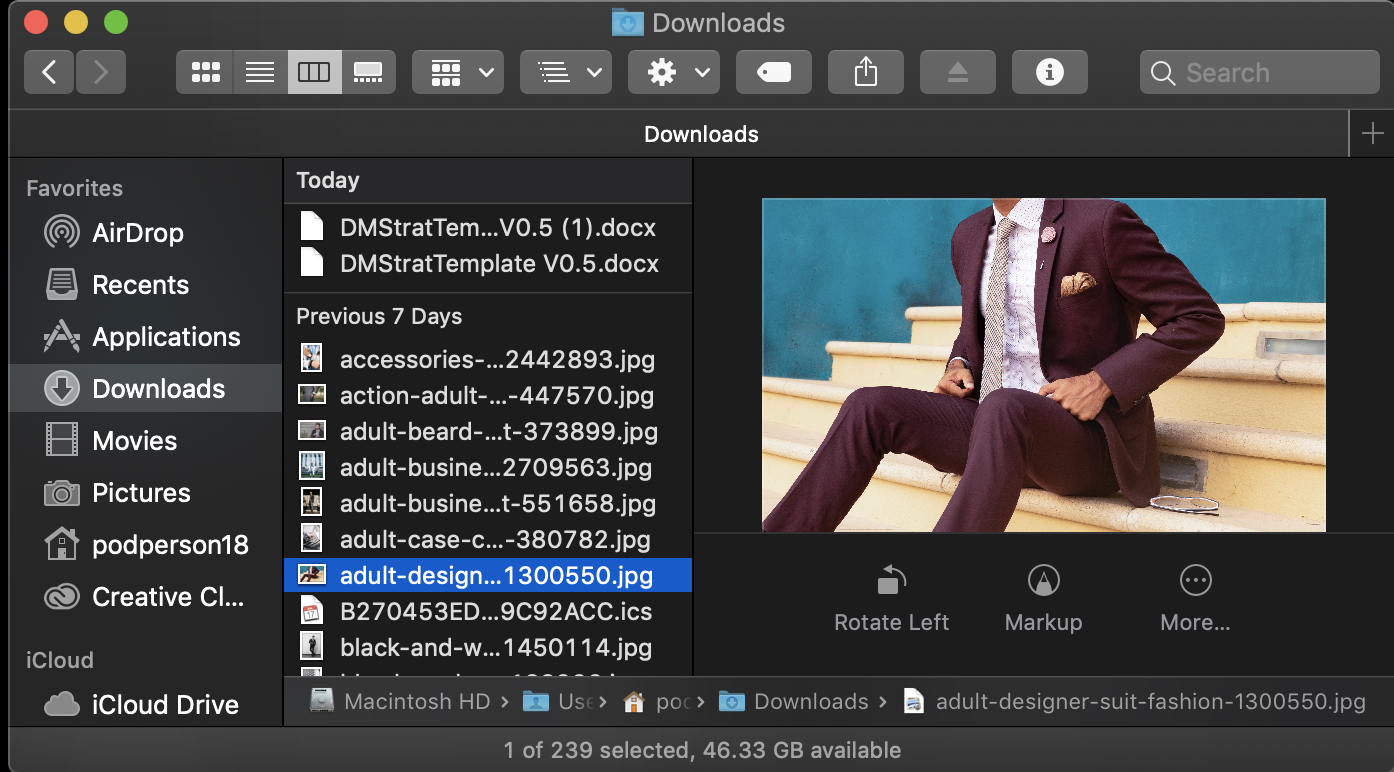
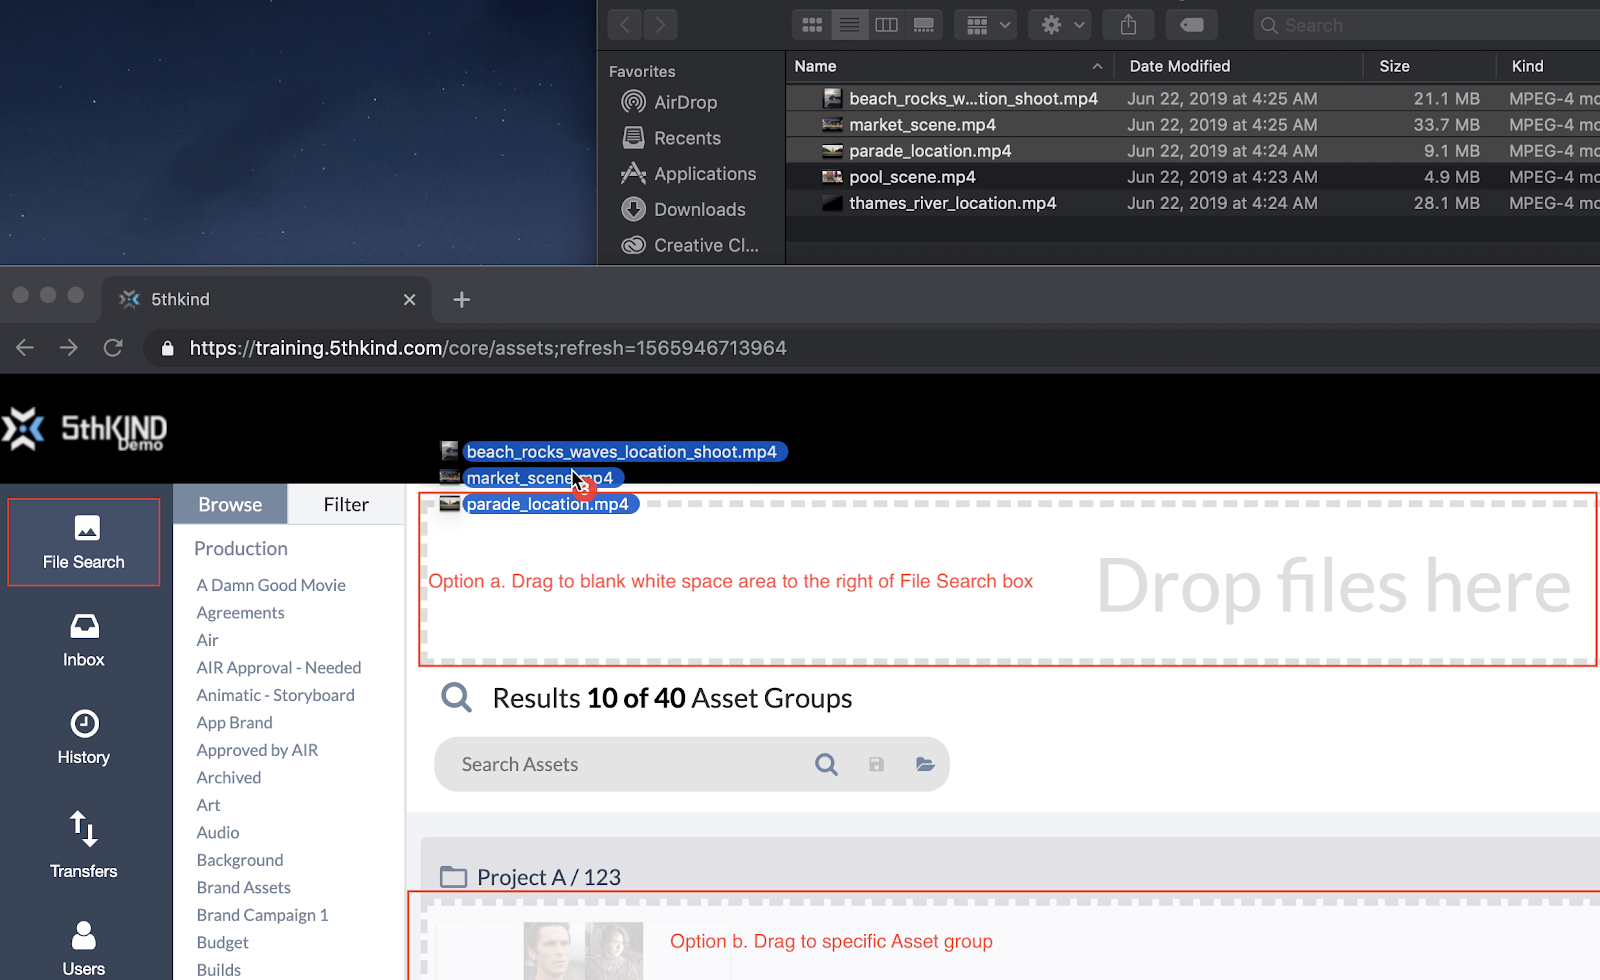
Drag and drop the file(s) into one of two places: a. The blank white space to the right of the File Search box b. A specific Asset Group
A pop-up confirming you are uploading files will appear. Select Allow. (In this image below, a file has been added to an existing Asset Group, which you can see by the “Uploading” thumbnail.)
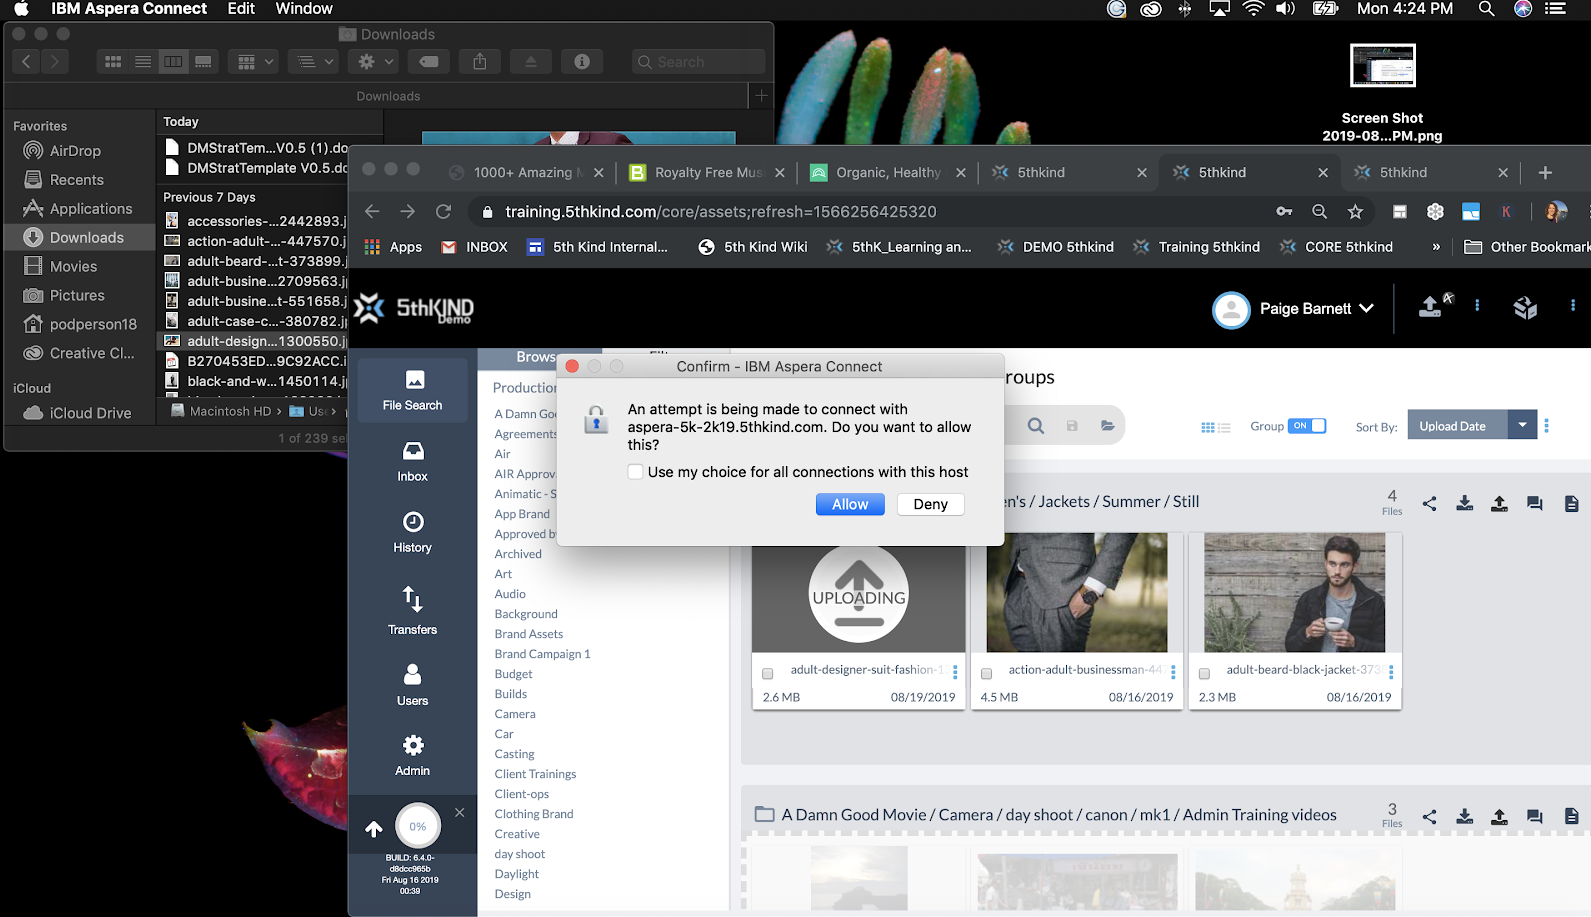
When the files are dropped into a specific Asset Group, they will be categorized structurally with the same tags as the group. However, when files are dropped into the top white search area, the files must be structurally categorized in that moment. This is referred to as Simple Categorization. You also have the option of clicking on Advanced Mode which will take you to the Standard Categorization form.

- To structurally categorize the files, select the Tag Values from each of the dropdown menus at the top of the page. These tags create an Asset Group name for your files.

Where to Find the Upload Icon in CORE
The Upload icon is found throughout CORE in the following places:
- Top Navigation Bar (everywhere on platform) - This initiates a general upload of one or more files that requires categorization.

- File Search >> Individual Asset Group - This initiates an upload of files into the selected Asset Group.
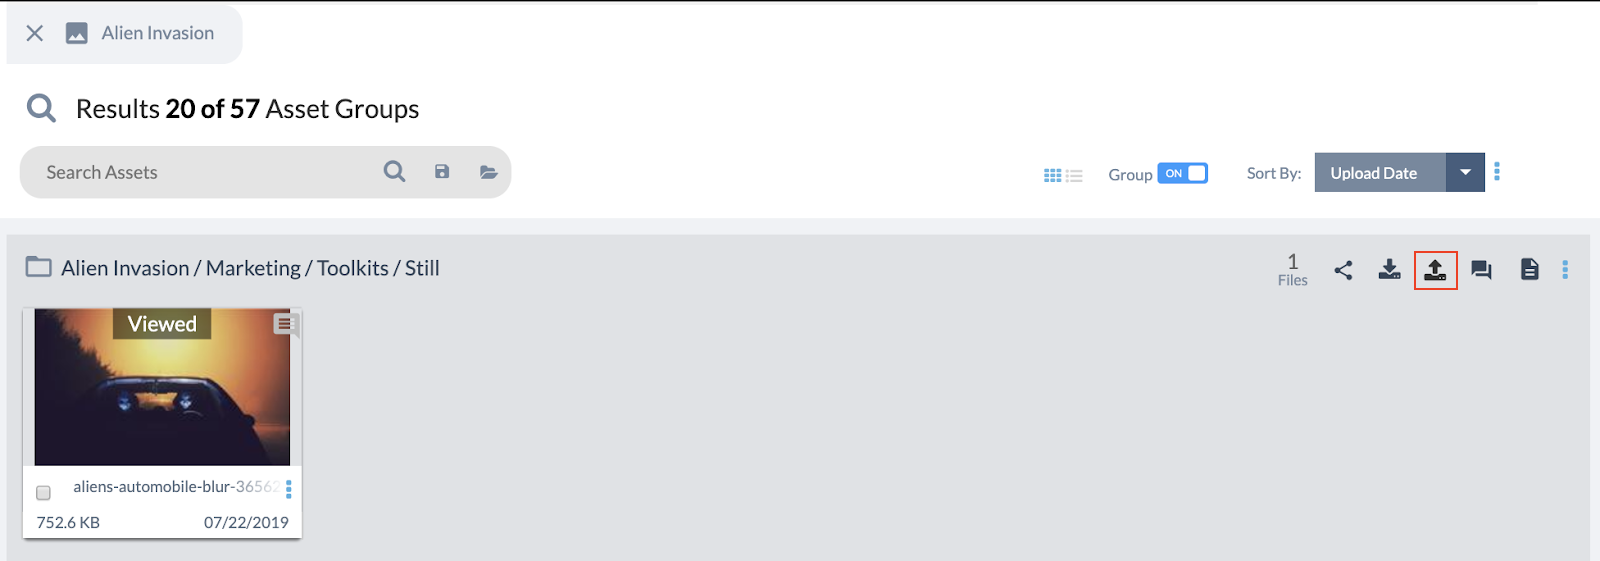
- File Search >> Top Tagging Bar >> Next to Selected “Production Name” - This initiates an upload of files into the selected Production.

- . Asset Viewer Module >> Top Bar - This initiates an upload of files into the selected Asset Group.

- Inbox >> Package >> Top Bar - This initiates an upload of files into the Package.

Categorize Uploaded Files
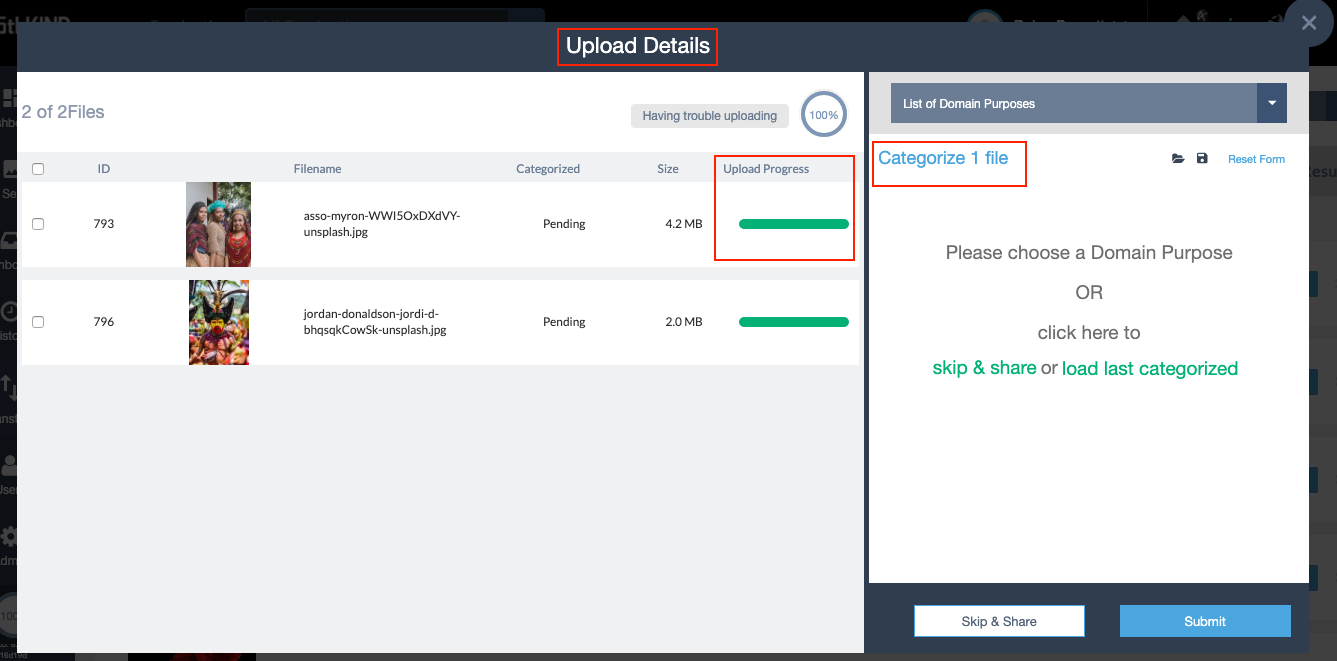
Your uploaded Files will appear in the Upload Details View, where you can categorize them.
Important: File Categorization is extremely important in CORE. The way files are categorized determines how people will find them in the system, as well as who has access to them. If you have questions about how to categorize the files you are uploading, please contact your system administrator.
Elements of Upload Details View
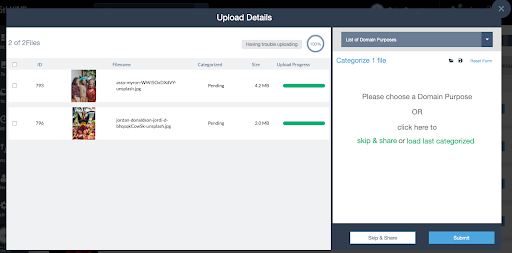
When you upload a file, the Upload Details view will pop up, where you can view your files’ progress, categorize / tag your files and then eventually share your files. Below are the different elements of the Upload Details View.
Elements of the Files Viewer
View information about your uploading files here. You can select them to apply categorization to a subset of files.
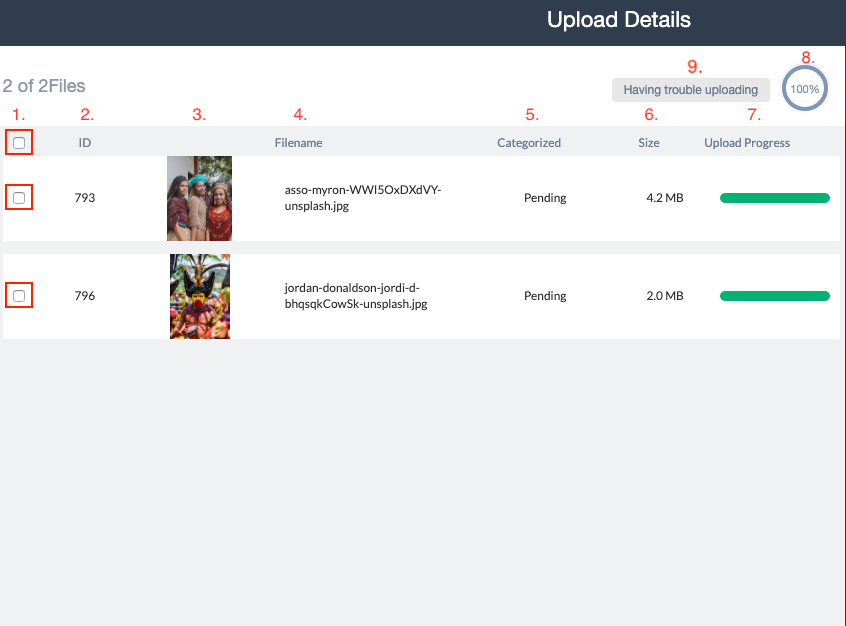
- Select - Check the box to select a file. If you have files selected, the categorization settings you choose will apply only to them. *If you do not sub-select files all files will be categorized in the same way.
- ID - The identification number for the individual file.
- Thumbnail - Files will display a default icon as they upload. Once they have been ingested and processed, the thumbnail will be updated to that of the File.
- Filename- The name of the individual file.
- Categorized - Status of the file’s categorization. There are two statuses:
- Pending - Means this file needs to be tagged.
- Categorized - Means the file has been tagged.
- Size - File size of the individual file.
- Upload Progress - The progress bar for each File will update as it uploads.
- Overall Upload Progress - This circle shows the overall upload progress for all Files. It will update as the Files upload.
- Troubleshooting uploads - Click this button for any troubleshooting issues with Aspera upload
Elements of the Categorization Panel
This is where you categorize the uploaded Files. If no single File is selected via the Select checkbox, this categorization will apply to all Files; otherwise, it will apply to the selected Files.
Categorization Panel Views
A. View when user first uploads B. View of Domain with Structural Tags only C. View of Domain with multiple Tag Groups
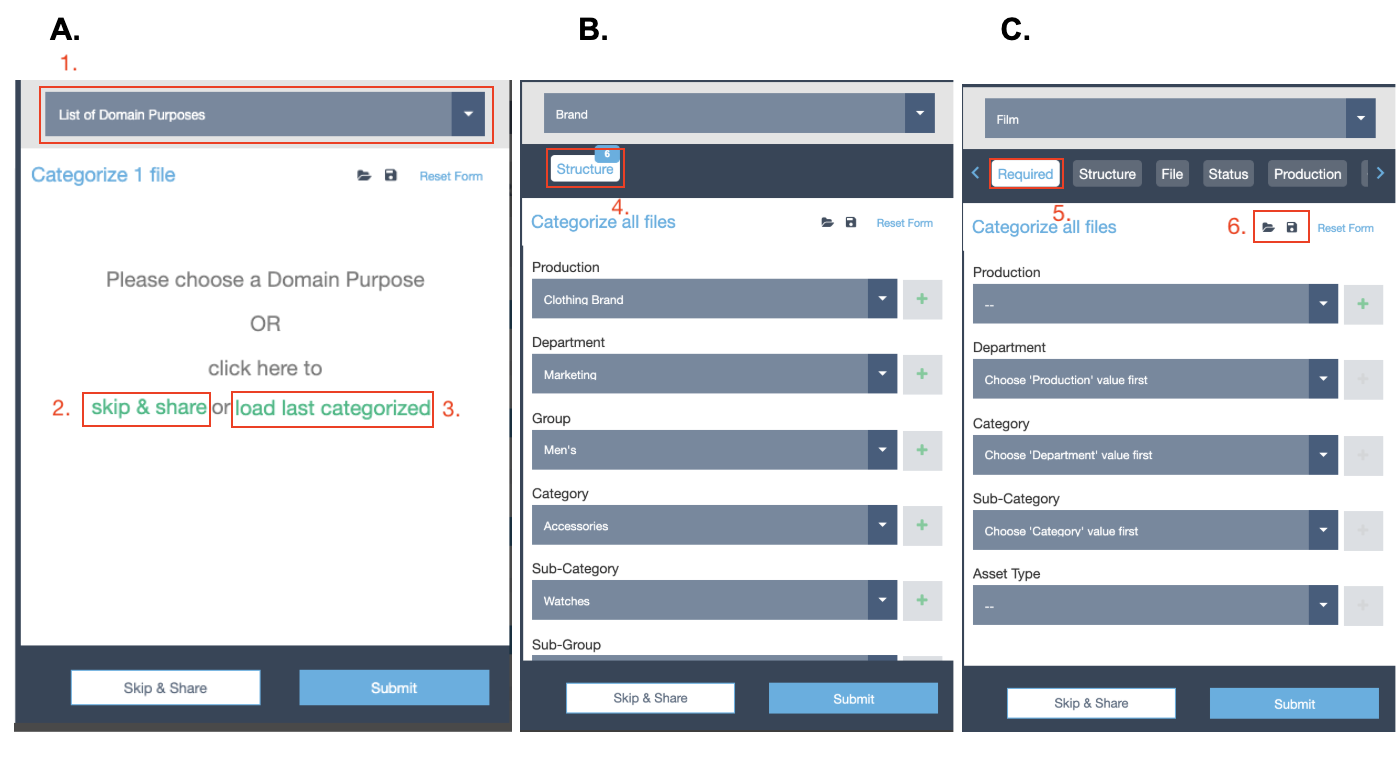
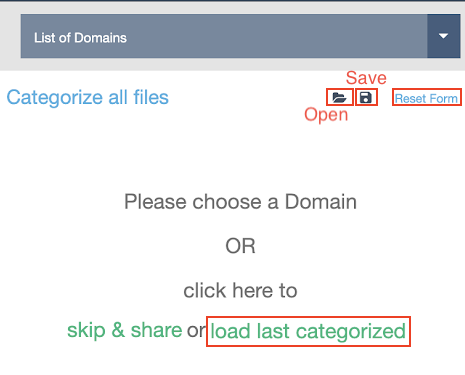
Domain Select - Select the Domain that the uploaded Files belong to. This must be selected in order to categorize your Files.
Skip & Share - Link in “Please choose Domain OR click here to skip & share or load last categorized” that bypasses tagging files, and takes the user to the Sharing Panel.
Load Last Categorized - Link in “Please choose Domain OR click here to skip & share or load last categorized” that loads the last set of tags created by the user during the previous upload. Helpful when uploading batches of assets using similar tags. Can also be accessed via the folder icon next to save icon and Reset form.

Tag Group Select - Each Tag Group contains a set of Tag Fields that can be used to categorize your uploads. Click any available Tag Group to view the Fields it contains.
Required Tags - The Required Tag Group contains the Tag Fields from all Tag Groups that have been designated as Required by your Administrator. These fields must be filled in order to submit your tagged files.
Templates - Templates can save you time when you regularly use the same or common tag settings to categorize Files:
Save Template - When you create a template, it saves all current Field settings for later use. Click the icon, enter a name for your template, and click to save.
NOTE:Templates are unique to the User and are not viewable by other users.
Load Template - Once you've saved a template, you can apply it to any other files. Click the icon, then select the template you would like to apply.
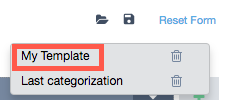
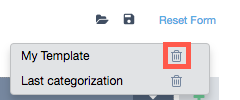
Delete Template - If you'd like to delete a saved template, click the icon to display your templates, then click the icon next to the unwanted template.
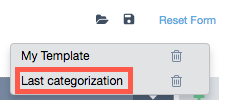
Last Categorization - CORE will automatically remember the last settings you used to categorize Files. If you'd like to repeat your previous settings, click the icon, and select Last Categorization.
Reset - Click Reset to clear all Fields. Click Reset to clear all Fields.

Field - For each Field in the selected Tag Group, click the dropdown to select a value. Some Fields are dependent on another; if so, you must select the drop downs in order of appearance.

Add New Value - If there are no values in a Field, or if the value you want is not an option, click the + button. Enter the new value, then click Save. To cancel adding a new value, click X Close. NOTE: Reach out to your system Administrator if you do not have the + option and need new values added.

Exit - Click the X to close out Upload Details window and skip categorization and sharing. You can return to it later by selecting your upload from the Transfers Uploads page. Note that if your files are not categorized, they will not appear in File Search view.
Categorize (aka Tag) Your Uploaded Files
Files should be categorized during the upload process so that they can be found easily. Files in CORE are categorized by their metadata. Metadata = tags. CORE is a metadata-based system which means files are stored and found according to their tags. Files saved with the same tags are grouped together in Asset Groups. CORE doesn’t have folders. It has tags. However, Structural tags organize files with the same tags under Asset Group names, like folders, so you can find them more easily. Go to the Tag Structure page to learn more about Structural Tags.
To categorize your files when you Upload,
Go to the Categorization Panel to the right of your uploading files.
Select the Domain according to the rules set by your company. Each Domain has its own set of Tag Fields for you to choose from.

Start with the Required subpanel. Here are tags you must complete in order to submit the files.
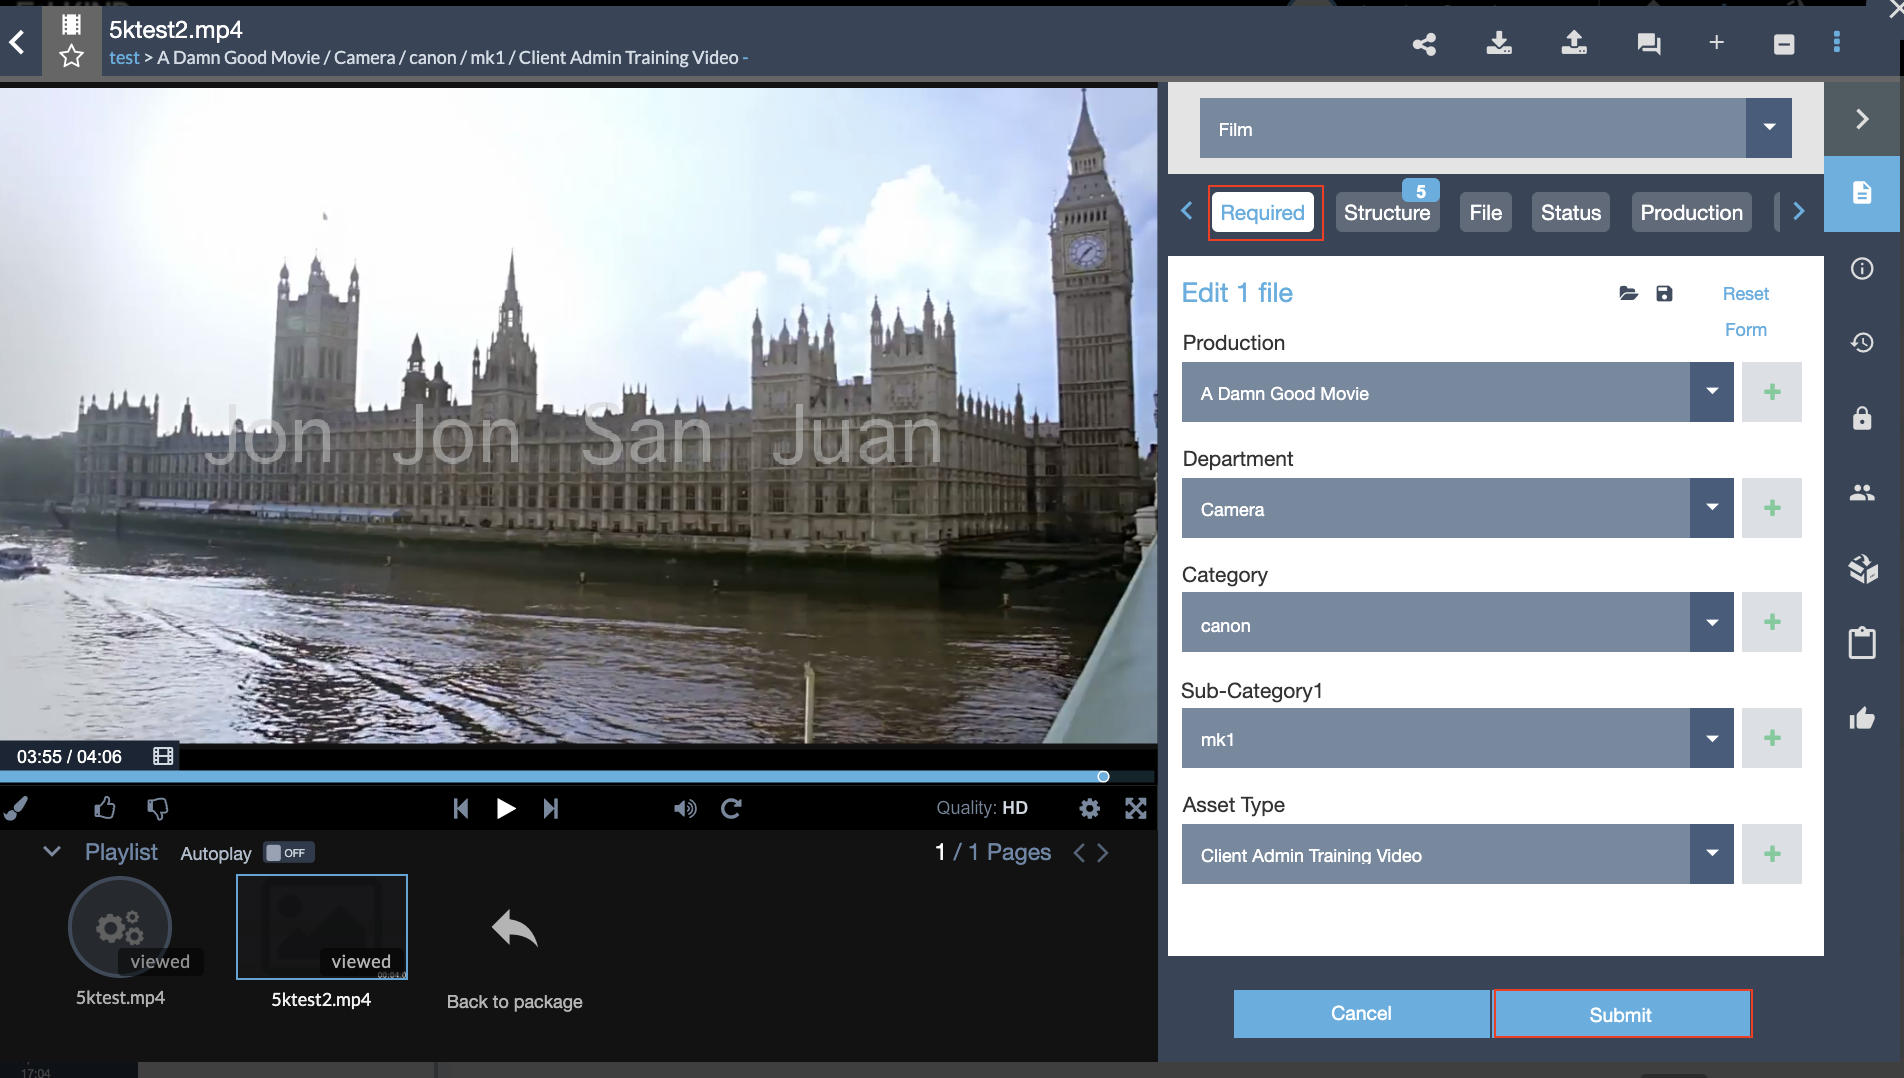
- Fill out the required tags on this panel. If you don’t know how to fill out these tags, please contact your team or company asset manager or Tier 1 support, who can assist you with the appropriate selections.
- Work left to right through each of the subpanels from Required through File Info, answering appropriately and per your company guidelines.
At the bottom of the panel, select Submit

NOTE:
- If you only need to upload your files (and not share them, etc.), you can verify your work by going to File Search to verify that the files you uploaded were tagged properly. To do so, go to File Search for detailed instructions about finding files and the Asset Viewer section to view the files and edit their tags, if necessary.
- If you need to share your uploaded files, select Share Files. Go to the Share Uploaded Files section in Share Uploaded Files section in Sharing a Package for instructions about how to share your files with the right people and settings.
CORE Tip: Save Tagging Time using “Load Last Categorization” and Templates
When tagging many batches of files, you can Load Last Categorization or select a template you’ve saved from the folder icon to auto-populate the Tag Fields with your Tag Values. When you have multiple Required tags or Tag Groups, this is especially handy.
CORE Tip: Save Time While Tagging Using Duplicate Folder Structures On Your Computer
If you upload files and they come from a folder on your computer with the same naming convention as an existing Asset Group, the system will pre-fill the tags for you in the Categorization Panel. You can confirm them before saving. This feature is not yet available in the Top Tagging Bar for Drag and Drop.
Tag Your Uploaded Uncategorized Files from Transfers
Uncategorized files in File Search, appear under the Tag Field “Distribution.” To categorize files in File Search’s Distribution field,
- Go to Transfers

- Select Uploads

- Choose the file or files with the link that says “# file(s) need categorization”

- Select the link

The link will open into the Upload Details View with the Categorization Panel

Select the Domain.
Enter the Required Tag Fields
Fill out any other desired information in each of the Tag Group’s Panels.
When finished, click Submit.

Congratulations. You’ve categorized your files.
Tag Your Uploaded Uncategorized Files from File Search
Uncategorized files in File Search, appear under the Tag Field “Distribution.” To categorize files in File Search’s Distribution field,
- Go to File Search

- Go to Distribution which is listed alphabetically with Productions in the Left Browse Panel
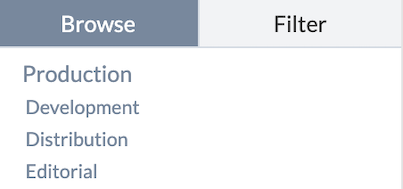
Select the File(s) or Asset Group that you desire to categorize
For individual files
Select the Edit icon when in Thumbnail Mode
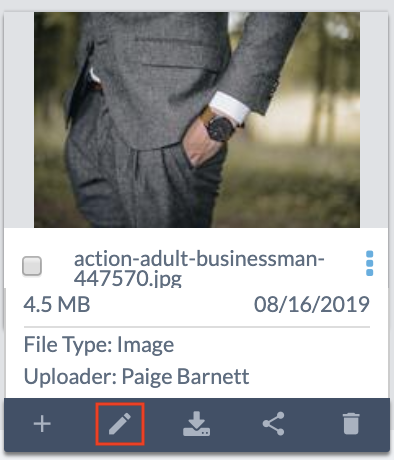
Select the More icon on the far right of the file when in List Mode.

For Asset Groups select the More icon, then select Edit.

Select the Domain.
Enter the Required Tag Fields
Fill out any other desired information in each of the Tag Group’s Panels.
When finished, click Submit.

Congratulations. You’ve categorized your files.
Skip Categorization and Share
Important: File Categorization is extremely important in CORE. The way files are categorized determines how people will find them in the system, as well as who has access to them. If you have questions about how to categorize the files you are uploading, please contact your administrator.
If you upload files using the Upload icons, and you still want to bypass the categorization process or go back to it later, close the Upload Details View. if you want to bypass categorization and share the files you've just uploaded, click Skip and Share.
NOTE: All uncategorized files can be found and categorized later. Go to the Where to Find Uncategorized Files section for further instruction.
Skip and Share Your Files
Please go to the Skip and Share section in Sharing a Package Skip and Share section in Sharing a Package for further instructions about how to share your uploads with other users, as well as to understand the drawbacks of skipping and sharing files.
Where to Find Uncategorized Files
Files not categorized (i.e. Skip and Shared files) show up in the following locations:
- Transfers Module - These files can be found in the following submenus:
- All - They will have links under the name saying they still require categorization
- Pending Categorization - All files requiring categorization are listed here
- Uploaded - Those file sets having completed processing with links under the name saying they still require categorization

- File Search Module - These files can be found under the Tag Field “Distribution”
Find, Track, or Monitor Uploaded Files (in Transfers Module)
The Transfers Module enables users and administrators to track their uploaded files, monitor the files’ progress, and troubleshoot issues.
Elements of the Transfers Module >> Uploads
Uploads are one part of the Transfers Module.
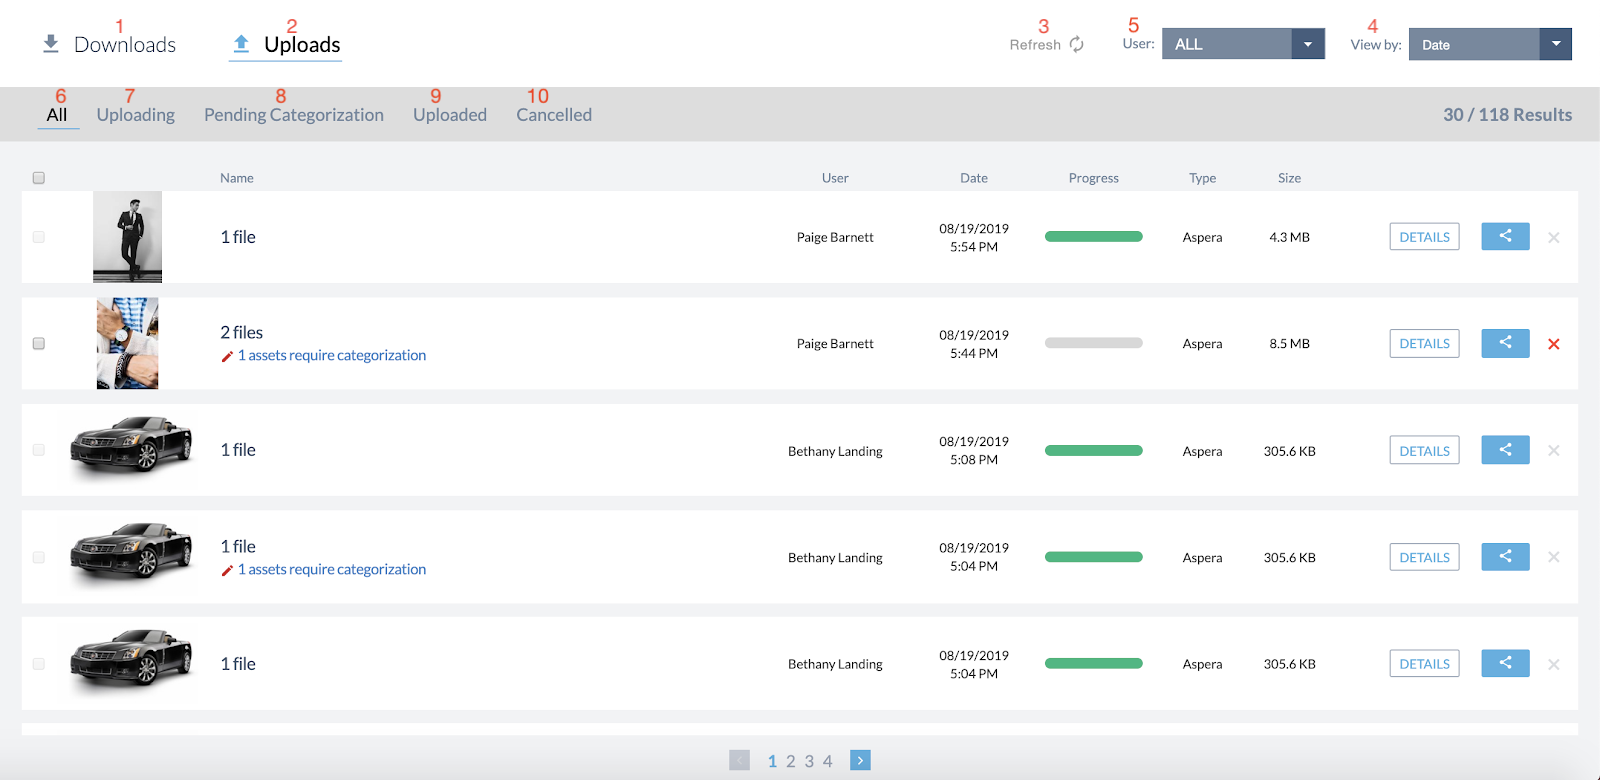
- Downloads - Section of Transfers Module, where a user can track their downloads, and an administrator or user with the permission can track the downloads of multiple users. Go to Downloads section for more information.
- Uploads - Section of Transfers Module, where a user can track their uploads, and an administrator or user with the permission can track the uploads of multiple users.
- Refresh - Refreshes the module page to sync and show the latest uploads or downloads.
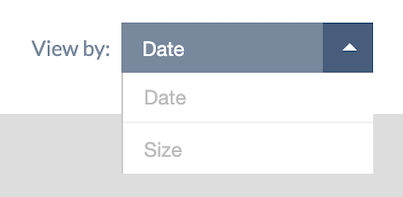
- View By - Sorts listed uploads and downloads by Date of the upload or download, or by the total Size of the files that were uploaded or downloaded.
- User - Admin tool that enables Upload/Download Managers to see transfers by a specific user.
Uploads Submenu:
- All - View of all uploaded files in the Transfers Module
- Uploading - Filtered view of all files currently in the process of uploading.
- Pending Categorization - Filtered view of all files that completed upload and still require categorization
- Uploaded - Filtered view of all files that have completed the uploading process. This view shows all uploaded files in spite of their categorization status.
- Cancelled - Filtered view of all files that started uploading, but were cancelled prior to completion of processing.
Uploads List:

- Select Box - Allows the user to select a stalled or mid-process file set in order to cancel it/them.
- Name - Name of the file set
- User - The user who uploaded the file(s)
- Date - Date and time of the upload
- Progress - Progress status bar showing the progress of the processing upload
- Type - Shows the type of upload process chosen, Aspera or Simple meaning HTTPs
- Size - Total size of the file set
- Details - A button that directs the user to the Upload Details View where you can see the same details for the individual files in the file set. This View is useful for troubleshooting file sets of more than one file where one or more files stall and disrupt the uploading of an entire file set.
- Share - Share button that opens up the Upload Details View with the Share panel. Go to Sharing a Package section for more information about how to do this.
- Cancel X - Will appear as a red X during the uploading process during which time a user can cancel the uploading files. The X will turn gray and become inactive once an uploaded file set has fully processed.
View Uploaded Files in Transfers
To view uploaded files in Transfers,
- Go to Transfers

- Select Uploads

- View by All or another submenu, if desired
- Scroll to the file you want. If it’s beyond the first page, you can select other pages at the bottom.

- Sort files by Date or Size for easier identification.
The Meaning of Upload Statuses in the Transfers Module
There are four statuses for uploads in the Transfer module:
- Uploading - Uploading means that the files are in progress of uploading. They are uploading into the database where they will be saved.
- Pending Categorization - Files that have completed uploading and then processed so that you can see the thumbnails and the files in the Asset Viewer are considered uploaded. Once they are uploaded, if you don’t categorize them, they are considered Pending Categorization, i.e. they haven’t been tagged.
- Uploaded - Files that have completed uploading and then processed so that you can see the thumbnails and the files in the Asset Viewer are considered uploaded. These files may have tags or may still be pending categorization. Either way, they are uploaded.
- Cancelled - Files that were in the process of uploading, but were stopped mid process are considered cancelled.
Upload/Download Managers: Filter Transfer Files by User
Users who are granted Upload Manager and/or Download Manager access have the ability to view other users’ uploads and/or downloads.
UL/DL Managers can search for uploads and downloads by a specific user in the Transfers Module.
To filter uploaded or downloaded files by User,
Go to the “User:” dropdown menu in the upper right corner of the screen.

Click on the menu and select the user whose transfers you would like to view.
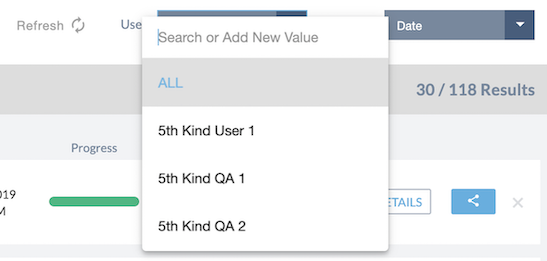
The Results Lists will filter to the Uploads and Downloads by that User.


