Downloading
For users with the permission to download from CORE, downloading files is simple and secure. In the following section you’ll find multiple options for downloading files individually, in bulk and downloading for other users with their watermark.
Choose a Download Mode
To Initiate a download select the download icon from an asset, a group of assets, a package, or from the details window of files in the downloads section of the Transfers Module.

In most places, you will be given the default option to download using Aspera, but you also have the option to download as a zip (also known as a Simple Download, which means via HTTPs).
Download using Aspera
Aspera is the recommended option for downloading. Using Aspera allows accelerated download speeds, as well as the ability to pause and restart downloads. You must have Aspera installed to use this option. (See instructions on installing Aspera).
Aspera Download from a Package
- From your package inbox click on the download icon

- The Package Download Options window will appear,
- By default you will be setup to download all the files in your package, but if you’d like to download only select files from the package, click on the checkbox next to the file name.
- From here, select your download options (all options explained below).
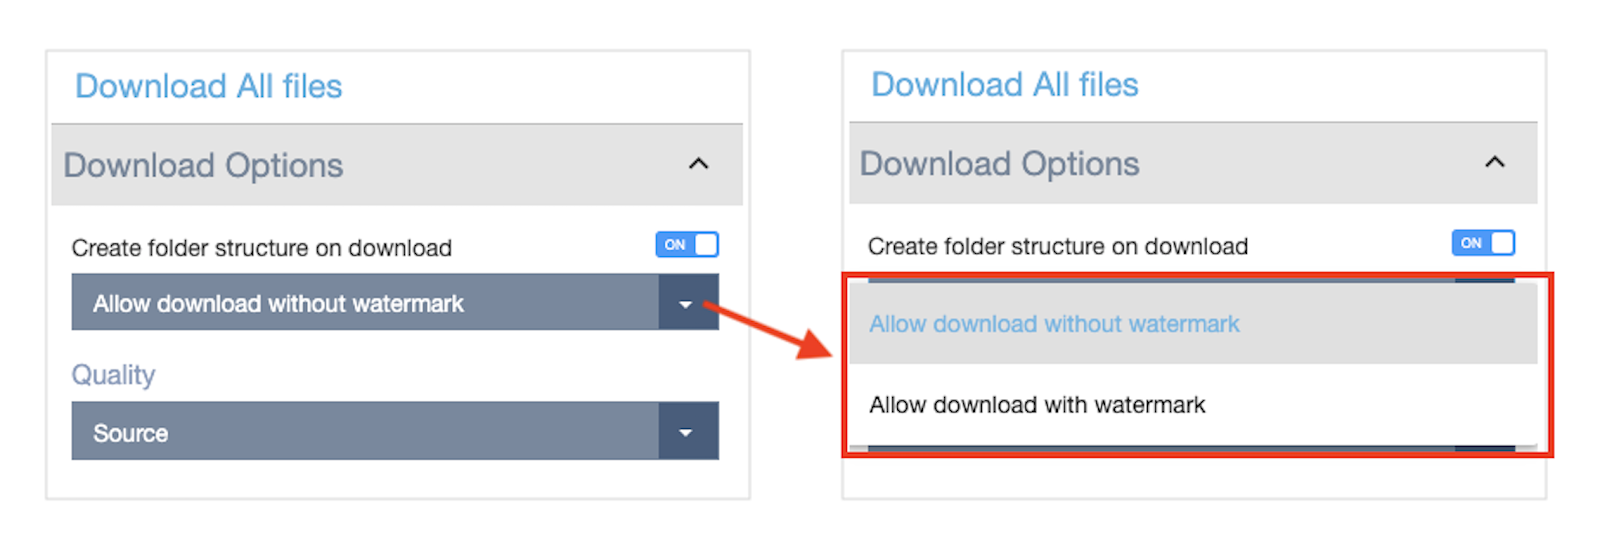
- Click Download.
- Aspera will open up a window for you to choose where you’d like to save the file.
- Select the download location and click Open.
- Your download will begin.
- Once complete you can find it in the folder you saved it to.
- If you are unable to locate the files on your computer you can go to the transfers page and click on download details for that download. You will see the file path in the top right corner.
 Aspera Download from an Asset Group in File Search
- In file search, click on the download icon on any asset group to download the contents of that group.

- The Download All files, Download Options window will appear.
- If you only want to download a few files from the group, click in the checkbox next to the file name you’d like to download.
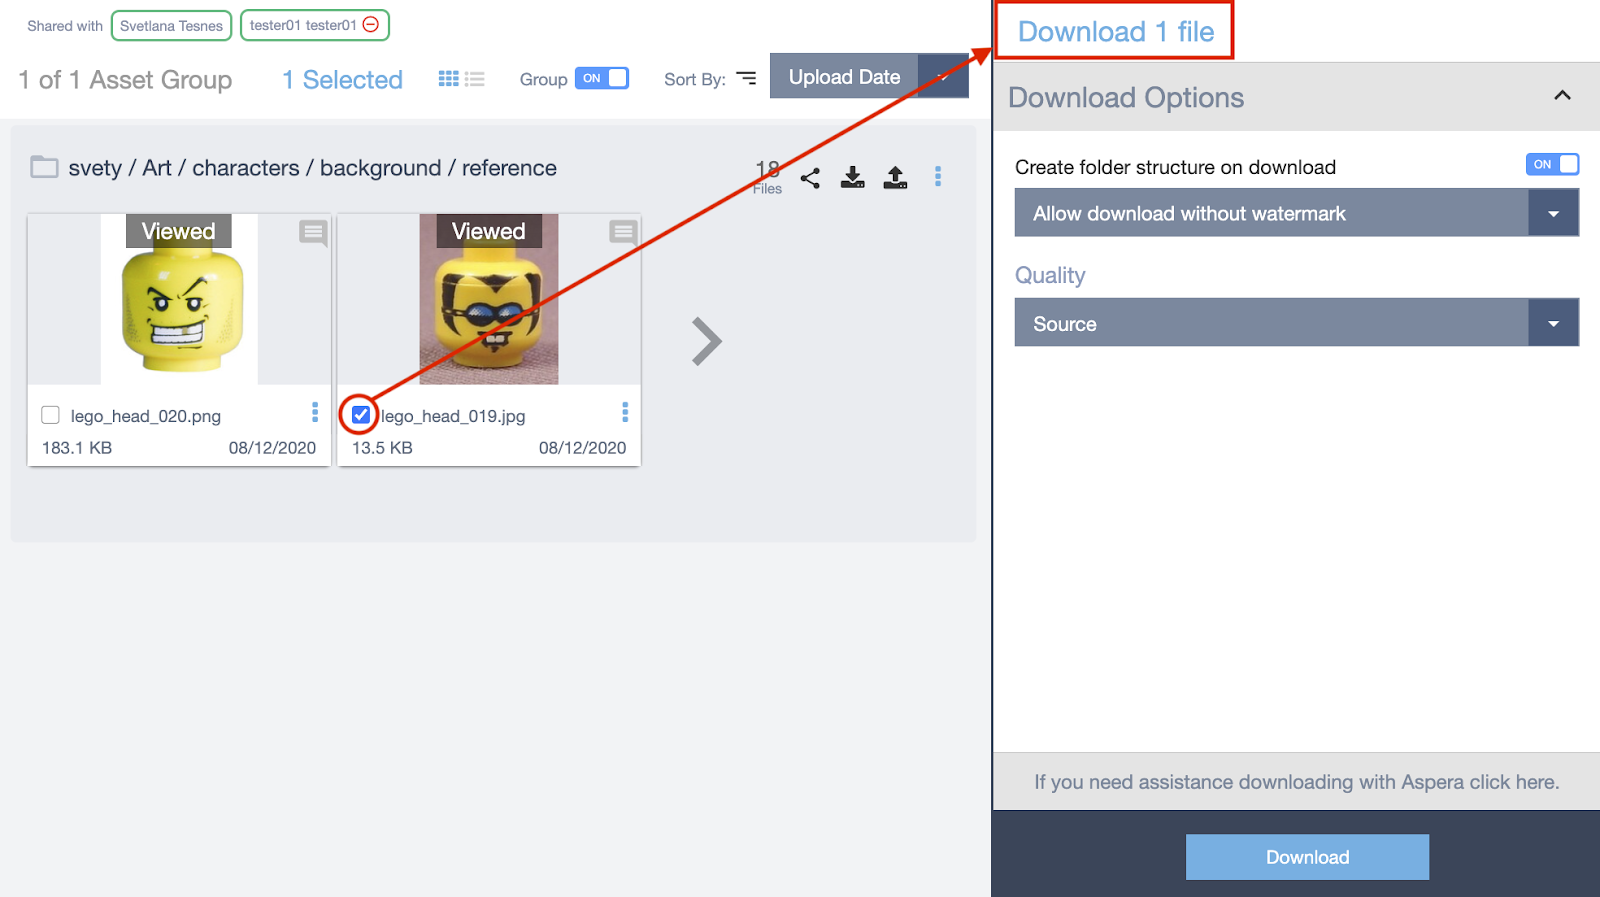
- To download only one or a select few assets from the asset group, click on the Asset Group Title

- Click the checkbox for each asset you’d like to download
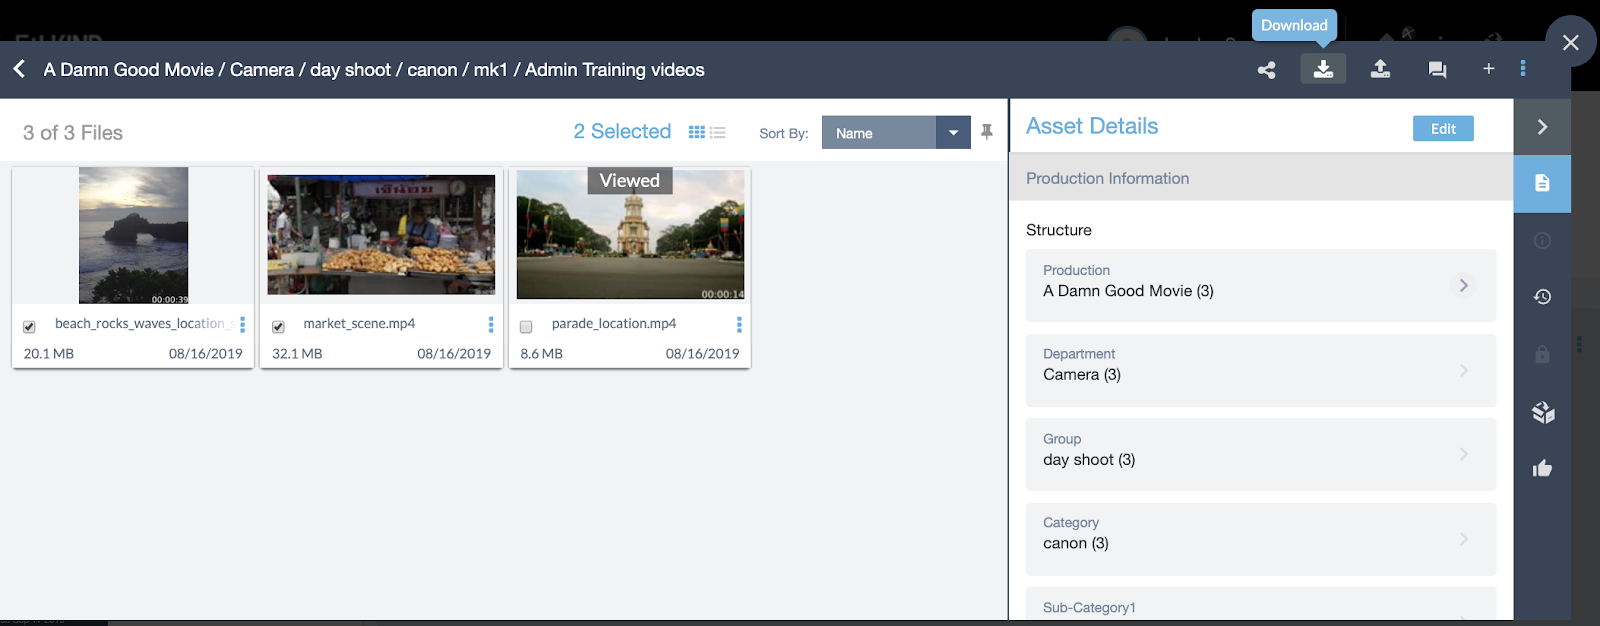
- Follow the steps below
- From here, select your download options (all options explained below).
- Click Download.
- Aspera will open up a window for you to choose where you’d like to save the file.

- Select the download location and click Open.
- Your download will begin.
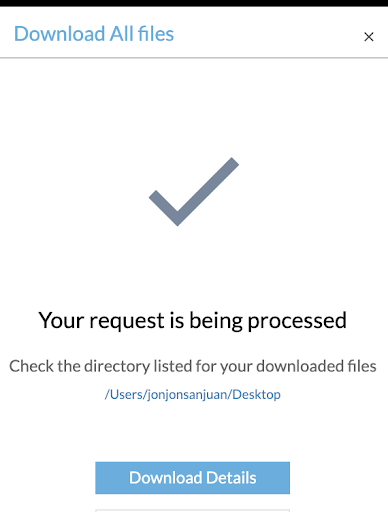
- Once complete you can find it in the folder you saved it to.
- If you are unable to locate the files on your computer you can go to the transfers page and click on download details for that download. You will see the file path in the top right corner.
Aspera Download from a Single Asset
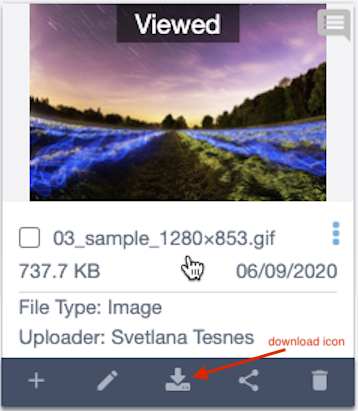
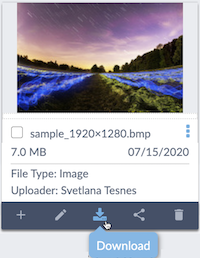
- Whether you’re in a package or an asset group, you can download a single asset by going to the asset list and hovering over the asset when in thumbnail mode.
- From here you will see an icon menu appear.
- Click the download icon and follow all the steps for download as written above.
Aspera Download from Download Details in the Transfer’s Module
- Click Transfers on the left navigation bar to go to the Transfer’s Module

- You will already be in the Downloads Section of the Module.
- Select one of the sub headers to narrow down your search.

- See Transfer Module section for details on the sub-headers.
- In this example we will stay in the default “All” header.

- Click on DETAILS for the file(s) you’d like to download
- The Download Details window will open
- In the top right click Aspera
- Select the download location and click Open.
- Your download will begin.
- Once complete you can find it in the folder you saved it to.
- If you are unable to locate the files on your computer you can go to the transfers page and click on download details for that download. You will see the file path in the top right corner.
Download Zip File
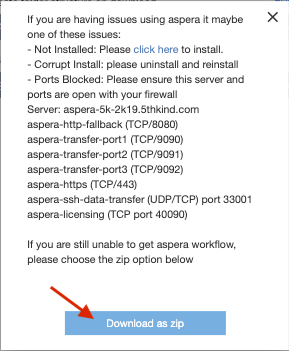
Downloading as a Zip file allows you to download one file containing all the selected files. This option is also known as a Simple Download (which means download via HTTPs). When selecting this option, please allow additional time for the Zip file to be created. When accessing the Zip option from an Asset group or package, you’ll see a popup window with information on potential issues that are blocking Aspera. At the bottom of the pop up window it also gives you the option to download as zip. See below for steps on downloading zips from different areas of Core.
Zip Download from a Package
- Click on Inbox on the left navigation bar

- Click on the package you’d like to download to open it
- To download the entire package you can select the download icon on the package directly from your inbox. NOTE: Not all packages are able to be downloaded, it depends upon the package or user’s permissions.

- Once inside the package, select the download icon on the top right of the package window

- Select your download options (all options explained in the “Download Options” section below).
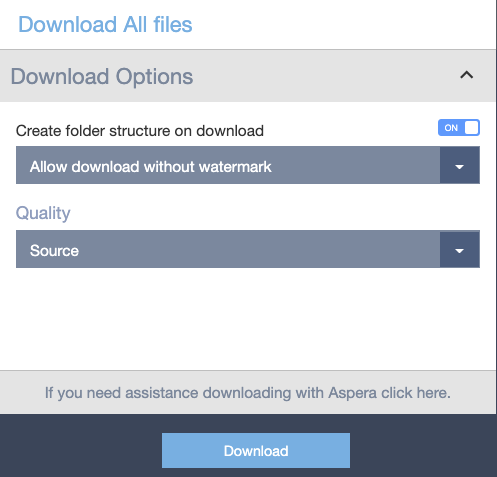
- From here you will click on the “If you need assistance downloading with Aspera click here” button at the bottom of the menu.

- Click on the Download as zip button and a zip file will begin downloading to your computer once the zip has been created. Please allow additional time for the Zip file to be created.
Zip Download from an Asset group
- Click on File Search on the left navigation bar

- Click on the Asset group you’d like to download to open it
- To download the entire asset group, you can select the download icon to the right of the asset group in File Search

- Once you are in the asset group, select the download icon on the top right of the asset group window.

- Select your download options (all options explained in the “Download Options” section below).
- From here you will click on “If you need assistance downloading with Aspera click here.”
- Click on the Download as zip button and a zip file will begin downloading to your computer.
Zip Download from a Single Asset
- Whether you’re in a package or an asset group, you can download a single asset by going to the asset list and hovering over the asset when in thumbnail mode.
- From here you will see an icon menu appear.
- Click the download icon and follow all the steps for downloading a zip as written above.
Zip Download from Download Details in the Transfer’s Module
- Click Transfers on the left navigation bar to go to the Transfer’s Module

- You will already be in the Downloads Section of the Module 3

- Select one of the sub headers to narrow down your search
- See Transfer Module section for details on the sub-headers

- In this example we will stay in the default “All” header. Click on DETAILS for the file(s) you’d like to download

- The Download Details window will open

- In the top right of the window click Zip

- The zip file will start downloading to your computer
Downloading a zip tip!
Zip downloads will continue downloading to your computer even after you have logged out or your login session has expired.
Download Options
When downloading files a window will open that will allow you to choose options for your download. These options are based on your user settings or on the package settings. You may not have all of these options available, depending on your permissions. If you need download options that are not available to you, please contact your Administrator.
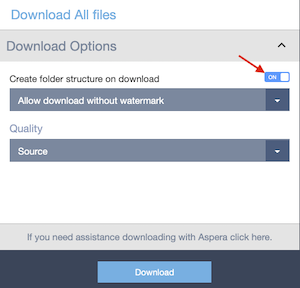
Create Folder Structure on Download
- If ON is selected folder structures will be created in your target folder based on the Asset Group Tags of files being downloaded. (eg. 5 Asset Group Tags = 5 folders deep, folder structure).
- If OFF is selected, all downloaded files will be placed without a folder structure, directly in the target folder selected.
Download without Watermark
Download the image, video, or document without a watermark burned in.
- Only select users will have the ability to download without watermark. Please contact your administrator if you do not see this option and need to download an unwatermarked version of the file.
Download with Watermark
Download the image, video, or document with a watermark burned in.
- If this is selected, you will be shown additional options for the watermark.
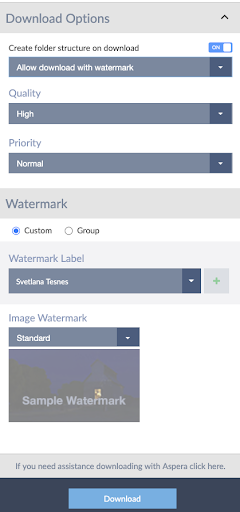
Quality
Source
Download the original Source file. This option is not available if you are permissioned to download with watermark only.
High
Download a high resolution proxy file with a burned in watermark.
Low
Download a low resolution proxy file with a burned in watermark.
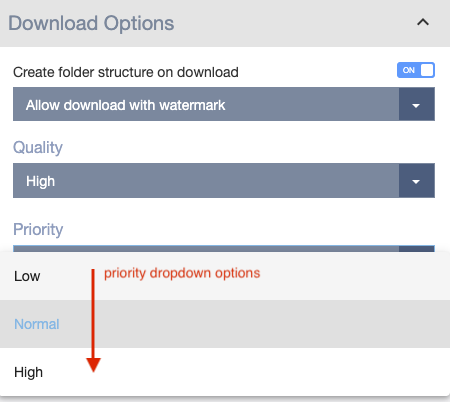
Priority
Select the priority for the watermarking process. If you select High priority, your watermarking job will go to the front of the queue; if you select Low priority, it will go to the back of the queue. This option defaults to Normal.
Watermark
This section will appear if you have selected to download with Watermark. You may not have all of these options available, depending on your permissions. If you need quality options that are not available to you, please contact your Administrator.
Custom Watermark
Specify the text that will be burned into the File as the Watermark, as well as the Watermark Style. Make sure the Custom option is checked before proceeding with your next selections.
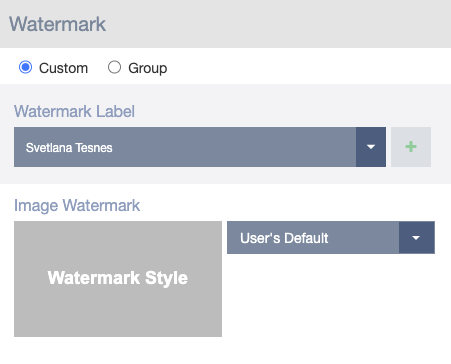
Watermark Label
This is the text that will be burned into the File as the Watermark. It defaults to your name, but you can change it by clicking the + button and adding a new label.

Watermark Style
Select the Watermark Style that will be used for each type of File that you're downloading: Image, Video, and Document. This defaults to your default as set in your User Role, but can be changed if you have the proper permissions.
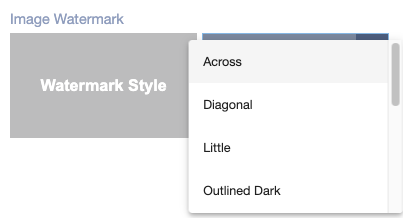
- ‘User’s Default’ watermark style: This option uses the default watermark that is currently set up for the user in their User Role.
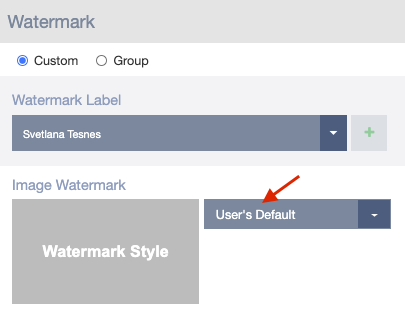
- The rest of the watermark styles are available as alternate watermark options for the user to select. Here are options that you might see in the dropdown menu: Across, Center Big, Diagonal, Little, Low Center Light, Outline Dark, Outline Light, Repeating Diagonal, ScriptStyle, Secure, Secure Light, Standard, Top (there could be other watermark style options depending on the company you work for).
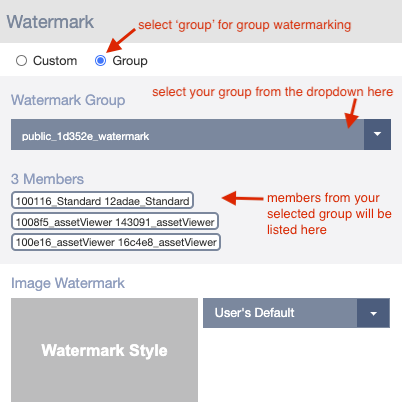
Group Watermark
This option lets you specify a group of Users and download a copy of each selected File for each of them, with their individual Watermark burned in.
Where to Find the Download Icon in CORE
The Download icon is found throughout CORE in the following places: from an asset, a group of assets, a package or from the details window of files in the downloads section of the Transfers Module.
File Search >> Individual Asset - This initiates a download of one particular file you select from the File Search menu. Mouse over your asset for additional options to appear below your asset, and select the ‘Download’ option.
File Search >> Individual Asset Group - This initiates a download of files from the selected Asset Group from File Search menu. The download option is available at the top right of the asset group.

Asset Viewer Module >> Top Bar - This initiates a download of files from the selected Asset Group from Asset Viewer module. When you click on your selected asset group, the Asset Viewer module will open. The download option is available at the top right of the Asset Viewer.

Inbox >> Package >> Top Bar - This initiates a download of files from the Package. The download option is available to the right of the package from your inbox.

Find, Track, or Monitor Downloaded Files (in Transfers Module)
The Transfers Module enables users and administrators to track their downloaded files, monitor the files’ progress, and troubleshoot issues.
Elements of the Transfers Module >> Downloads
Downloads are one part of the Transfers Module.
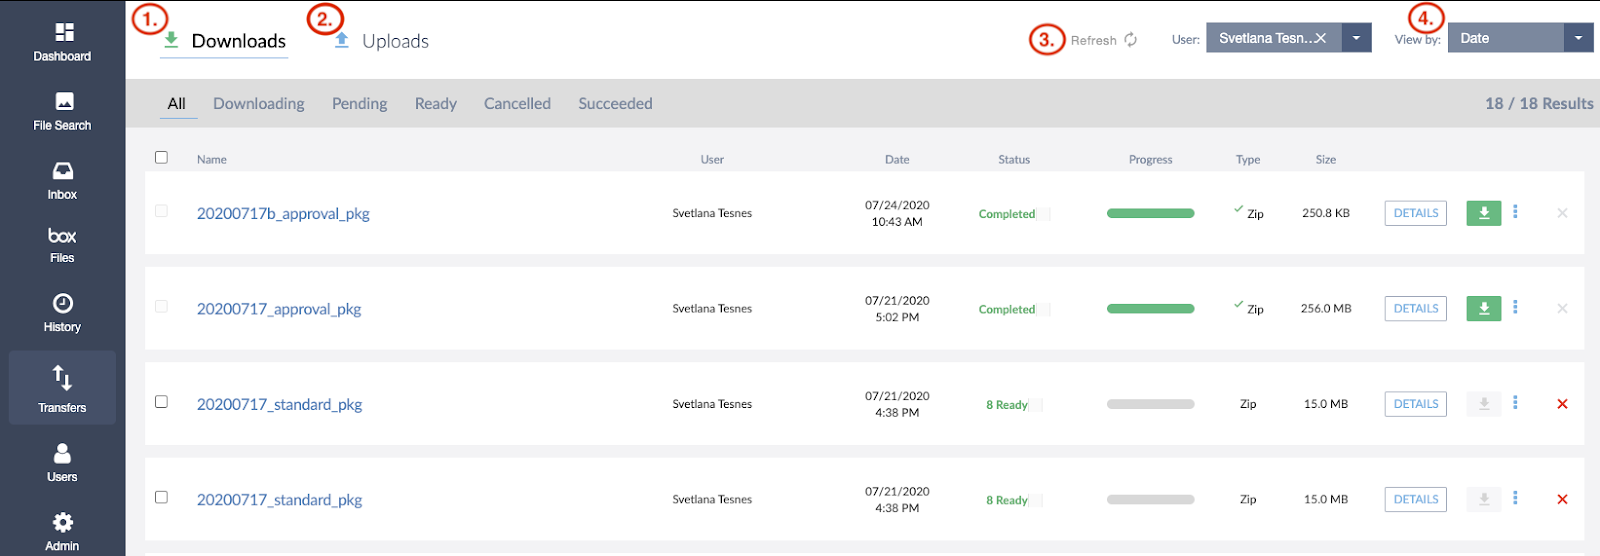
- Downloads - Section of Transfers Module, where a user can track their downloads, and an administrator or user with the permission can track the downloads of multiple users.
- Uploads - Section of Transfer Module, where a user can track their uploads, and an administrator or user with the permission can track the uploads of multiple users. Go to Uploads section link here for more information.
- Refresh - Refreshes the module page to sync and show the latest uploads or downloads.
- View By - Sorts listed uploads and downloads by Date of the upload or download, or by the total Size of the files that were uploaded or downloaded.
Downloads Submenu:
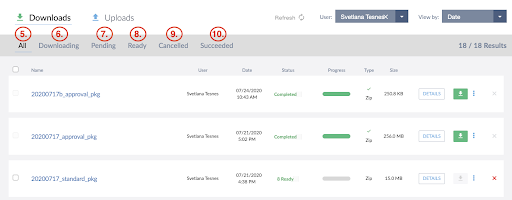
- All - View of all downloaded files in the Transfers Module.
- Downloading - Filtered view of all files currently in the process of downloading.
- Pending - Filtered view of all files that are pending download, they are being watermarked.
- Ready - Filtered view of all files that are ready for download, they have been watermarked and/or zipped.
- Cancelled - Filtered view of all files that started downloading, but were cancelled prior to completion of processing.
- Succeeded - Filtered view of all files that have been successfully downloaded.
Downloads List:

- Select Box - Allows the user to select a stalled or mid-process file set in order to cancel it/them.
- Name - Name of the file set.
- User - The user who downloaded the file(s).
- Date - Date and time of the download.
- Status - Download status of your file set. Here are the different types of statuses that you will see in this section:
- Proxy processing: lets you know that you have a file or files in your file set that are still processing in the system. Once a file has processed, then it can be watermarked.
- Watermarking: lets you know that your files are being watermarked.
- Ready: lets you know that your files are ready to be downloaded. All the watermarking (if requested) and/or file zipping have been done on your file set. You will also see the Download button at the right of your package change from grey to green color.
- Cancelled: lets you know that a package download process has been cancelled for your file set and your package will no longer download.
- Completed: lets you know that your package has been successfully downloaded to your computer.
- Error: lets you know that a file or files in your package have encountered an error & will need to be checked before resuming your download.
- Progress - Progress status bar showing the progress of the processing download.
- Type - Shows the type of download process chosen, via Aspera or Simple (aka Zip), which means via HTTPs.
- Size - Total size of the file set.
- Details - A button that directs the user to the Download Details View where you can see the same details for the individual files in the file set. This View is useful for troubleshooting file sets of more than one file where one or more files stall and disrupt the downloading of an entire file set.
- Download Button - A button that will initiate the download of your file set.
- Three Dot Menu - A menu that gives you options to download your file set via Aspera or Zip.
- Cancel - Will appear as a red during the downloading process during which time a user can cancel the downloading files. The will turn gray and become inactive once an uploaded file set has fully processed.
Upload/Download Managers: Filter Transfer Files by User
Users who are granted Upload Manager and/or Download Manager access have the ability to view other users’ uploads and/or downloads. Full system Administrators are also able to perform these searches as well.
UL/DL Managers can search for uploads and downloads by a specific user in the Transfers Module.
To filter uploaded or downloaded files by User:

- Go to the “User:” dropdown menu in the upper right corner of the screen.
- Click on the menu and select the user whose transfers you would like to view.
- The Results Lists will filter to the Uploads and Downloads by that User.
