Tag Structure
The Tag Structure module is the heart of CORE's metadata management. This is where you define the metadata (aka tag) structures that will determine how your Files are categorized.
Overview
5th Kind’s CORE does not use traditional folder structures for organizing, categorizing, and controlling access to Files. Instead, those tasks are based solely on how Files are tagged. The Tag Structure module is where system Administrators define how users will categorize files on upload. As an Admin, you’ll create the hierarchy of your metadata, the content of Tag Fields, and the details about them.
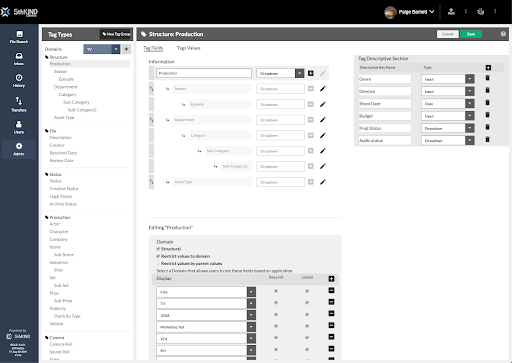
The Anatomy of the Tag Structure Module
In this section, you will learn the different parts of the Tag Structure Module.
Tag Structure Module Components
In CORE, to access the Tag Structure Module, you must be an Admin level user.
 Go to the Admin Module in the Left Navigation Bar.
 Select the Sub-Module Tag Structure.
In Tag Structure, there are two primary work areas:
- On the left is the Left Tag Types Panel.
- On the right is where Tags are created, edited, and defined.
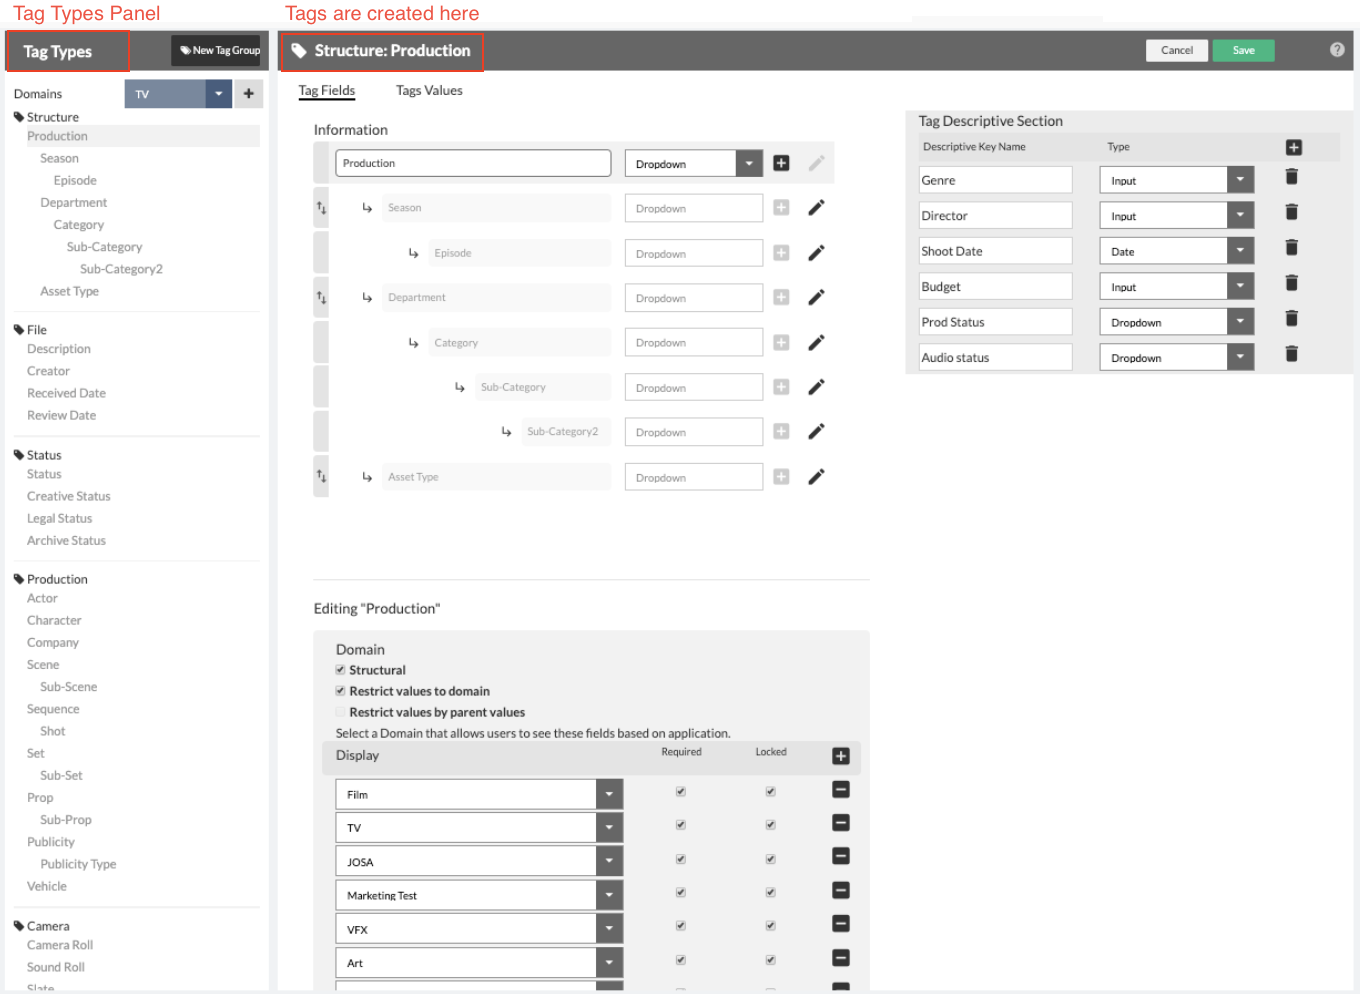
Left Tag Types Panel
The Left Tag Types Panel contains your list of Domains, the button that creates Domains, and the list of Tag Groups and their respective Tag Fields associated with the Domains.
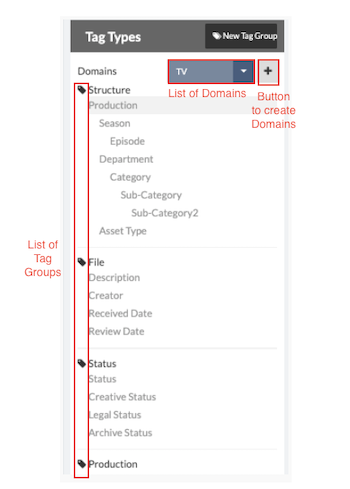
Each Tag Group is identified by the tag icon and a bold title name.

Tags Area
To the right of the Left Tag Types Panel, is the Tags Area where Fields and Values are defined. There are essentially two tabs or sections to this part of the module:
- The Tag Fields section
- The Tag Values section

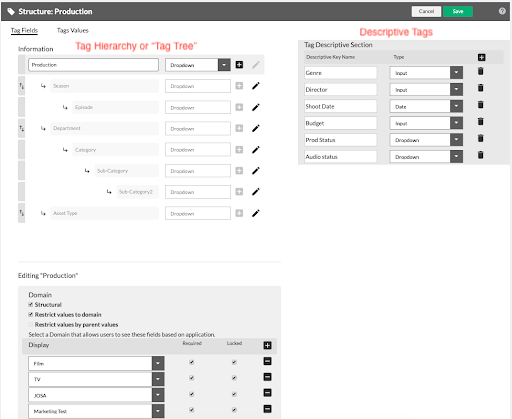
In the Tag Fields section, is the Tag Hierarchy or Tag Tree, the Tag Field Domain Options, and to their right, the Descriptive Tags section. Descriptive Tags are a type of Tag Group often defined as metadata about metadata. We’ll detail that more below.
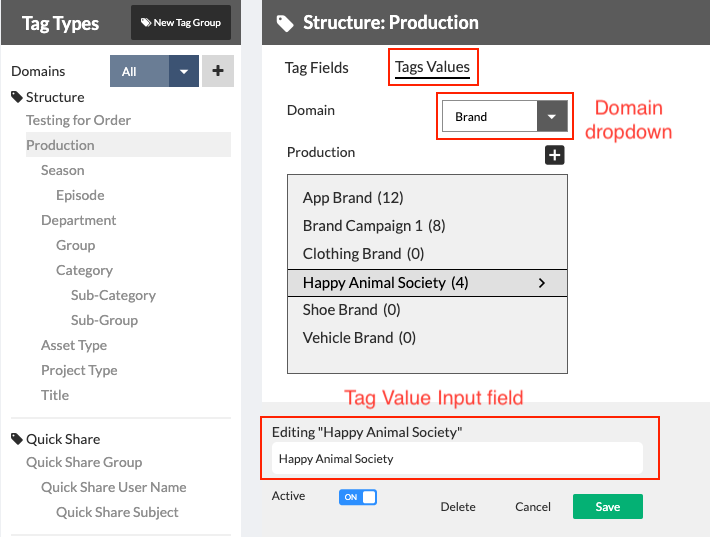
In the Tag Values section, you can manage values for a selected Tag Field. There’s the Domain dropdown to select the Domain that you will use for that Tag Field, the Tag Value Boxes where Tag Values for that Tag Field are listed. The Tag Value Input Field is found below the boxes. Here users can add, edit, and delete Tag Values.
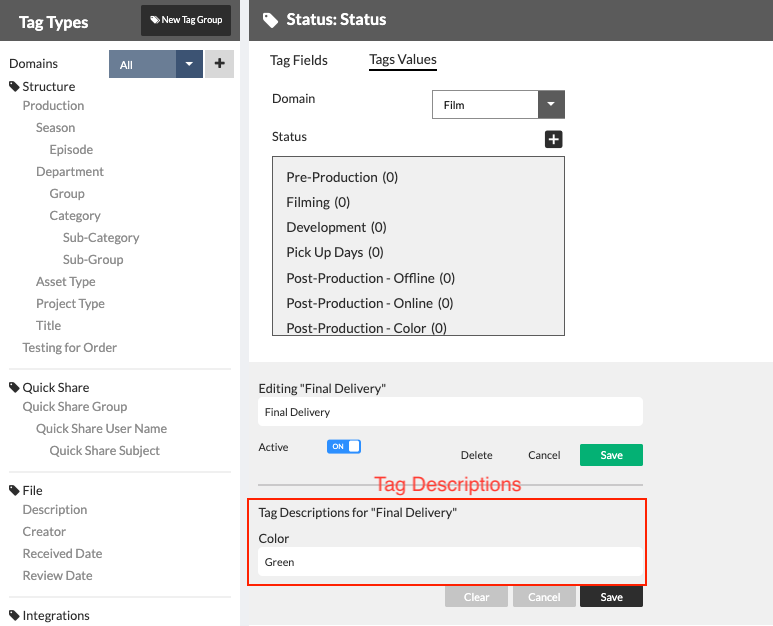
In the case of Descriptive tags, data and status color associations can also be added here just below the Tag Value Input.
Domains
What is a Domain
In CORE, a Domain is essentially a top-level category that lets you decide what metadata fields will apply to what type of content. Said a different way, it’s a type of workflow that defines the structure in which files are organized.
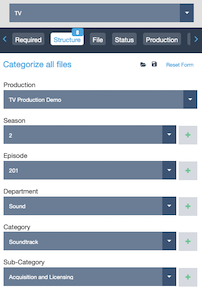
When a User uploads Files, they select a Domain. That Domain has a specifically organized tag structure called a taxonomy, as well as other associated tags that help make the files searchable. When the files are uploaded, the user tags them according to the structure defined by the Domain.
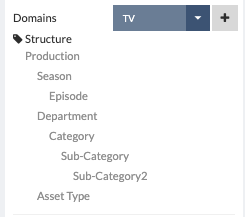
| Admin User’s View | End User’s View When Uploading Files |
|---|---|
 |  |
Domains allow Files for different project types to be categorized into different groups. These groups are defined by their tags, also known as metadata. For example, television shows need an organizational structure that includes Season and Episode, while feature films do not. Because their organizational needs are different, these two media formats are represented in separate Domains.

CORE Tip: A Domain is Not a project.
Multiple projects using the same workflow or organizational structure can fall under the same Domain. Selecting the Domain dictates the required Tag Fields--the metadata fields a user sees when tagging a file. A Domain also dictates structure, the order of visible tags associated with an Asset group, and what the user sees in the Browser panel.
Ways a Domain Can Be Used and Why
In this section you’ll learn how Domains can be used for Permission-ing and DAM organization.
Domains can be used for Permissioning
Users are often given access to CORE based on a Domain.
For example, a company that has TV, Film and Online content might have a unique Domain for each. Certain users would have access to one Domain based on their position at the company, but wouldn’t have access to any content in another Domain.
So think of Domains as having far reaching permission capabilities as well as a unique tagging structure.
Domains can be used for Digital Asset Management Organization
Every industry is different, and while Domains are helpful in reflecting and complementing workflows, they’re also useful for organizing the DAM itself. Domains can be organized by industry, client type, or company departments. For instance, a company that has different divisions, such as Home Electronics, Personal Electronics, Phones, and Media Solutions, might have a domain for each. Or, let’s say a company’s clients’ industries vary from Automotive to Shoes to Dog Food and Accessories. The company would create a Domain for each industry respectively.
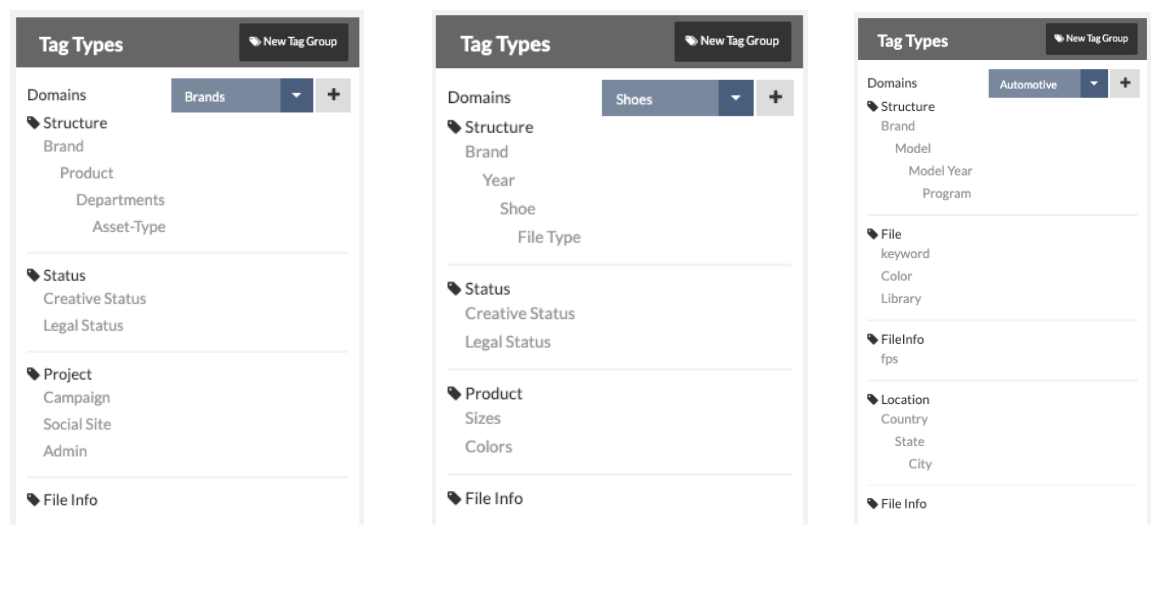
Domains are an organizing tool that enable companies to organize their materials according to their own organization.
CORE Tip: Domains are Permanent
When creating your Domain name, make sure it is approved for use and spelled correctly. Once a Domain is created, it cannot be edited or deleted.
Create a New Domain
To create a Domain
- Go to the Left Tag Types Panel
- Select the button next to the Domain dropdown menu
- Enter the name of your Domain
- Save
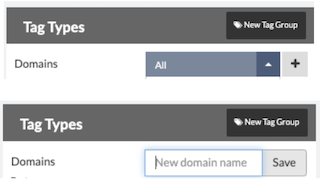
You’ve now completed the first step in building a taxonomy.
Filter Tag Groups and Tag Trees by Domain
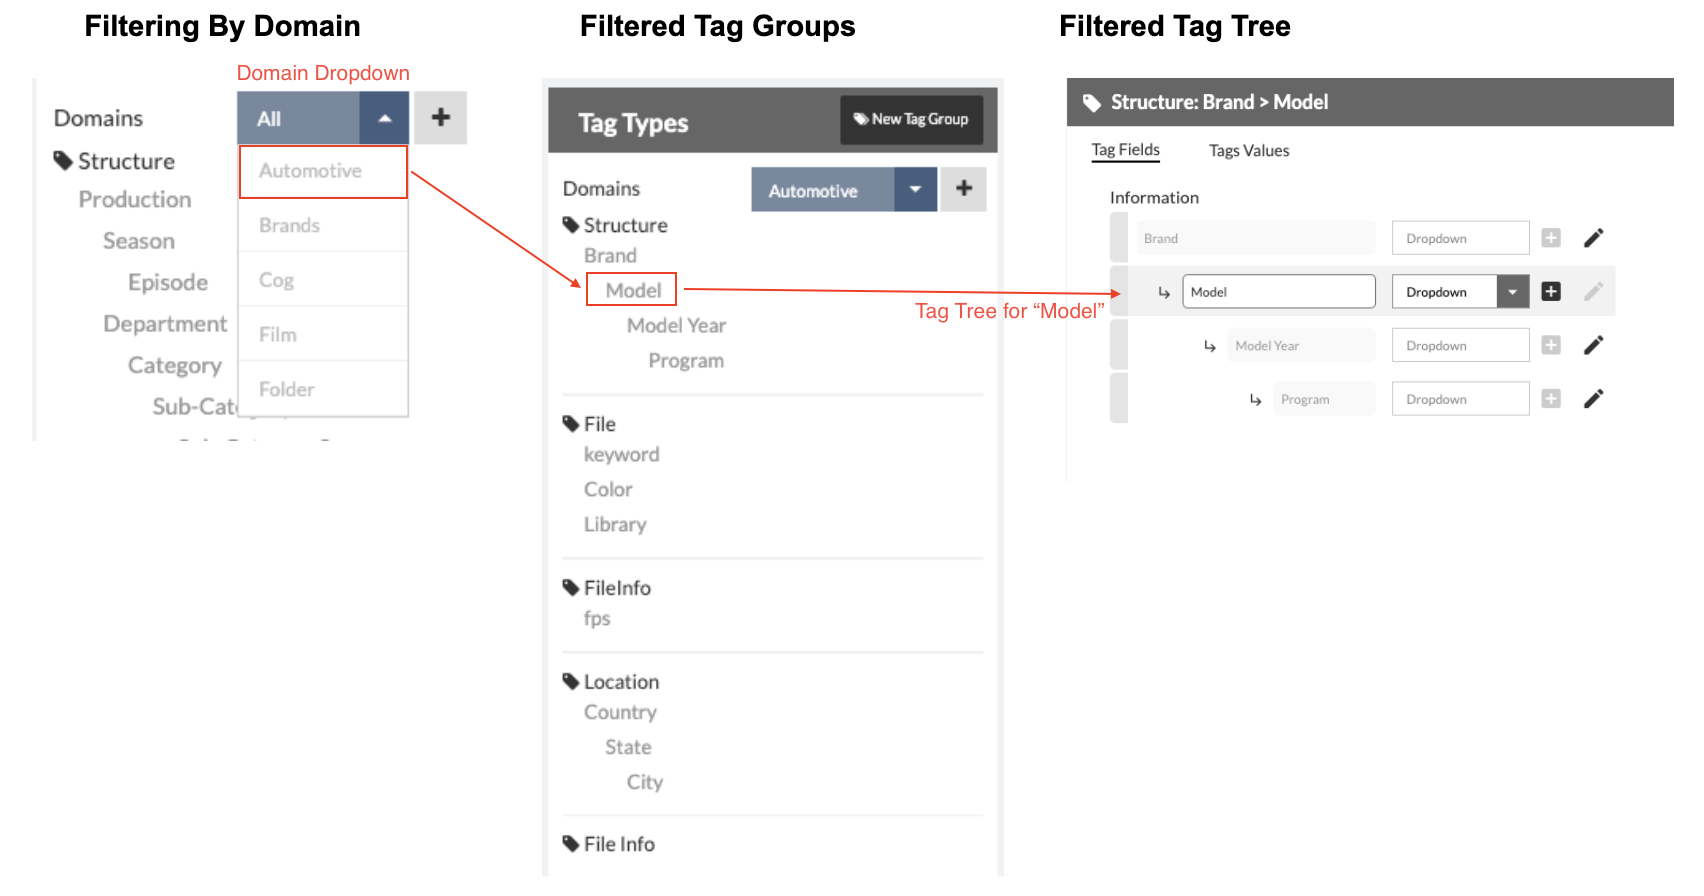
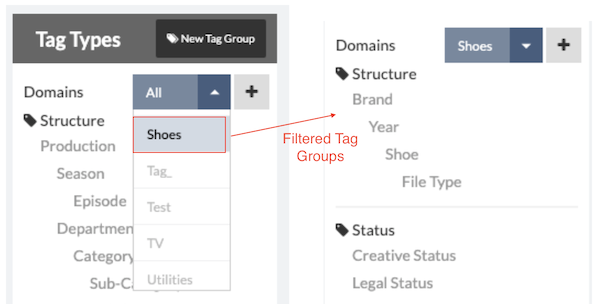
Filtering by your desired Domain shows only the metadata fields that apply to it. When creating new Domains, Groups, and Fields, check your work by filtering to the updated Domain.
- Go to the Domain dropdown field at the top of the Left Tag Types Panel.
- You can find your Domain listed alphabetically in the Dropdown list.
- Select it.
- The Left Tag Types Panel will filter to show only the Tag Groups and Tag Fields associated with that Domain.
- Then select a Tag Field in the Left Tag Types Panel, the corresponding Tag Tree or Tag Hierarchy will appear in the main area on the right. When filtered by Domain, the Tag Tree will reflect the same Tag Fields and hierarchy that is listed in the filtered Tag Group.
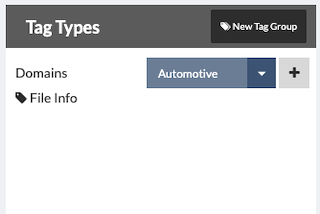
No Tag Groups are associated with a new Domain. They must be added or connected. So when you filter by a new Domain, there will be no Tag Groups shown in the Tag Groups list except for File Info.
To see all fields again, set Domain to All. For new Domains, you now can build out your taxonomy by adding existing or new Tag Groups and Tag Fields to it.
CORE Tip: Domain Visibility is Determined by User Permissions
If you as a user can see only one Domain in your list when uploading files, that means you have permission to just that one Domain. What you see as a user is dependent on the permissions you have been granted by your CORE system administrator.
Tag Groups
What is a Tag Group
A Tag Group is a set of metadata fields that are grouped together. They are often determined by a common set of values, such as subject matter or use, and their names typically define the set of characteristics that make up a Tag Group, i.e. Structure, Status, Game, etc.
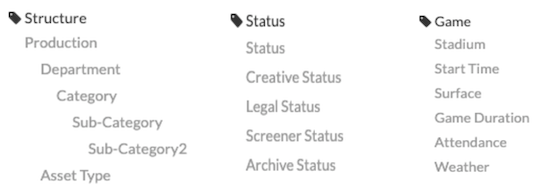
A Tag Group can contain a simple list of tags or have tags with a hierarchical relationship to each other.
A hierarchical relationship is based on levels - Tag Fields that are level(s) above another—and subordination—Tag Fields that are level(s) below another. In this relationship, the superordinate Tag Field represents a class or a group type, in which the subordinate Tag Fields are its members or parts.
For the tag groups with a hierarchy structure, when users chose one Tag Field at a certain level, the below level Tag Fields’ tag values will adjust to show different values. These Tag Values are defined by Parent Tag Values in the Domains Options setting.
Tag Groups are customizable to contain as few or as many Tag Fields that are relevant to that group and domain. To filter the Tag Groups you see, select a Domain for your desired view.
Types of Tag Groups
In CORE, there are four different types of Tag Groups:
- Structural
- Associated
- Inherited
- Descriptive
Structural - The Structural Tag Group is the type that defines the tag structure for all asset groups and files. It’s the core categorization method for CORE.

Associated - Associated Tag Groups are Tag Groups providing additional data around files. They are defined by a common set of values. Examples of Associated Tag Groups are Production, Status, and Project Info.
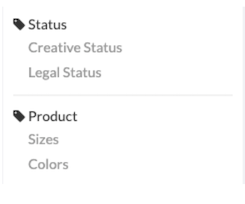
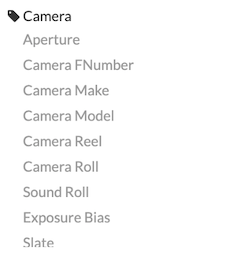
Inherited - Inherited Tag Groups automatically import metadata when a file is uploaded, because it is data inherited from the files themselves. Examples of Inherited Tag Groups are File Info and Camera.
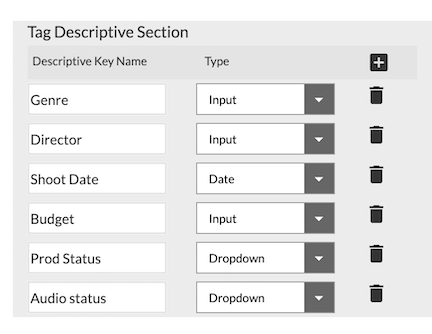
Descriptive - The Descriptive Tag Groups are often described as metadata about metadata. They are a second layer related to existing data found in Tag Fields by providing additional information and color status options. Descriptive Tags can literally be about anything. This section can be used to build out entire databases around a specific Tag Field.
For instance, if you had a field named "Car Manufacturer," you could add associated fields such as “Number of Dealerships,” "Address," and "Phone Number" to it. Or, if it were a movie, you could associate “Genre” and “Director” with the Tag Field “Production.” Or if you had a “Brand Website” Tag Field you could associate whether or not it was “A/B Tested.”
Tag Groups Order
When you first arrive in the Tag Structure Module, the default view in the Left Tag Types Panel is a complete list of All Tag Groups and Tags.
- The Structural Tag Group is always listed at the top
- Followed by Associated Tags
- At the very bottom, is File Info, the Inherited Tag Group.
It’s currently not possible to change the order of the Tag Groups. When a new Tag Group is added, it appears at the bottom of the list above the File Info Tag Group.
Create a Tag Group
To create a new Tag Group, click the New Tag Group button at the top of the Left Tag Types Panel.

Then enter the Group name and click Save.

Edit the Name of a Tag Group
Tag Group Names cannot be edited or deleted at this time.
CORE Tip: Define Your Tag Groups Before Creating Them
When creating your Tag Group names, make sure they are approved for use and spelled correctly. Once a Tag Group is created, it cannot be edited or deleted.
Edit the Contents of a Tag Group
File Info is the default Tag Group for all metadata automatically imported from your files. File Info cannot be changed or added to by a user. All other Tag Groups, however, can be edited.
To edit the contents of an existing Tag Group, users can do any of the following:
- Select an existing Tag Field and delete it.
- Select an existing Tag Field and modify it by:
- Changing its name
- Changing its Field Type
- Changing its Domain Options
- Changing its Tag Values
- Changing its order within the Tag Group by Drag and Drop
- Add a new Tag Field by selecting the Tag Group’s name
For more detailed instructions about how to perform these actions, please read through the remainder of the Tag Structure chapter.
Tag Fields
What is a Tag Field
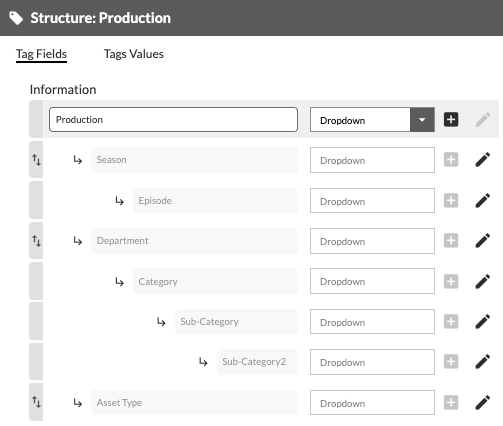
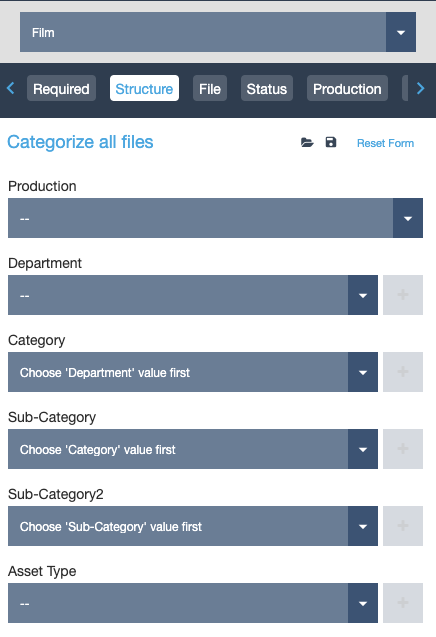
Tag Fields are the Fields a User will choose from when uploading and tagging assets. They are used to organize files and are the main categories for your project, such as Production Name, Department or Asset Type.
| Administrator View of Structure Tag Group’s Tag Fields in Tag Tree | User View of Tag Fields in Asset Viewer During Upload |
|---|---|
 |  |
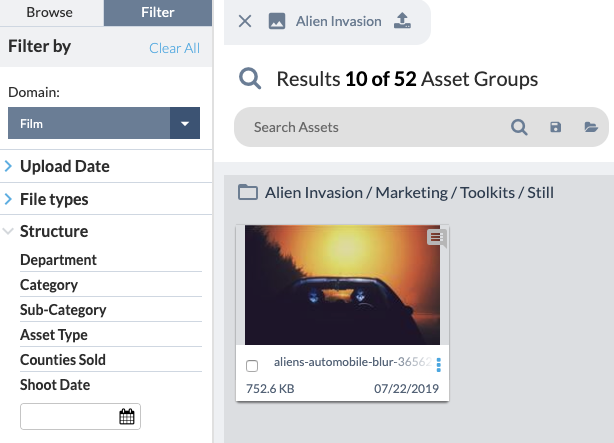
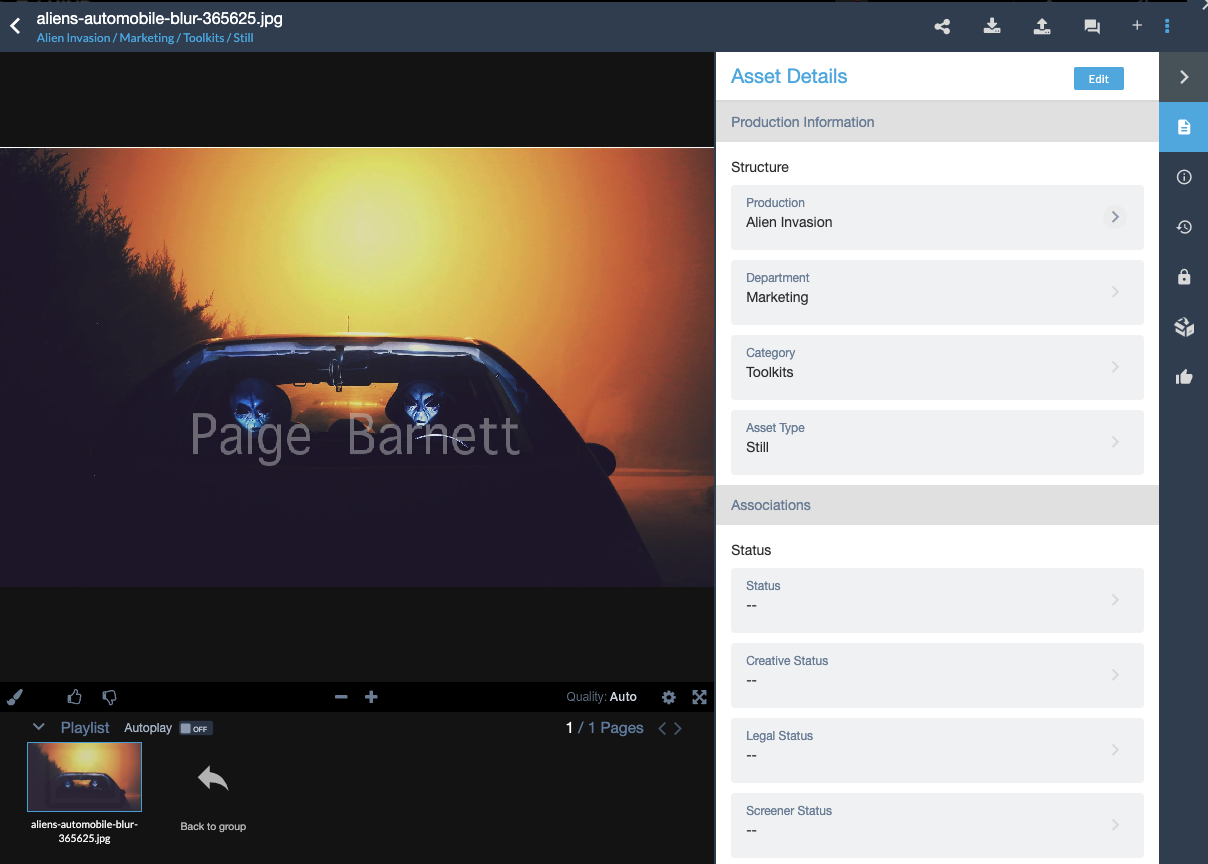
The fields also appear in File Search Filters and in the Asset Details Panel of the Asset Viewer.
File Search - Filter Tab - Structural Tag Fields
Asset Viewer - Asset Details - Tag Fields
Elements of the Tag Field Section
Tag Field Section Overview
- Tag Fields Tab
- Tag Tree
- Tag Field Domain Options
- Descriptive Tags Section
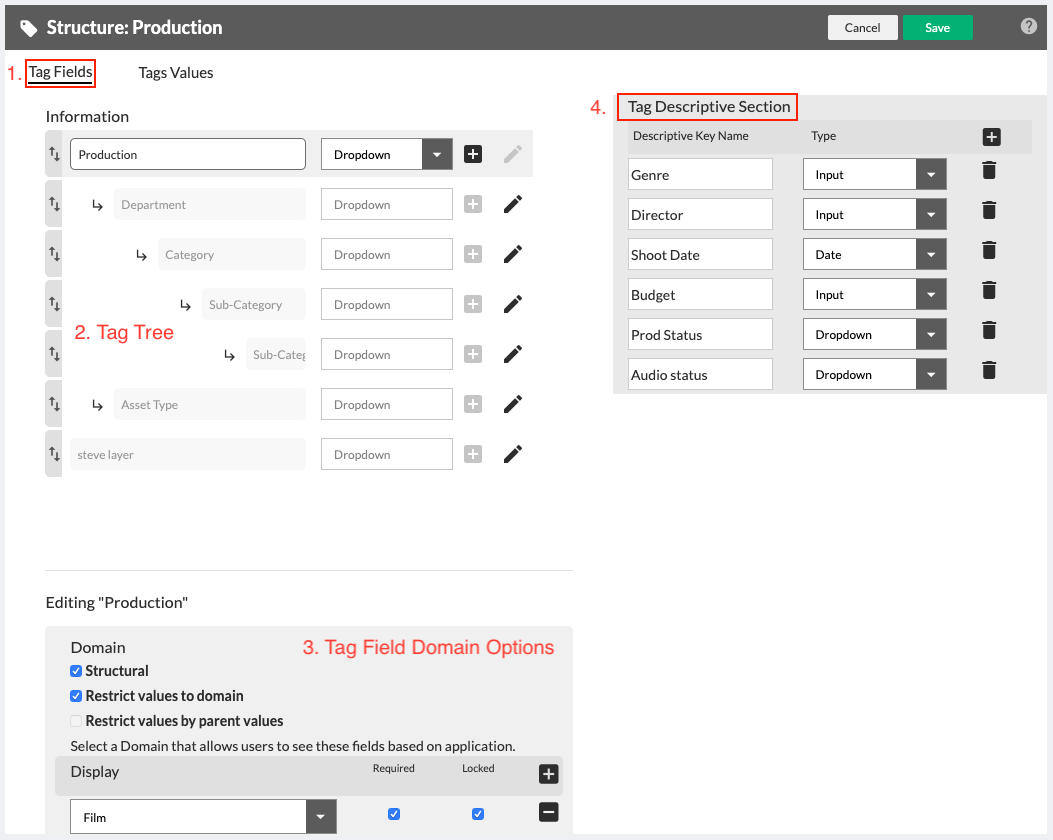
Elements of the Tag Tree
The Tag Tree is where Admins can create and edit a Tag Field.

- Field Name - A text input field where you can add or edit the name of a Tag Field.
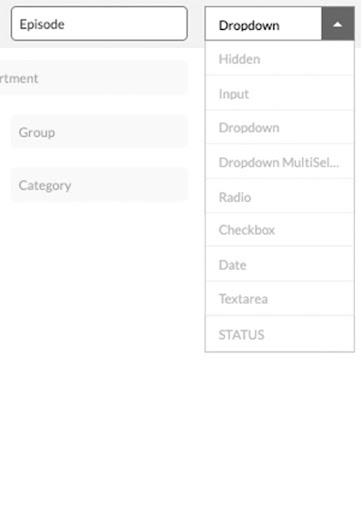
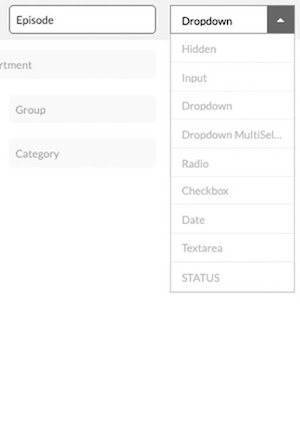
- Field Type - A dropdown list where you can select the method a user will use to enter the value of a Tag Field. Entry types include the following:
- Hidden - The field will not appear in the interface, but you can access this field through the API.
- Input - A Text field. You can enter any type of text into this field.
- Dropdown - A field where you can select from a pre-specified list of values. Depending on the settings, a User may also be able to add their own values.
- Dropdown Multiselect - A field where you can select one or more value from a pre-specified list of values. Depending on the settings, a User may also be able to add their own values.
- Radio - A field where you must select one circular button option from a list of values.
- Checkbox - A field where you can check one or more values from a list of values.
- Date - A field where you can enter a date. When editing the field, you'll be able to use a date-picker widget to help you.
- Text Area - A large input area field where you can enter long text notes and messages.
- STATUS - A field where you can create different status values and attribute a different color to each of them, which will then appear on a File’s thumbnail when a status value is entered.
- Edit Field - Icon that when selected, makes the associated Tag Field editable.
- Add Field - Icon that when selected, creates a new, editable, child Tag Field underneath the selected Tag Field.
- Delete Field - Icon that deletes the associated Tag Field.
- Reorder / Move Field - Area that when grabbed with the mouse icon, enables the associated Tag Field to be dragged and dropped into a different order in the hierarchy.
Elements of the Tag Field Domain Options
These settings control how the Tag Field will behave. You’ll know which Tag Field you’re editing by the Editing “Tag Field Name” at the top of the box.
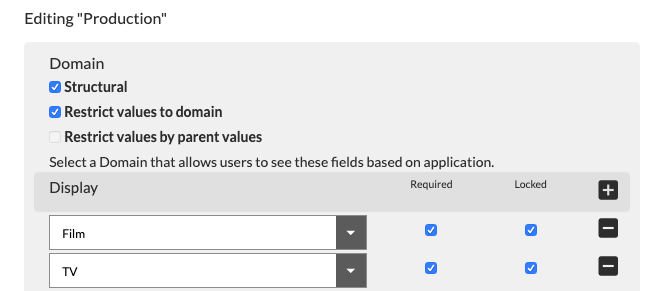
Tag Field’s Behavioral Checkboxes (located under “Domain”)
- Structural - Structural metadata determines the categorization in 5th Kind. Files that share the same Structural Metadata are grouped together, and browsable in a virtual directory structure, similar to what you may be used to on your desktop. Setting a field to Structural means that it will be used in the core categorization.
- Restrict values to domain- If checked, the values entered under any Domain will only be available under that Domain. If not checked, any values entered for this field will be available under any Domain.
- Restrict values by parent values - If the field is nested under a parent field, checking this option means that any value you enter will appear under just that corresponding parent value. So, if there are two values in the Parent Tag Field, each parent tag will have separate child tag values.
- Structural - Structural metadata determines the categorization in 5th Kind. Files that share the same Structural Metadata are grouped together, and browsable in a virtual directory structure, similar to what you may be used to on your desktop. Setting a field to Structural means that it will be used in the core categorization.
Domain Display Adding a Domain to a Tag Field makes the field appear as an option in Asset Details when that Domain is selected. Each field must be connected to at least one Domain.
- Required- If this is selected, the field will become required when a File is set to the selected Domain Purpose, and a File will not be able to be submitted without setting a value for the field.
- Locked - If this is selected, only values that are pre-populated can be used, and Users are not able to add new values when submitting or categorizing Files.
- Add Domain- Click the button to add a Domain to the field. The Tag Field will now be available with this Domain.
- Remove Domain-- Click the icon to remove the Domain from the field. After saving, the field will no longer be listed in that Domain.
Elements of the Descriptive Tag Section
These elements operate the editing and creation of a Descriptive Tag Field.
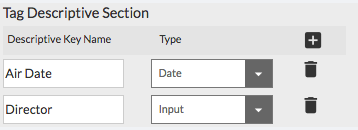
- Descriptive Tag Field Name - A text input field where you can add or edit the name of a Tag Field.
- Descriptive Tag Field Type - A dropdown list where you can select the method a user will use to enter the value of a Tag Field. Entry types include the following:
- Hidden - The field will not appear in the interface, but you can access this field through the API.
- Input - A Text field. You can enter any type of text into this field.
- Dropdown- A field where you can select from a pre-specified list of values. Depending on the settings, a User may also be able to add their own values.
- Dropdown Multiselect - A field where you can select one or more value from a pre-specified list of values. Depending on the settings, a User may also be able to add their own values.
- Radio - A field where you must select one circular button option from a list of values.
- Checkbox - A field where you can check one or more values from a list of values.
- Date - A field where you can enter a date. When editing the field, you'll be able to use a date-picker widget to help you.
- Text Area - A large input area field where you can enter long text notes and messages.
- Add Descriptive Tag Field - Select to add a new Descriptive Tag to the associated Tag Field.
- Delete Descriptive Tag Field - Select to delete an existing Descriptive Tag from the associated Tag Field.
Additional Need-to-Knows About Tag Fields Before Editing or Creating One
- Tag Fields cannot be applied to more than one Tag Group.
- A Tag Field’s name can be used only once.
- A new, top-level Tag Field appears at the bottom, but new, child Tag Fields appear directly under their parent tags. However, once saved and refreshed, those new tags appear at the bottom of their hierarchy level.
- Tag Fields within one Tag Group cannot be dragged and dropped to a different Tag Group. Reordering Tag Fields is possible, only within the Tag Field’s Tag Group.
Edit an Existing Tag Field
Click on any metadata field in a Tag Group to view and edit it. In the Tags Area, the Tag Tree will update to show the selected Tag Group’s Tag Fields. Below is an example of what you’ll see:
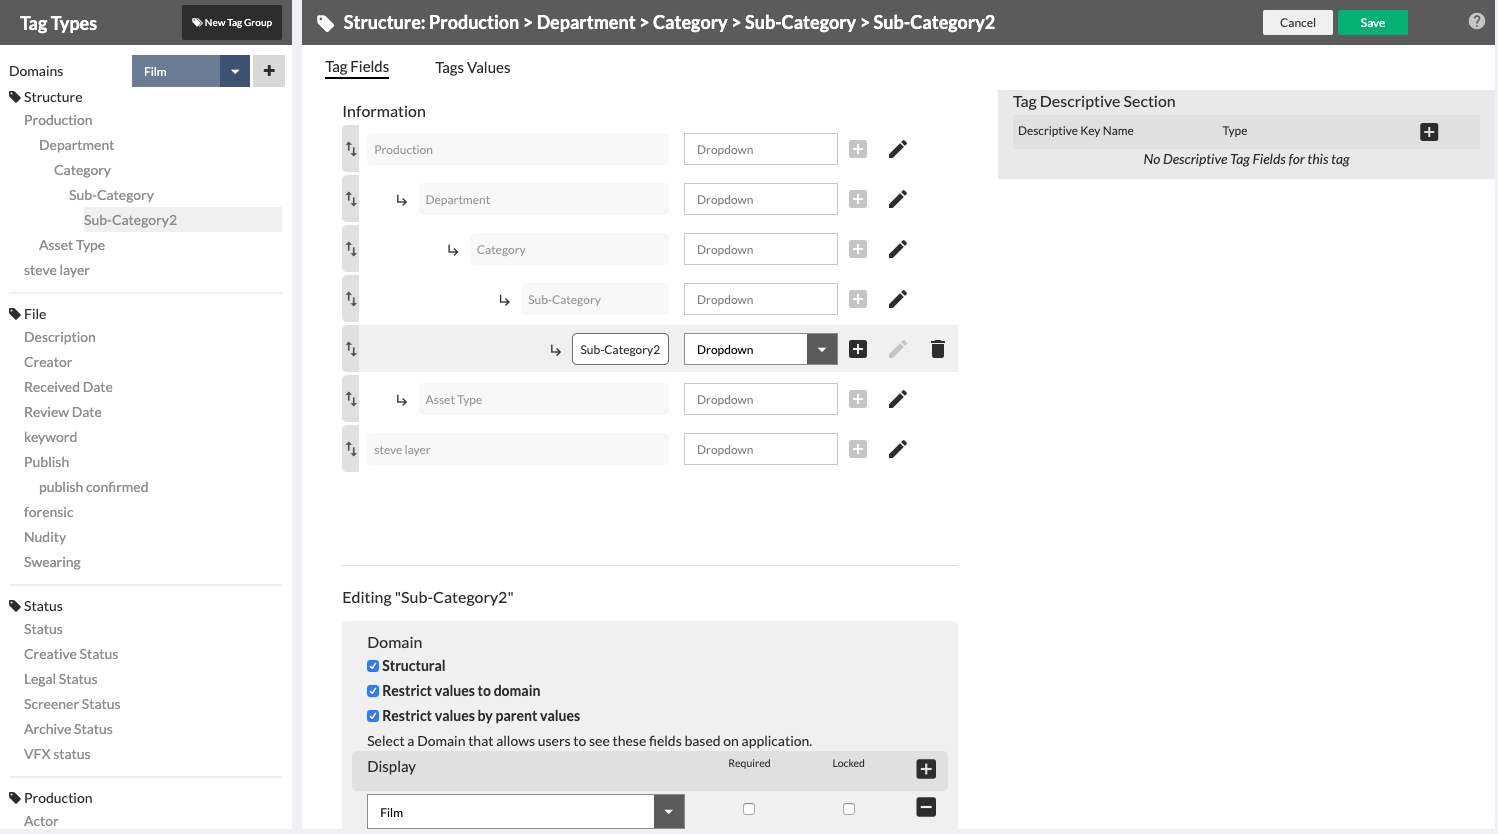
The field you selected to edit is now a text field.
- You can change the name of the field.
- You can change the type of of field it will be, i.e. a checkbox, dropdown, date, etc.
- You can delete the field.
- You can add a new, child / dependent field under it by selecting . Go to Add a Child Tag to an Existing Tag Field
After any change, hit Save. Then continue.
In addition to editing the field directly, you can also edit other aspects of the Tag Field, including the following. (Click on the list item to be directed to that instruction):
- Adding a new Domain to the Tag Field in the Tag Field Domain Options box below the Tag Tree.
- Changing the Domain Options relating to the field in the Tag Field Domain Options box
- Adding or editing a Descriptive Tag to the Tag Field in the Descriptive Tag section to the right of the Tag Tree.
- Adding or deleting the Tag Values of the Tag Field in the Tag Values section.
Create a New Tag Field
This section shows you how to create and modify the Tag Fields you will use to categorize your Files, including creating hierarchical relationships between them.
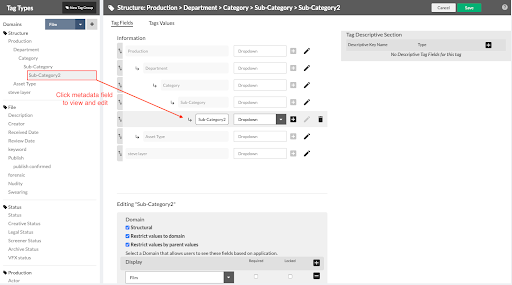
To Create a New Tag Field follow these instructions:
- Go to the Tag Group where the Tag Field will be listed
- Select the title of the Tag Group.
- A new, blank, top-level, text input field will appear at the bottom of the Tag Tree.
- Enter the name of the field. This can be changed at any time.
- Choose the desired Field Type. The Field Type lets you select the type of data that will be stored in a field.
- Scroll down to the Tag Field Domain Options box below the Tag Tree
- Add a Domain to your Tag Field.
- Save.
- Go to Tag Field Domain Options section for the next step, or go to the How to Build Your Tag Taxonomy: A Step-by-Step Guide for a more complete guided walk through of the taxonomy creation process.
- Finally, once a Tag Field has been created and associated with a Domain, it needs values added to it. To learn how to add Tag Values to your Tag Field, go to the Tag Value Section or go to the How to Build Your Tag Taxonomy: A Step-by-Step Guide for a more complete guided walk through of the taxonomy creation process.
CORE Tip: Select Single Value Inputs for Structural Tags When you set up a new Tag Field, you are required to enter the way the User will select or input data. In the case of structural tags, because each field is like a folder name, only one value can be selected for each Tag Field. The methods that allow a single value input are the Dropdown menu, Input field, Radio, and Date.

Only single value entry methods are accepted for structural tags. Dropdowns are the most commonly used method.
Add or Edit Tag Field Domain Options
Tag Field Domain Options are a required element of a new Tag Field. Once a new Tag Field is created, the Tag Field Domain Options can be modified at any time.
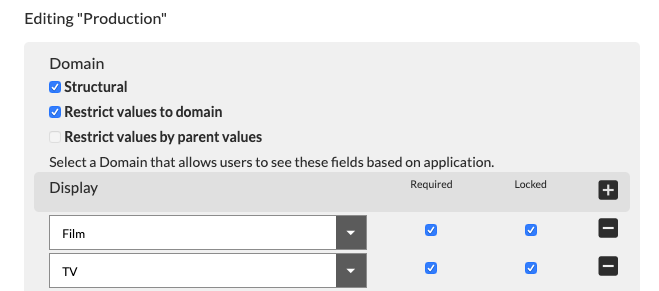
Select Your Tag Field’s Behavioral Checkboxes (located under “Domain”)
- Structural - Setting a field to Structural means that Tag Field will be listed in the structural filter tab and it will be included in the Asset Group name as the key categorization method.
- Restrict values to domain - If checked, the values entered under any Domain will only be available under that Domain. If not checked, any values entered for this field will be available under any Domain.
- Restrict values by parent values- If the field is nested under a parent field, checking this option means that any value you enter will appear under just that corresponding parent value. So, if there are two values in the Parent Tag Field, each parent tag will have separate child tag values. For instance, imagine you had a field named "Car Manufacturer," and a nested field underneath named "Car Model." Here “Car Manufacturer” is the parent tag, the values of “Car Manufacturer” are “Honda” and “Nissan”. With this checkbox selected, the user sees in the “Car Model” Tag Field that there’s “Civic” under “Honda” and “Sentra” under “Nissan”. If this checkbox wasn’t checked, the user would see both “Civic” and “Sentra” under “Honda” and “Nissan.”
Add Your Domain
- Add a Domain to your Tag Field by selecting the icon.
- Go to the dropdown menu and select your Domain
- Choose whether or not it is a Required Tag Field for that Domain
- Choose whether or not it is a Locked Tag Field for that Domain
- Save
To remove or change your Domain, select to remove, or go to the dropdown to change it.
Additional Need-to-Knows About Tag Field Domain Options
Domain Options can be modified at any time; however, there are a few things to note:
- “All” Domains cannot be applied at this time to Tag Field Domain Options.
- There must always be one Domain associated with Tag Field Domain Options.
- Once a Tag Field is created and Tag Values have been added, if a user selects Restrict Values to Domain or Restrict Values by Parent Values, and they weren’t previously selected, those values become associated with only the Tag Field and Tag Values currently selected. Which means, if these items were broadly available across Tag Values or Domains, they will now be limited to one. And, if the user desired to make them widely available again or available in a couple different areas, these values will need to be manually entered per Parent Tag Value or Domain.
- If the Admin desires to avoid future clean up and minimize duplications or Tag Values that aren’t standardized, Locking a Tag Field in this section is the best option.
Add a Child or Nested Tag to an Existing Tag Field
To add a Nested or Child Tag Field to an existing field:
- Click the button next to your parent Tag Field.
- A new field will appear indented below it.

- Enter the field name.
- Select its type.
- Scroll down to the Tag Field Domain Options box below the Tag Tree
- Add a Domain to your Tag Field.
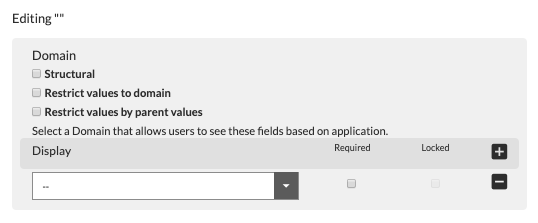
- Select the desired Domain Options.
- Save.
- Finally, once a Tag Field has been created and associated with a Domain, it needs values added to it. To learn how to add Tag Values to your Tag Field, go to the Tag Value Section or go to the How to Build Your Tag Taxonomy: A Step-by-Step Guide for a more complete guided walk through of the taxonomy creation process.
Move a Tag Field’s Position in the Tag Tree / Hierarchy
To change the order of a field, click and drag the handle next to it, then drop it in the desired position. There are some rules and limitations to the re-ordering Tag Fields:
- Top-level tags, such as Production can be re-ordered.
- The Production tag, whatever it may be renamed to, is the system tag for populating projects in the File Search Browser Panel. Putting top-level tags above Production will not cause them to appear in the Browser Panel instead.
- Tags at the same child / hierarchy level, who share the same parent tag, can be re-ordered within that parent tag.
- Tags with child tags, when moved, will move all the child tags associated with that parent tag.
- Moving child tags from one parent tag to another parent tag is not currently possible.
- Moving Tag Fields up or down hierarchy levels is not currently possible.
- Moving Tag Fields between Tag Groups is not currently possible.
Delete a Tag Field
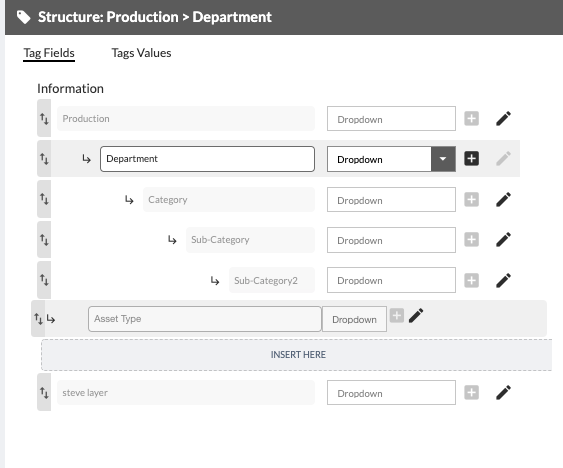
To delete a field, click the (trash) icon next to it. Note that you cannot delete a field that is currently being used to categorize Files. You must first re-categorize any Files using the field before deleting it.
Working with the Tag Hierarchy (aka Tag Tree)
In this section, you’ll learn
- The effects of the Tag Tree’s organization on File Search and the Browser Panel
- And, how to work with the order of Tag Fields in the Tag Tree
In the Tag Tree, the order of your Fields and whether they are nested or listed top down affects how they appear in the Structural Name of an Asset Group and in the Asset Details.
Mixed Nested and Listed Structural Hierarchy
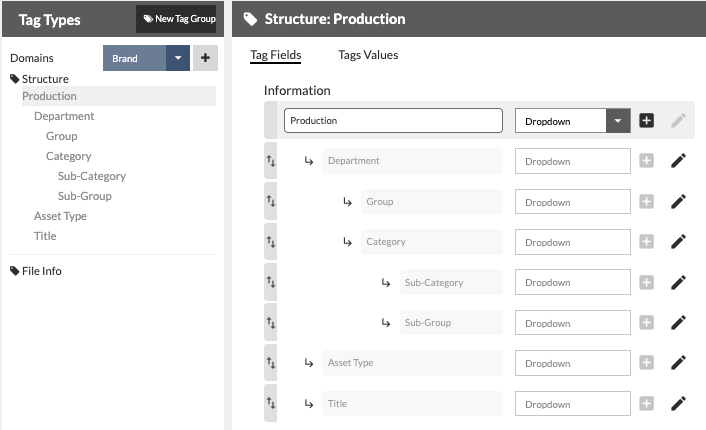
Mixed Structural Tags Make Up Asset Group Name and Appear in Asset Details
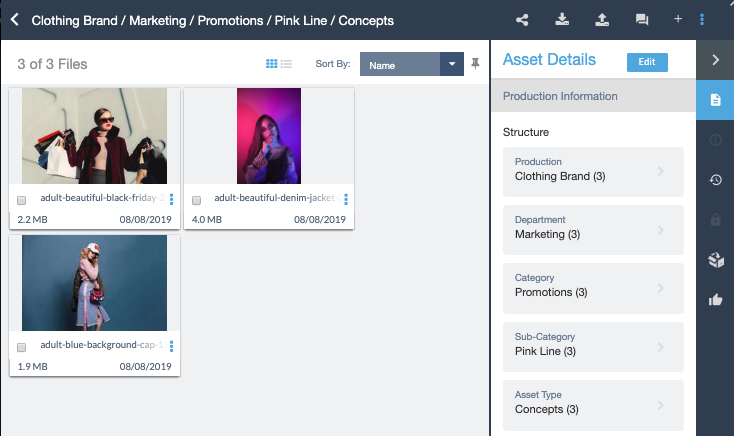
Left Browser Panel Shows Nested Structural Tags, but not Listed Tags.
If hierarchy was listed only, listed structure would appear in Left Browser Panel.
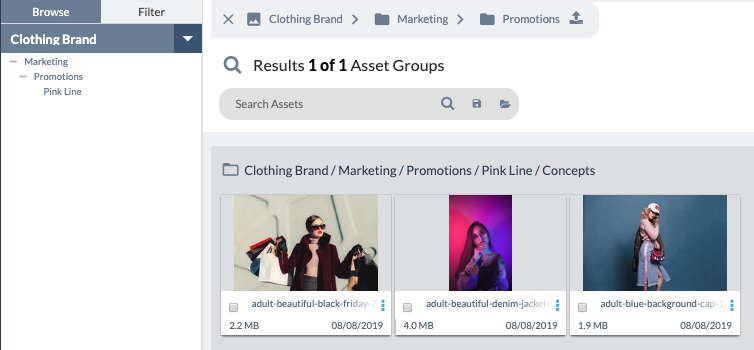
Tag Fields live on two axes:
- A top down axis. This is equivalent to a list where Tag Fields are organized consecutively, one below the other.
- And a left to right axis. This is equivalent to a nested folder structure whether Tag Fields are prioritized in a ranked hierarchy, similar to an outline structure.
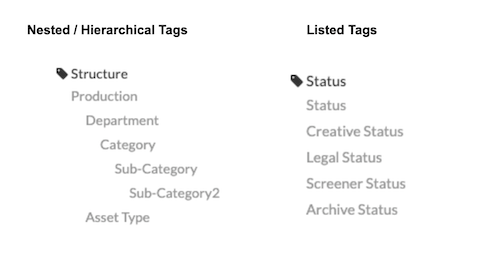
The hierarchy for a Tag Group can be a combination of Tag Fields that is both nested and listed top down.
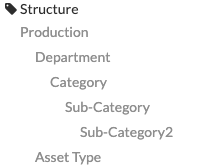
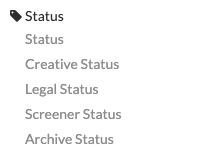
- A purely nested or left to right structure shows a series of Tag Fields each respectively a child to the parent tag above.
- A purely top down structure shows a series of tags at the same top level.
| Nested / Hierarchical Tags | Listed Tags |
|---|---|
 |  |
What the Tag Hierarchy Looks Like and What a User Sees
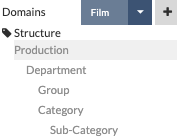
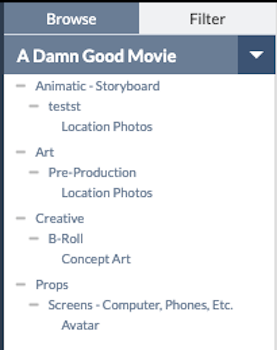
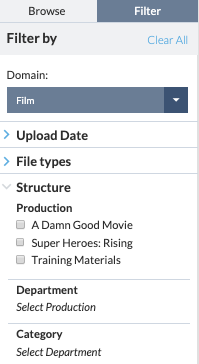
What an Admin sees in the Tag Structure Module for Tag Groups and the Tag Field Hierarchy is different from what a user sees in the Browser and Filter tabs. Where the Admin sees the Tag Fields, the user sees the Tag Values associated with files. The Browser lists all Tag Values listed in the Tag Field Productions which are associated with files. The Tag Values selected from the tag’s hierarchy can be opened with the below it.
| What the Administrator Sees | What the User Sees in the Left Browse Panel |
|---|---|
 |  |
| What the User Sees in the Left Browse Panel When a Production is Selected | What the User Sees in the Left Filter Panel When Filtering by Domain |
|---|---|
 |  |
Tag Values
This section lets you manage and add values for a selected Tag Field.
What is a Tag Value
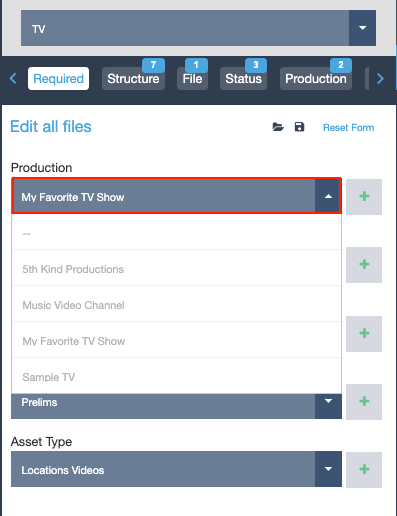
When a user selects or adds a menu option within a Tag Field, that’s a Tag Value. Tag Values are the values assigned to Tag Fields. They are the actual menu options a user sees in each Tag Field and the final executed metadata associated with files.
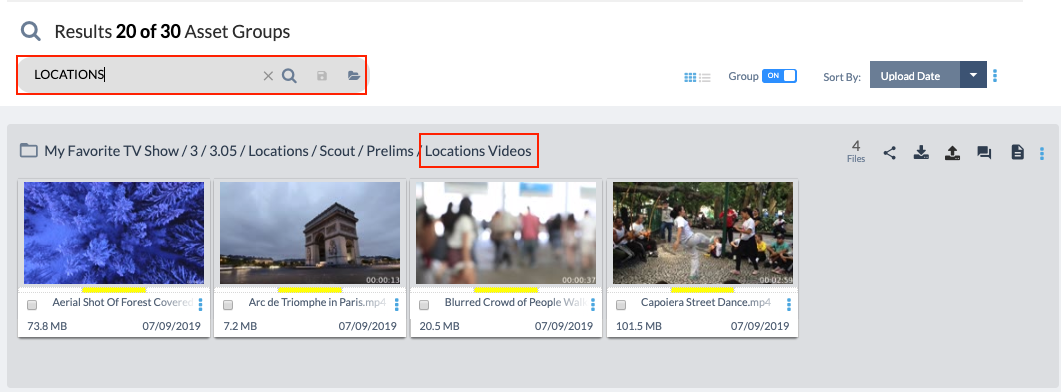
They are the words or values listed in the name of an Asset Group, and they are the Keywords or values used to search and filter for a file.
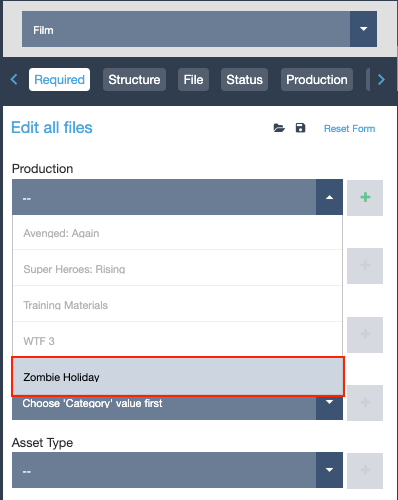
Tag Values can be anything, such as a Yes and No for a checkbox status, or a list of Production Titles under the Tag Field called “Production,” such as Zombie Holiday, WTF 3, and Avenged: Again.
Tag Values can be pre-populated, or users can be allowed to enter their own values when a Tag Field isn’t locked.

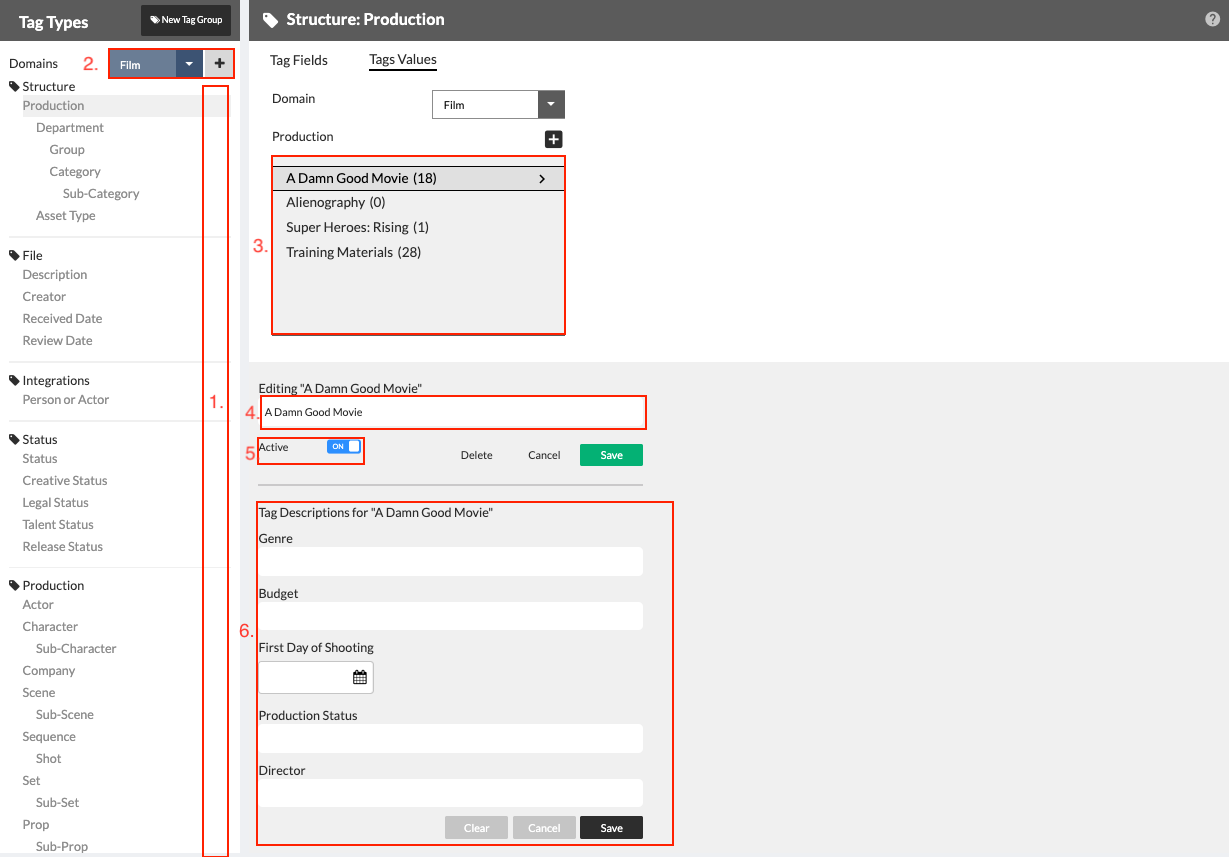
Elements of the Tag Values Section
- Left Tag Types Panel - where Tag Fields are selected
- Domain Menu - where Domain is filtered
- Tag Field’s Tag Value Box - where Tag Values for a particular Tag Field are listed
- Tag Value Input Field where - the content of a Tag Value is entered, edited, saved, and deleted
- Active Toggle where Tag Values can be hidden from the view of the user when toggled off
- Descriptive Tag Value Input Field(s) where the content of the Descriptive Tag Values is entered, edited, saved, and deleted
Filter Tag Values by Domain
Field values are filtered by Domain Purpose. Select a Domain from the dropdown to view values that have been entered for it.
View and Edit Existing Tag Values
Select a Tag Field either in the Left Tag Types Panel while in the Tag Values section, or select the field in the Tag Fields section and then go into Tag Values. Values that have already been entered will be viewable in a box underneath the field name, along with the number of Files that have been categorized with them.
To edit a Tag Value,
- Select the desired Tag Field in the Left Tag Types Panel.
- Filter to the correct Domain.
- Select the Tag Value in the Tag Value Box.
- Go to the input field below the box where the Tag Value is now editable.
- Change the name, toggle the Tag Value to Inactive or delete it.
- Save.
Add or Edit Tag Values for Nested Fields
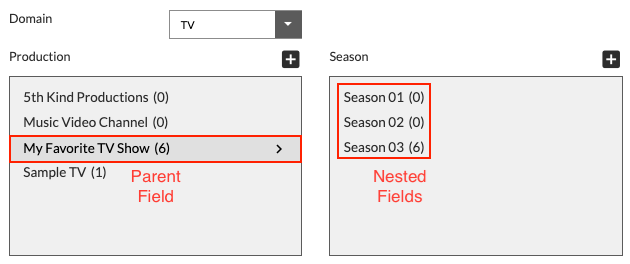
If a field is nested, its values may be dependent on its parent values. Therefore, to view its values, you must first select a value from its parent field to view all values that are nested under it in the nested field. Conversely, clicking on a nested field will display all of its parent fields as well.
Add a Tag Value
To add a value to a field, just click the icon above it. You'll be prompted to enter the new value. Click Save when done.
Edit a Tag Value
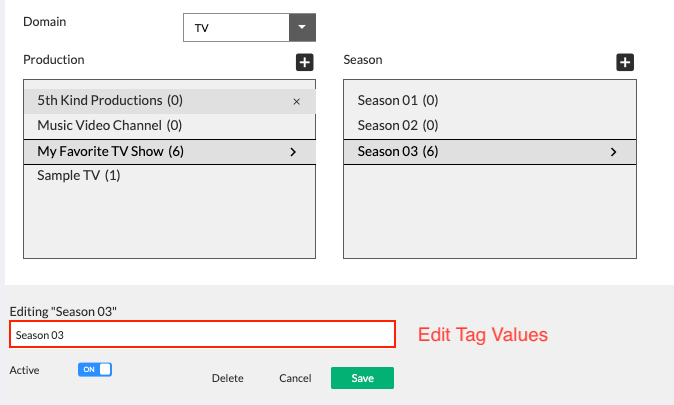
After you have selected a value, you can modify it if you'd like. In the "Editing [value]" section, just type your changes to the Tag Value, and click Save. Your changes will instantly be applied to any File that is categorized with this value.
Delete a Tag Value
To delete a value, click the icon that's displayed when mousing over it, or select it and then click the Delete button in the "Editing [value]" section. Note that you can only delete a value that is not applied to any Files. If you'd like to delete a value that is used to categorize Files, you must first re-categorize those Files with a different value.
Working With Descriptive Tags
What are Descriptive Tag Fields
Descriptive Tags are Tag Fields that allow you to add metadata to your metadata. They are a second layer of information associated with a Tag Field in the Tag Tree. For instance, if you had a Tag Field named "Car Manufacturer," you could add fields such as "Address" and "Phone Number" to it.

Add a Descriptive Tag Field
To add a Descriptive Tag field to an existing Tag Field,
- First make sure your Tag Field is selected and in edit mode by clicking on its name in the Left Tag Types Panel. See “Car Manufacturer” above, for reference.
- Then click the icon in the Descriptive Tag section. Enter a name for the field, and select the entry type.
- Scroll up to the top and Save.
- To then add its Descriptive Tag Value, go to the Tag Value Section and follow the directions in Add or Edit Descriptive Tag Values d or Edit Descriptive Tag Values
Edit a Descriptive Tag Field
You can change a field's name and type at any time. Just click on the name box to edit it, or click the Type dropdown to change the type.
Delete a Descriptive Tag Field
To delete a Descriptive Tag Field, click the trash icon next to it.
What are Descriptive Tag Values
Descriptive Tag Values, like Tag Fields’ Tag Values are the metadata that is entered or selected in the respective Descriptive Tag Field and then added or edited in the Tag Values section. It’s the information that appears to the user in Asset Details as secondary data to individual Tag Fields and Tag Values.
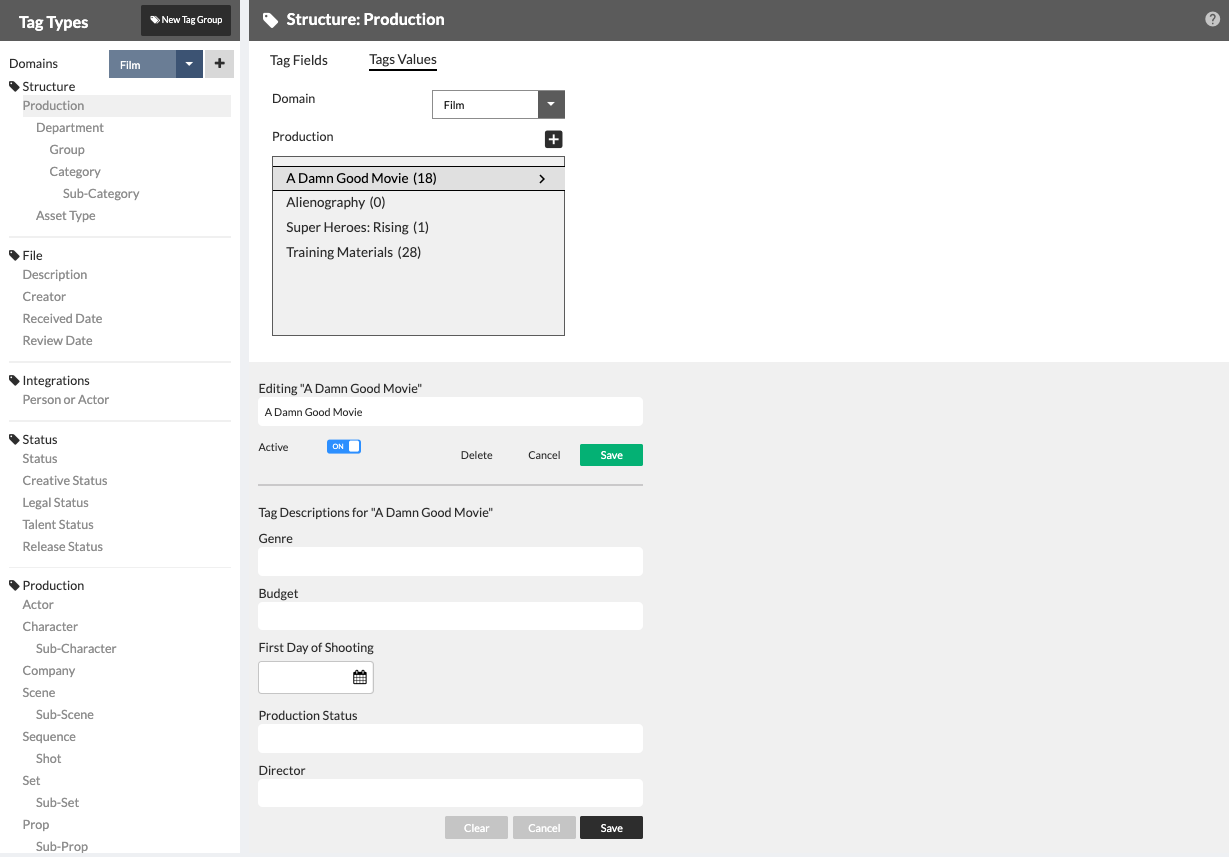
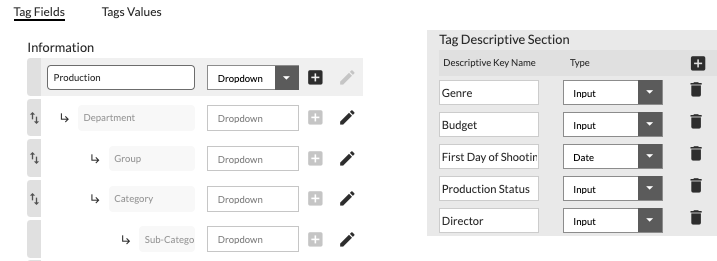
Example, Tag Field is “Production” with Descriptive Tag Fields to the right.
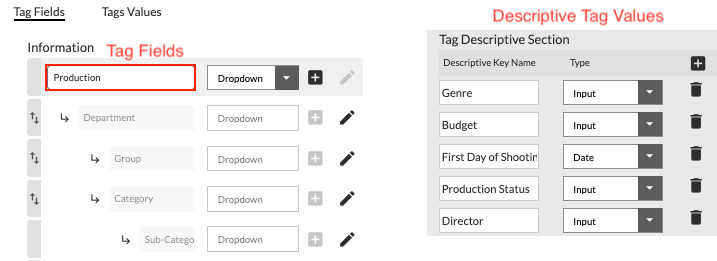
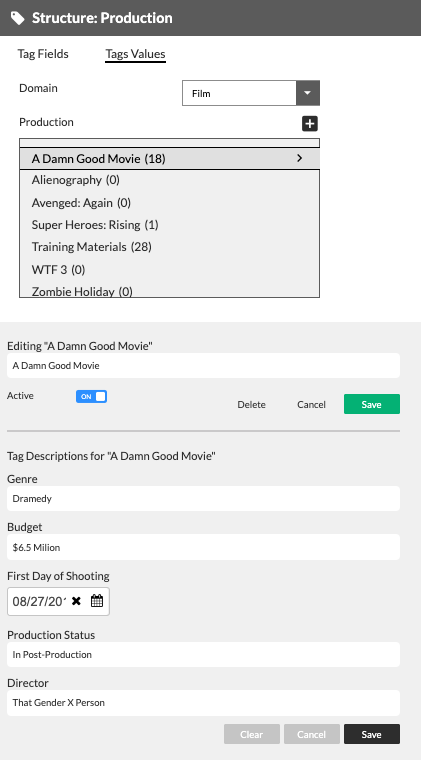
Here, “Production” Tag Field is filtered by Film Domain with Tag Values listed in the box below. Descriptive Tag Values are listed below the regular Tag Values.
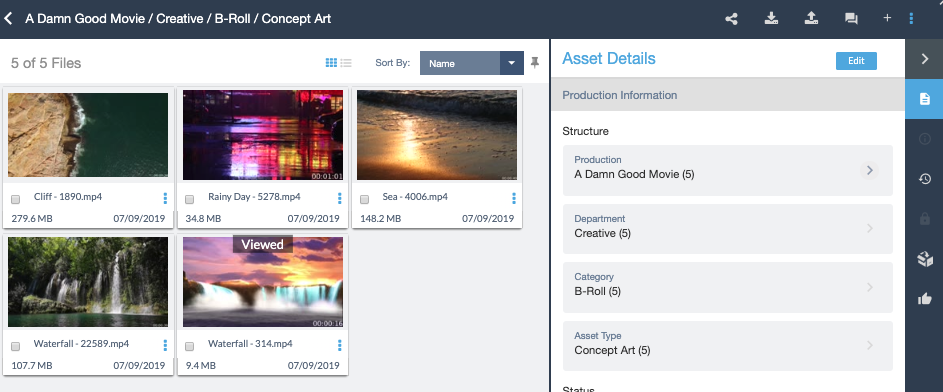
Here, Tag Fields and Tag Values are listed in Asset Viewer Module’s Asset Details Panel. The “Production” Tag Field’s Tag Value is “A Damn Good Movie.”
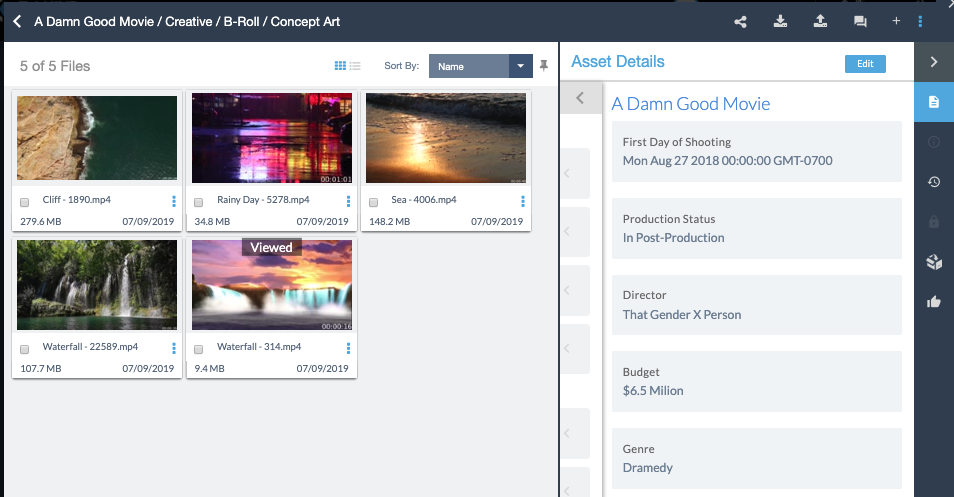
Selecting the right arrow of “A Damn Good Movie” takes the user to the Descriptive Tag Fields and Tag Values.
Add or Edit Descriptive Tag Values
When you select a Tag Field, you can view and edit the Tag Values of its associated Descriptive Tag Fields in the Tag Values section. Selecting the Descriptive Tag Fields does not activate the Descriptive Tag Values in the Tag Values section.
By selecting the Tag Field, in the Tag Values section, all the Descriptive Tag Fields’s Tag Values that are associated with that Tag Field are listed below the main Tag Values section.
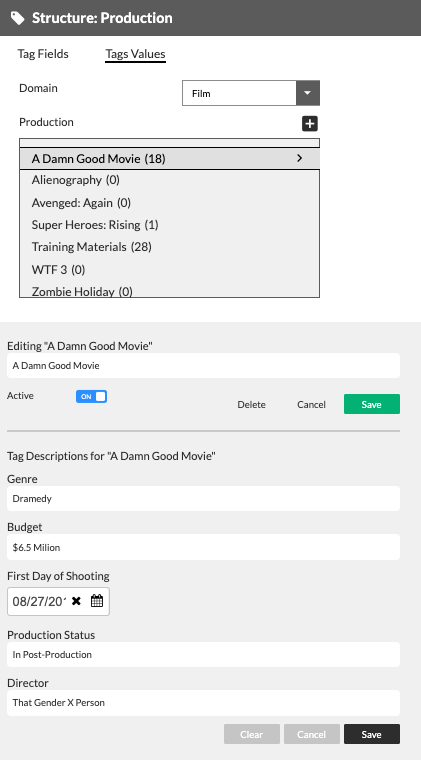
To add or edit any Descriptive Tag Value:
- Select the Descriptive Tag Key whose values you want to add to or change.
- Go to the Tag Values section. If your Descriptive Tag Values, don’t appear underneath you Tag Values section, do the following:
- Select the Domain.
- Select the Tag Value of the appropriate Tag Field.
- If the Tag Field is a Child or Nested Tag, select the chain of Tag Values to get to your appropriate Tag Field and Tag Value.
- For instance, if your Descriptive Tag Field is associated with Category, select the Production >> the Department >> then the Category. Your Descriptive Tag Values should appear below once Category is selected.
- Once the correct Descriptive Tag Field’s Tag Values appear below, enter your new value in the field.
- Click Save when you're done.
How to Build Your Tag Taxonomy: A Step-by-Step Guide
Step 1 - Create Your Domain or Select the Domain You Want to Edit
For a new Domain, in order to build out your taxonomy, you need to do two things:
- Associate the Domain with a Structure
- Associate Existing Tag Groups or Create New Tag Groups that fit the workflow and metadata requirements you’ve identified for this Domain.
For an existing Domain with a defined taxonomy, you’ll add new Tag Fields or edit existing ones. Follow the same steps below to achieve the results you want. For the purposes of this guide, these instructions are about how to build out a tag taxonomy for a new Domain.
To create a Domain,
- Go to the Left Tag Types Panel
- Select the button next to the Domain dropdown menu
- Enter the name of your Domain. For this guide, we’ll call it “Online.”
- Save.
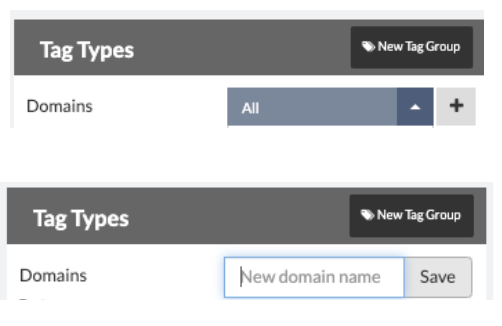
You’ve now completed the first step in building a taxonomy.
Step 2 - Start with the Structure Tag Group
Structure is the most important Tag Group of all the Tag Groups in the CORE system. Structure defines the Metadata categorization. Files that share the same structure are grouped together like folders. These files are browsable in the Browser Tab’s virtual directory and searchable in the Filter Tab under Structure.
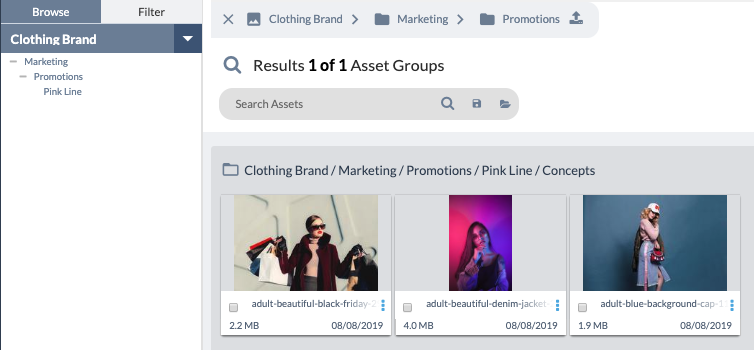
By setting a Tag Field to Structural, it will be listed in the structural categorization of the Filter and reflected in an Asset Group’s Name.
Step 3 - Pair Your Domain With an Existing Structure
To create a structure for your Domain, you can pair it with an existing Structure and modify it, or build your structure from scratch.
| Description | Image |
|---|---|
| 1. In the Left Tag Types Panel, select a top level Tag Field in the Structure Tag Group by clicking on it. In this case, Production. | 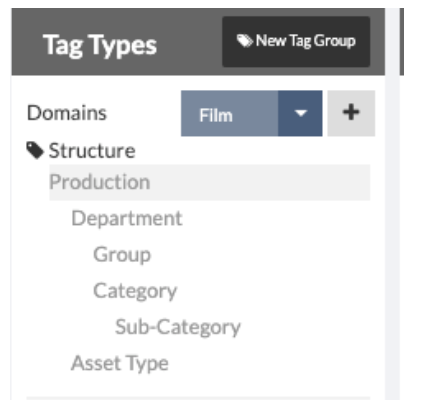 |
| 2. Production becomes an editable field to indicate changes are being made. | 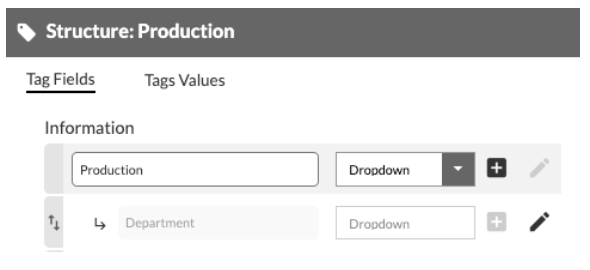 |
| 3. Next, Scroll Down to the Tag Field Options Box below the Tag Hierarchy Tree. This area is titled by the Tag Field you are editing, so you always know the Tag Field you are changing. This example is called “Editing Production.” | 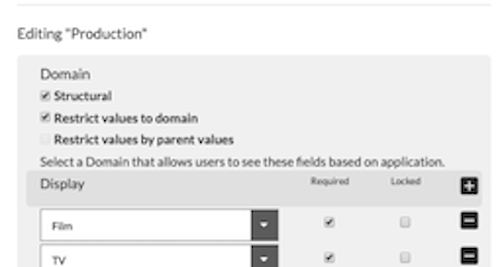 |
Under “Editing [Production],” you can choose different options that will reflect how a user will view and interact with the Tag Field.
At the top of the box, there are three check boxes:
- Structural
- Restrict values to Domain
- Restrict tag values by parent values
Selecting Structural ensures this Tag Field will be applied to the structural string of an asset group even if it isn’t a part of the Structure Tag Group.
Selecting Restrict values to Domain means that the tag values associated with the Tag Field are specific and available to that Domain only. For instance, with this restriction selected, users would see in the Film Domain that the Production Tag Values are The Fantasticals 3 and Daylight, while the TV Domain has Newb Detective, Ugliest Liars Ever, and Babe’s Big Burritos.
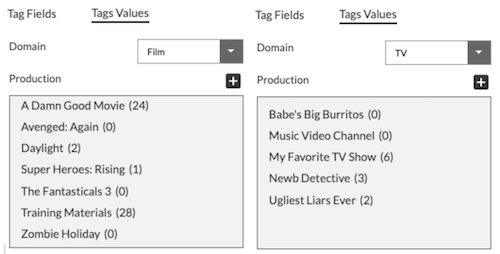
If this box was not selected, both Film and TV Domains would see all the values: The Fantasticals 3, Daylight, Newb Detective, Ugliest Liars Ever, and Babe’s Big Burritos.
Selecting the third checkbox restricts tag values by parent values which means that the tag values of a nested or child tag is restricted by the values of its parent. For example Babe’s Big Burritos is an animated show whereas Ugliest Liars Ever and Newb Detective are not. By choosing “restrict by parent tag values”, the Tag Field Department would show Animation as a Tag Value only when Babe’s Big Burritos was selected. The other two shows wouldn’t have Animation as a Department tag value.

| Description | Image |
|---|---|
| 4. In our example with Production, since we are building out our structural hierarchy, we will make sure Structure is checked, and Restrict values to our Domain Purpose. At the top most level of the tag structure, this first Tag Field is the parent, so it cannot be restricted by parent values. Therefore, Restrict tag values by parent values is not clickable for top-level Tag Fields. | 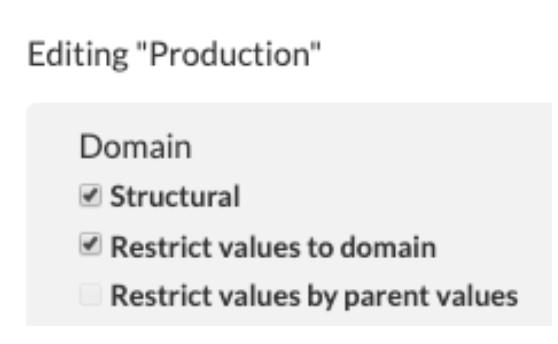 |
| 5. Next, select the top button to the right of the Locked column. |  |
| 6. In the new, blank field, use the arrow to expand the dropdown menu and select your Domain. | 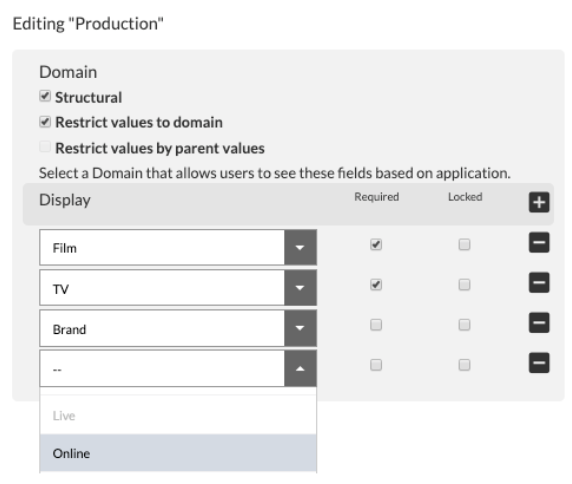 |
| 7. Then, check the Required box if this Tag Field is a required tag when a file is uploaded. Required tags mean the user must fill out those Tag Fields when uploading. This is helpful to ensure users are organizing their files with basic categorization so that files don’t get lost in the mix and go tagless. | 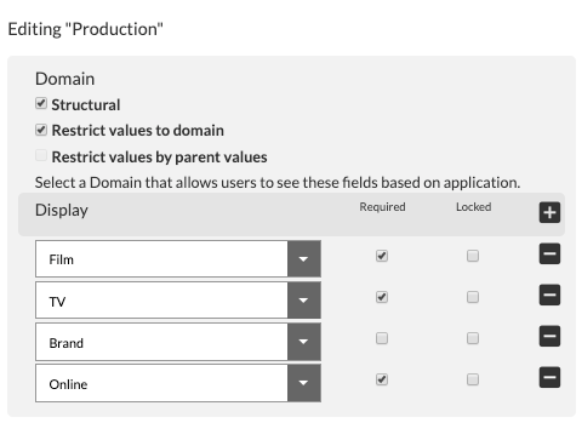 |
| 8.Next to Required is the Locked column. If you check Locked, it Locks a Tag Field. This means users can select only the Tag Values that are provided in the tag’s menu. If this box is left unchecked, it means the Tag Field is unlocked, so when users upload files, they will see a next to the field and be able to add their own values and menu items. For our example, we will Lock this field. |  |
| 9. Now scroll up and hit the Save button. |  |
You have successfully associated a Tag Field with your Domain. However, there are no tag values in this field’s menu yet. It’s essentially an empty field. To add those, we must add Tag Values.
| Description | Image |
|---|---|
| 10. After Saving, next select Tag Values at the top of the section. |  |
| 11. In Tag Values, select the Domain of your Tag Field. Here you’ll see the Tag Field Production above the Tag Values box. | 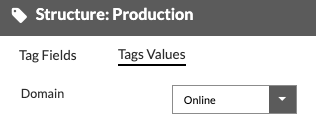 |
| 12.To add the Tag Values a user will see in their menus when tagging a file, select the sign above the box. | 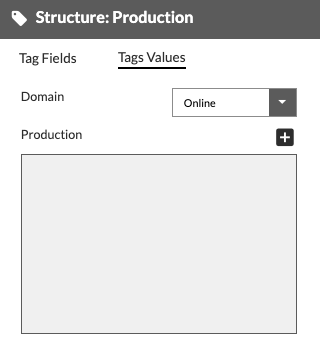 |
| 13.An empty field appears below the box. Add the first value in your Production Tag Field. | 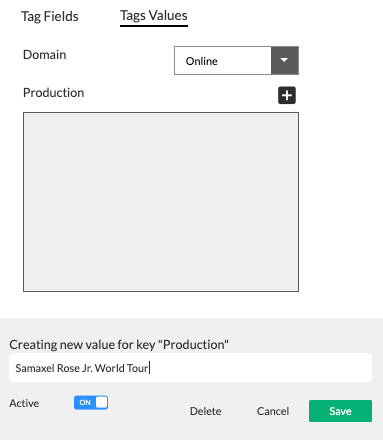 |
| 14. Hit the Save button again. |  |
| 15. Select the sign above the box again, and add another value. Then hit save. | 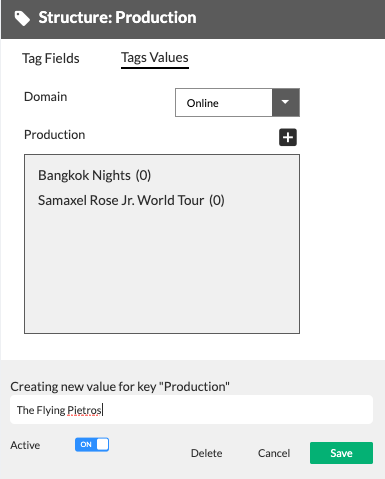 |
Congratulations. You have just associated your Domain with the Production Tag Field, and given it Tag Values.
CHECK YOUR WORK:
| Description | Image |
|---|---|
| 1. Refresh the page. |  |
| 2. Go to the Left Tag Types Panel, and select your Domain. |  |
| 3. The Domain filters what Tag Groups and Fields are associated with it. You should see your selected Tag Field under Structure. Select it. | 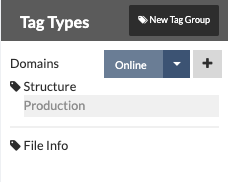 |
| 4. Go to Tag Values. |  |
| 5. Select your Domain. |  |
| 6. You should see the Tag Values you entered. | 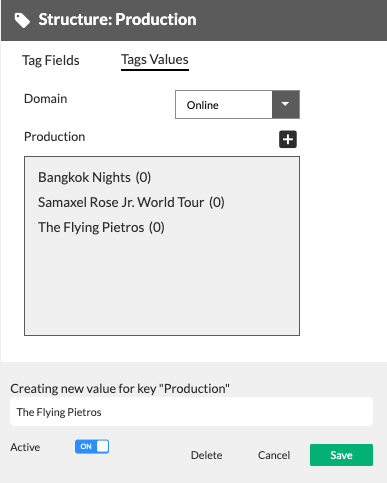 |
Follow these same steps to pair additional existing Tag Groups and Fields with your Domain.
Step 4 - Create a New Tag Structure with New Tag Fields
To create your own tag Structure,
| Description | Image |
|---|---|
| 1. Click on the Structure Tag Group name, and in the Tag hierarchy you will see a new top level empty field at the bottom. | 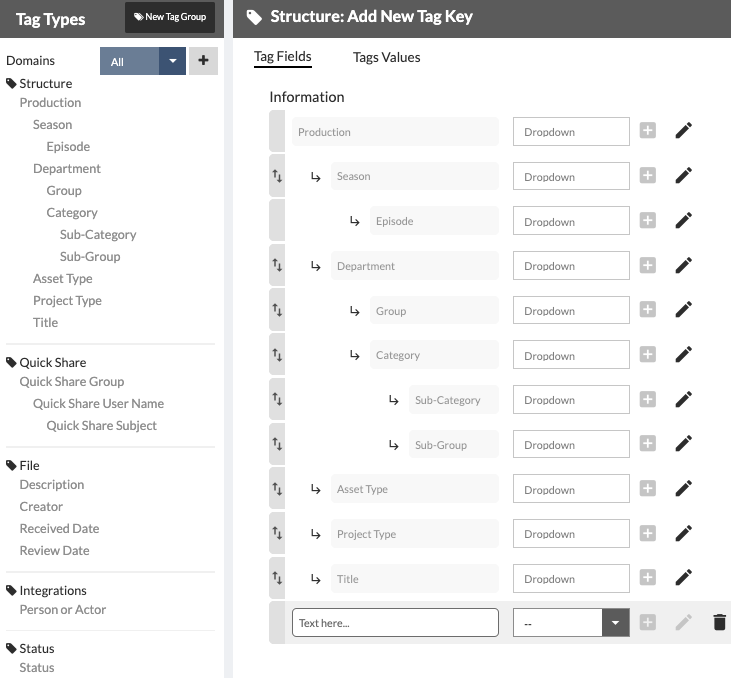 |
| 2. Enter your intended name. We will call it Project Name here for training purposes. | 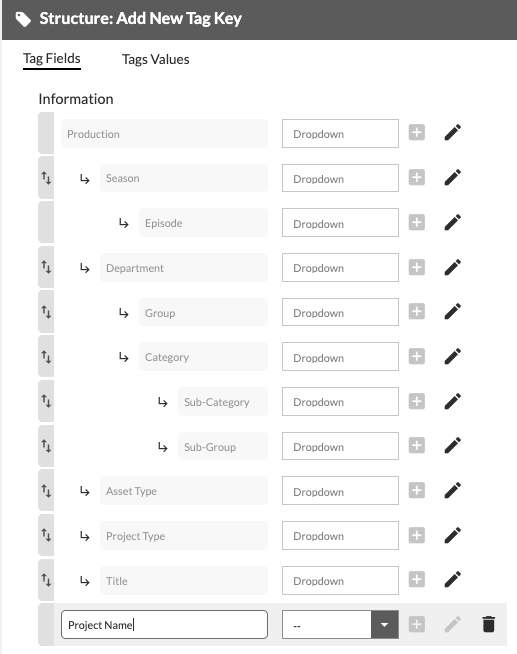 |
| 3. In the dropdown, choose how a user will select the tag value. For Structure tags, use a dropdown. |  |
| 4. Then follow the same instructions to associate it with your Domain and Tag Values as you did with an existing Tag Field. 5. Start by scrolling Down to Tag Field Option Box below the Tag Hierarchy Tree. 6. Select Structural 7.Select Restrict value to Domain 8. Add a new Domain row by clicking and select your Domain. 9. Check Required. 10. Leave it unlocked. | 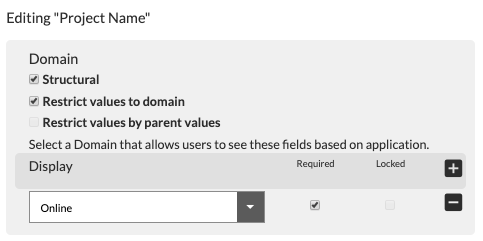 |
| 11. Scroll up and Save. |  |
| 12. Go to Tag Values. |  |
| 13. Select Domain. | 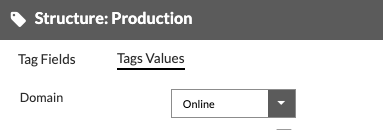 |
| 14. Click next to Project Name | 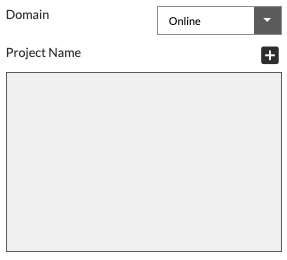 |
| 15. Add Project A 16. Save 17. Add Project B 18. Save 19. Add Project C 20. Save. | 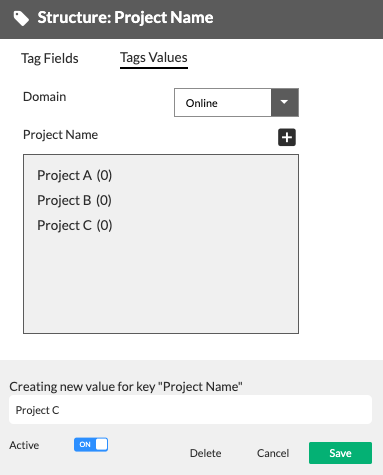 |
Check your Work. Well done.
Step 5 - Create Child or Nesting Tag Fields
Nesting Tag Fields with a parent-child relationship is like creating a folder structure. Tags in direct connection to each other where one is subordinate are a parent and child.
To create child Tag Fields,
| Description | Image |
|---|---|
| 1. Go to the Tag Field that will be the parent. In this example, Project Name. 2. Select the next to the field. An indented, new blank field will appear under it. This is the child Tag Field or rather the next step down in your tag hierarchy. |  |
| 3. Enter your intended name. We will call it Project Name here for training purposes. |  |
| 4. Then follow the same instructions to associate the tag with your domain and select the various options: 5. Scroll Down to Tag Field Option Box below the Tag Hierarchy Tree. 6. Select Structural. 7. Select Restrict value to Domain. 8. Select Restrict tag values by parent values. 9. Add a new Domain row by clicking and select your Domain. 10. Check Required. 11. Leave it unlocked. | 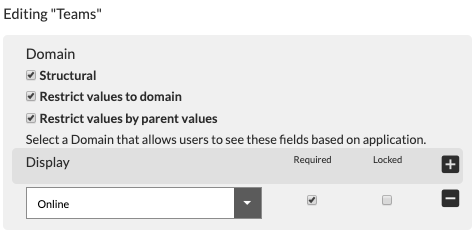 |
| 12. Scroll up and Save. |  |
| 13. Go to Tag Values. |  |
| 14. Select Domain. | 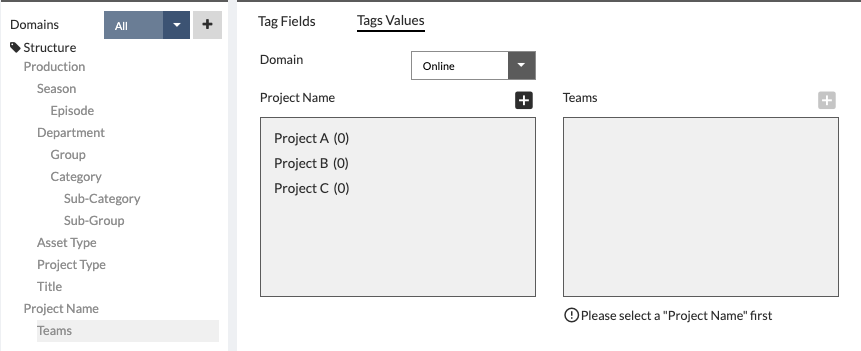 |
| 15. Click Project A under Project Name. | 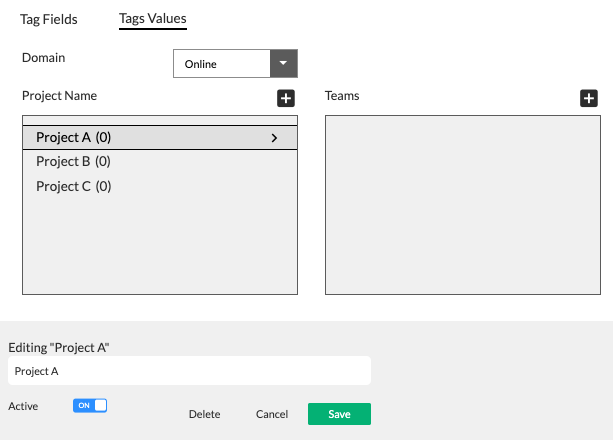 |
| 16. Select next to Teams. | 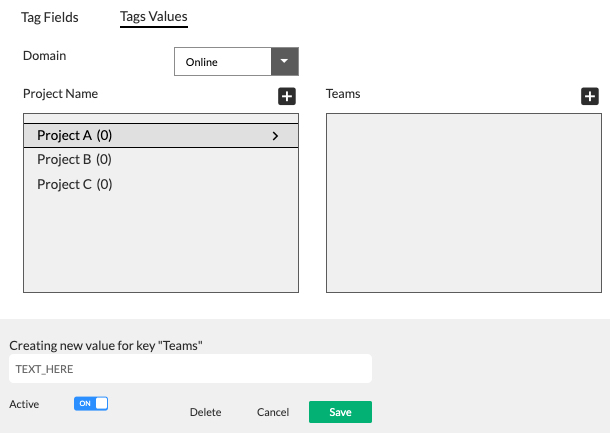 |
| 17. Add 123. 18. Save. 19. Select next to Teams. 20. Add 456. 21. Save. | 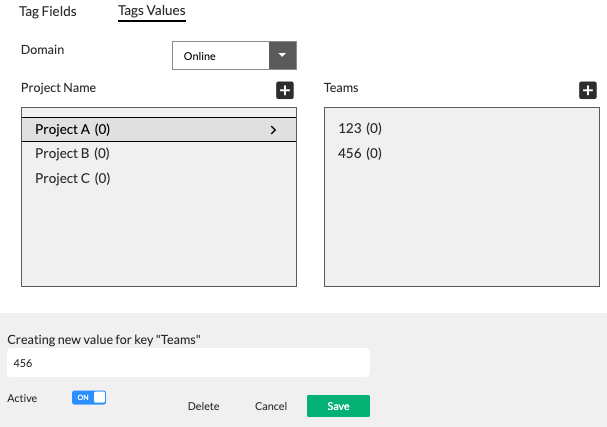 |
| 22. Go back to Project Name and select Project B. | 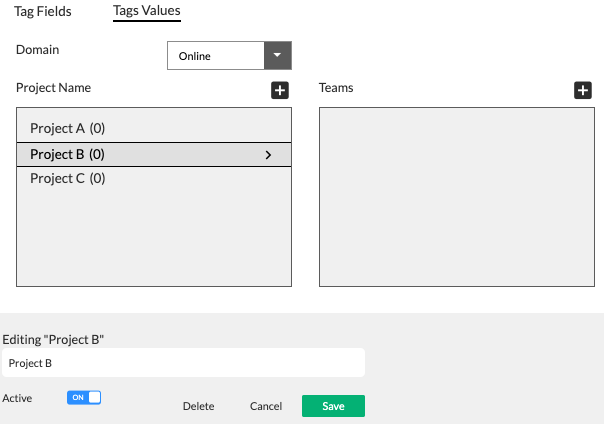 |
| 23. Select next to Teams. | 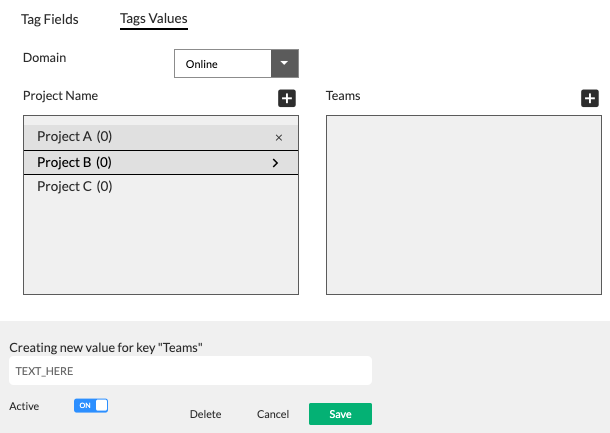 |
| 24. Add Alaska. 25. Save.26. Select next to Teams. 27. Add California. 28. Save and check your work. | 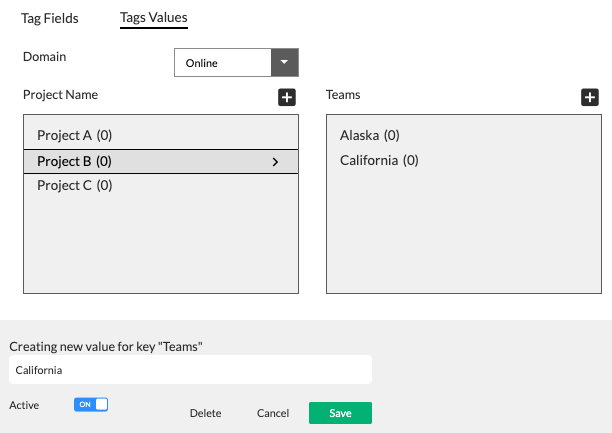 |
| 29. Refresh |  |
| 30. Select Teams in the Left Tag Types Panel. | 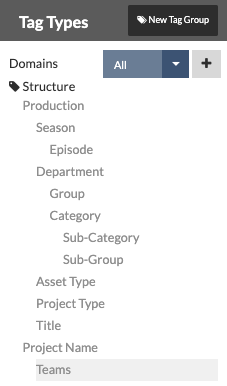 |
| 31. On the right, select your Domain |  |
| 32. In the Project Name Tag Value Box, you see that Project A, Project B, and Project C are listed under Project Names. | 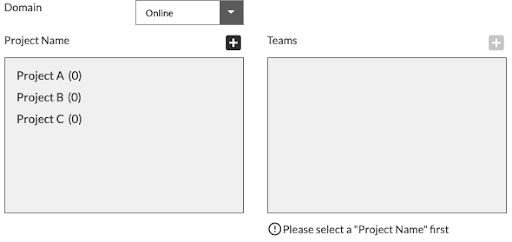 |
| 33. Select Project A. You will see that 123 and 456 are listed in the Teams tag box. | 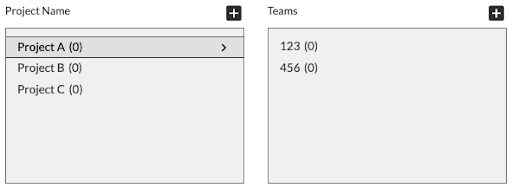 |
| 34. Select Project B. It shows Alaska and California. | 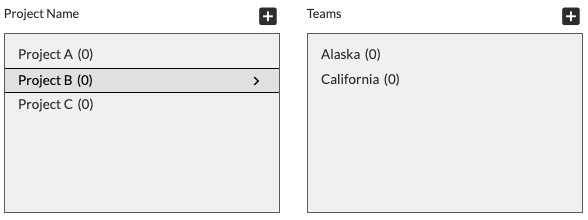 |
| 35.Select Project C. It has nothing. | 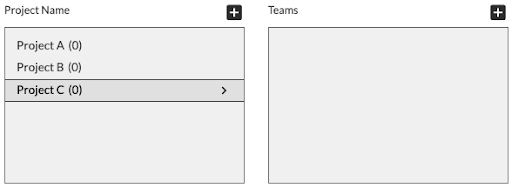 |
Tag Values are restricted by parent values. Mission accomplished
