Manage Users
Use this section to view and modify User accounts in the system.
Note: The User accounts you have access to view and modify will depend on the permissions granted to you. If you feel you need to see additional User accounts, or need the ability to modify User accounts, please contact your system Administrator.
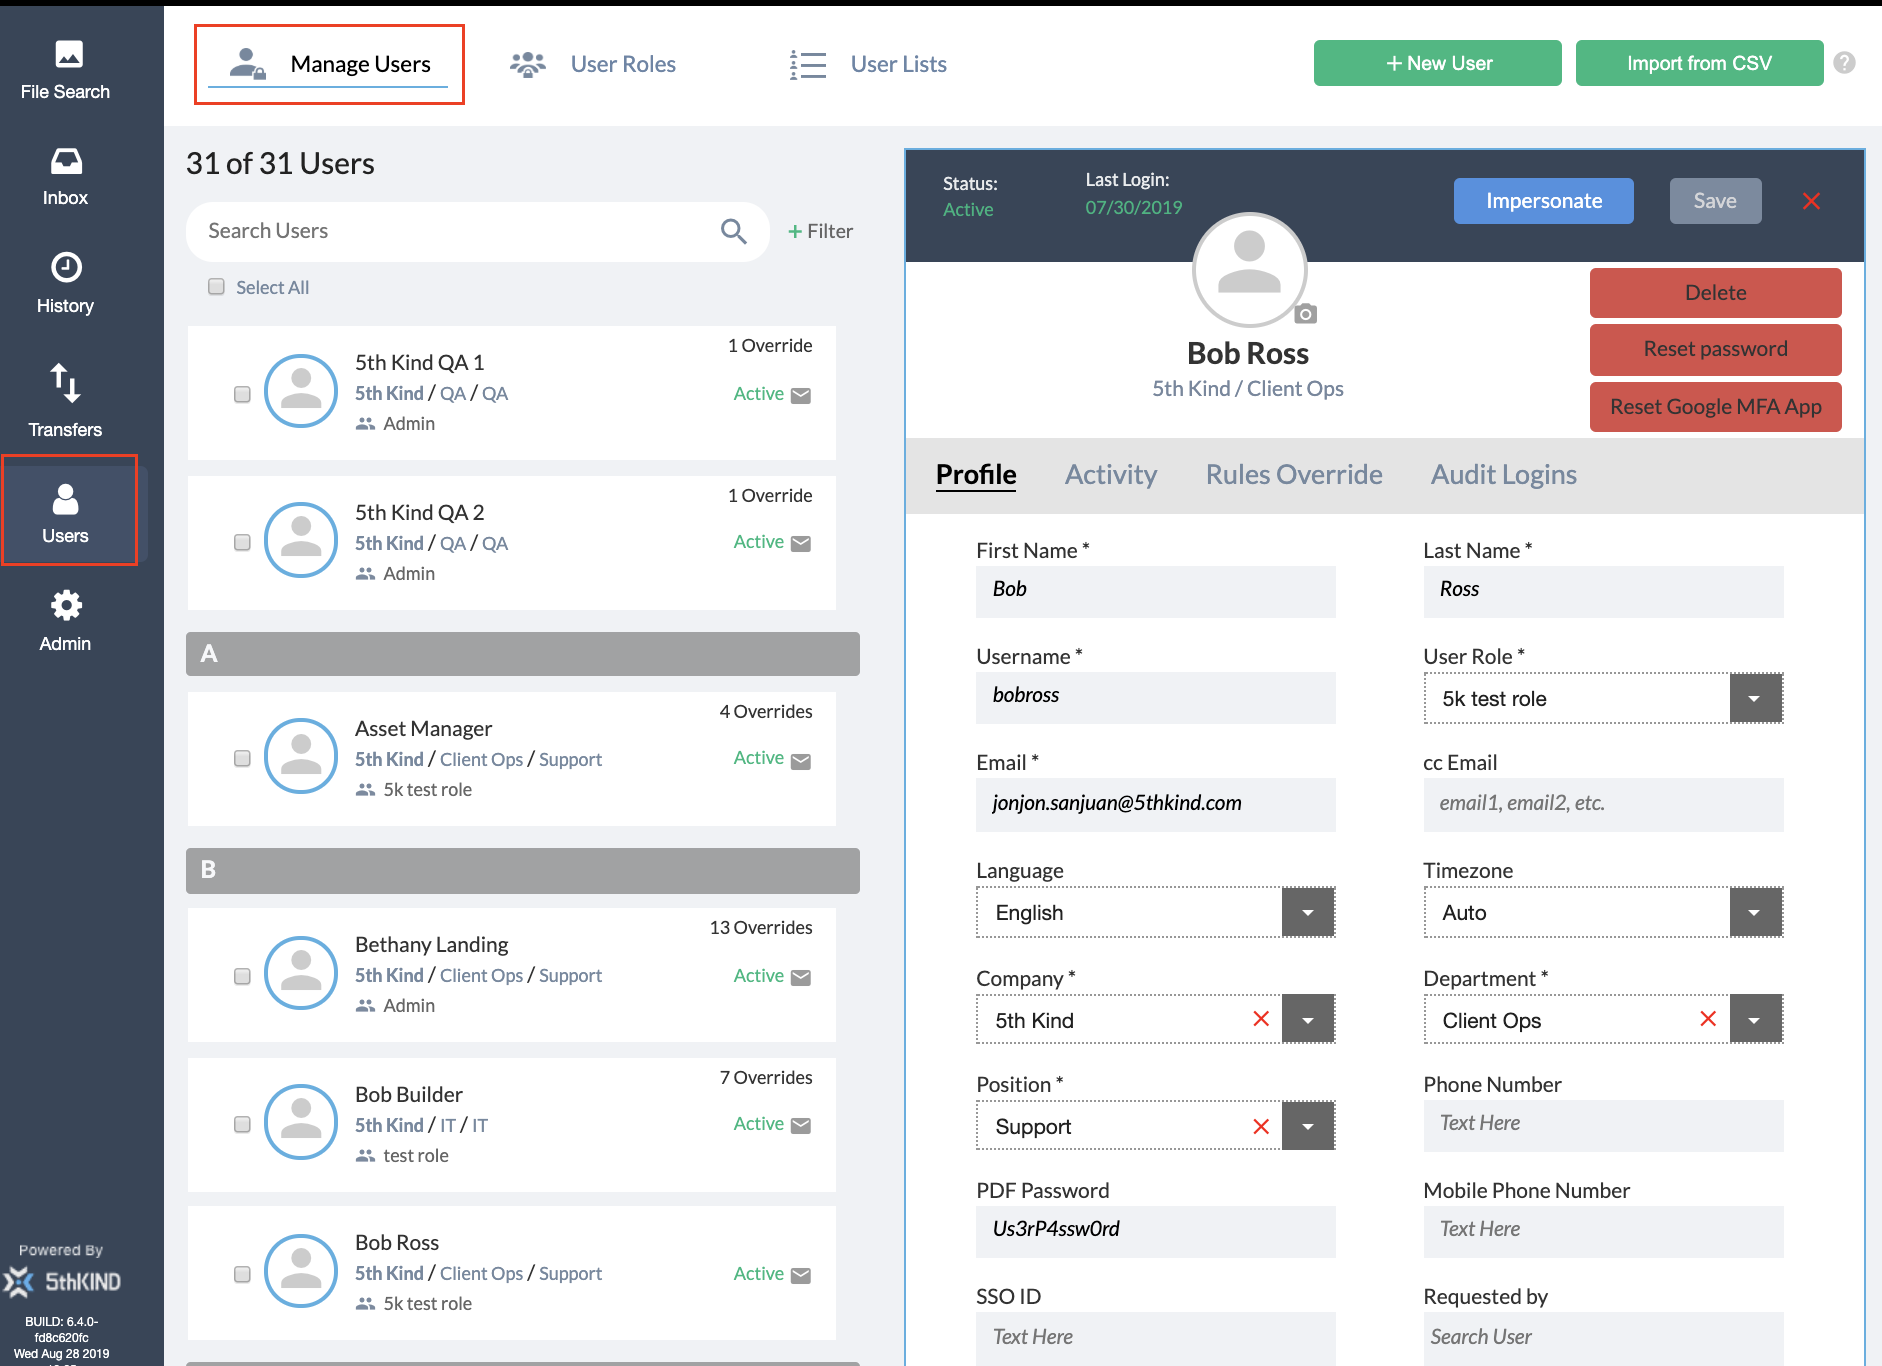
Manage User Elements
- User Browse - Search and filter users
- Add User(s) Buttons - Add a single user or group of users
- User Profile - Profile details of a selected User
User Browse
This section shows all available User accounts, and lets you search and filter within them.

1. Search
Type a User's name to search by it, and click the or press Enter to search. To clear a search, delete the name and search again.
2. Add Filter
Click the +Filter button filter User’s accounts by their Company, Department, User Access Role the user belongs to, Device Type user has access to and User’s current Status in the system (active, locked or expired). You can apply multiple filters when searching for users.
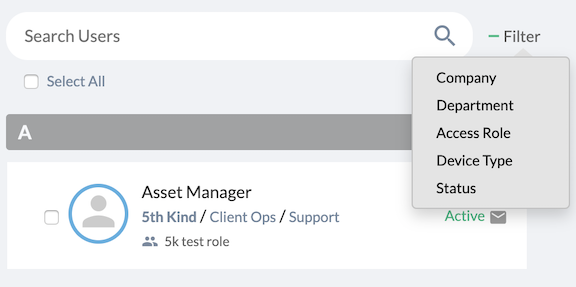
Select a parameter to filter by.
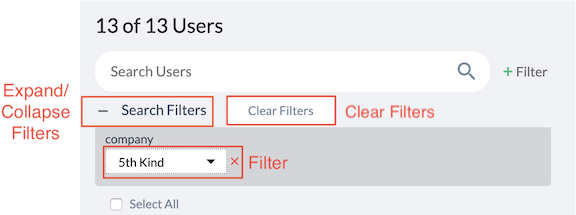
Filter
Select a value to filter by. You can add multiple filters at once. Click the ( ) to remove a Filter.
Expand/Collapse Filters
Click to hide the filters. Click again to show them.
Clear Filters
Remove all Filters to go back to the full list of Users.
3. Select All
Check this to select all currently loaded User Accounts. Once you select all (or check individual boxes next to users) you can Activate, Deactivate or Delete Users in bulk.

4. Users
Click on any User to view their profile. This box contains the User’s Name, an avatar if uploaded, the company, department, position and User Access Role that the user belongs to. In the top right are the number of Access Overrides for the user outside of their role. It also displays if the User is Active in the system and is set up for Email notifications.

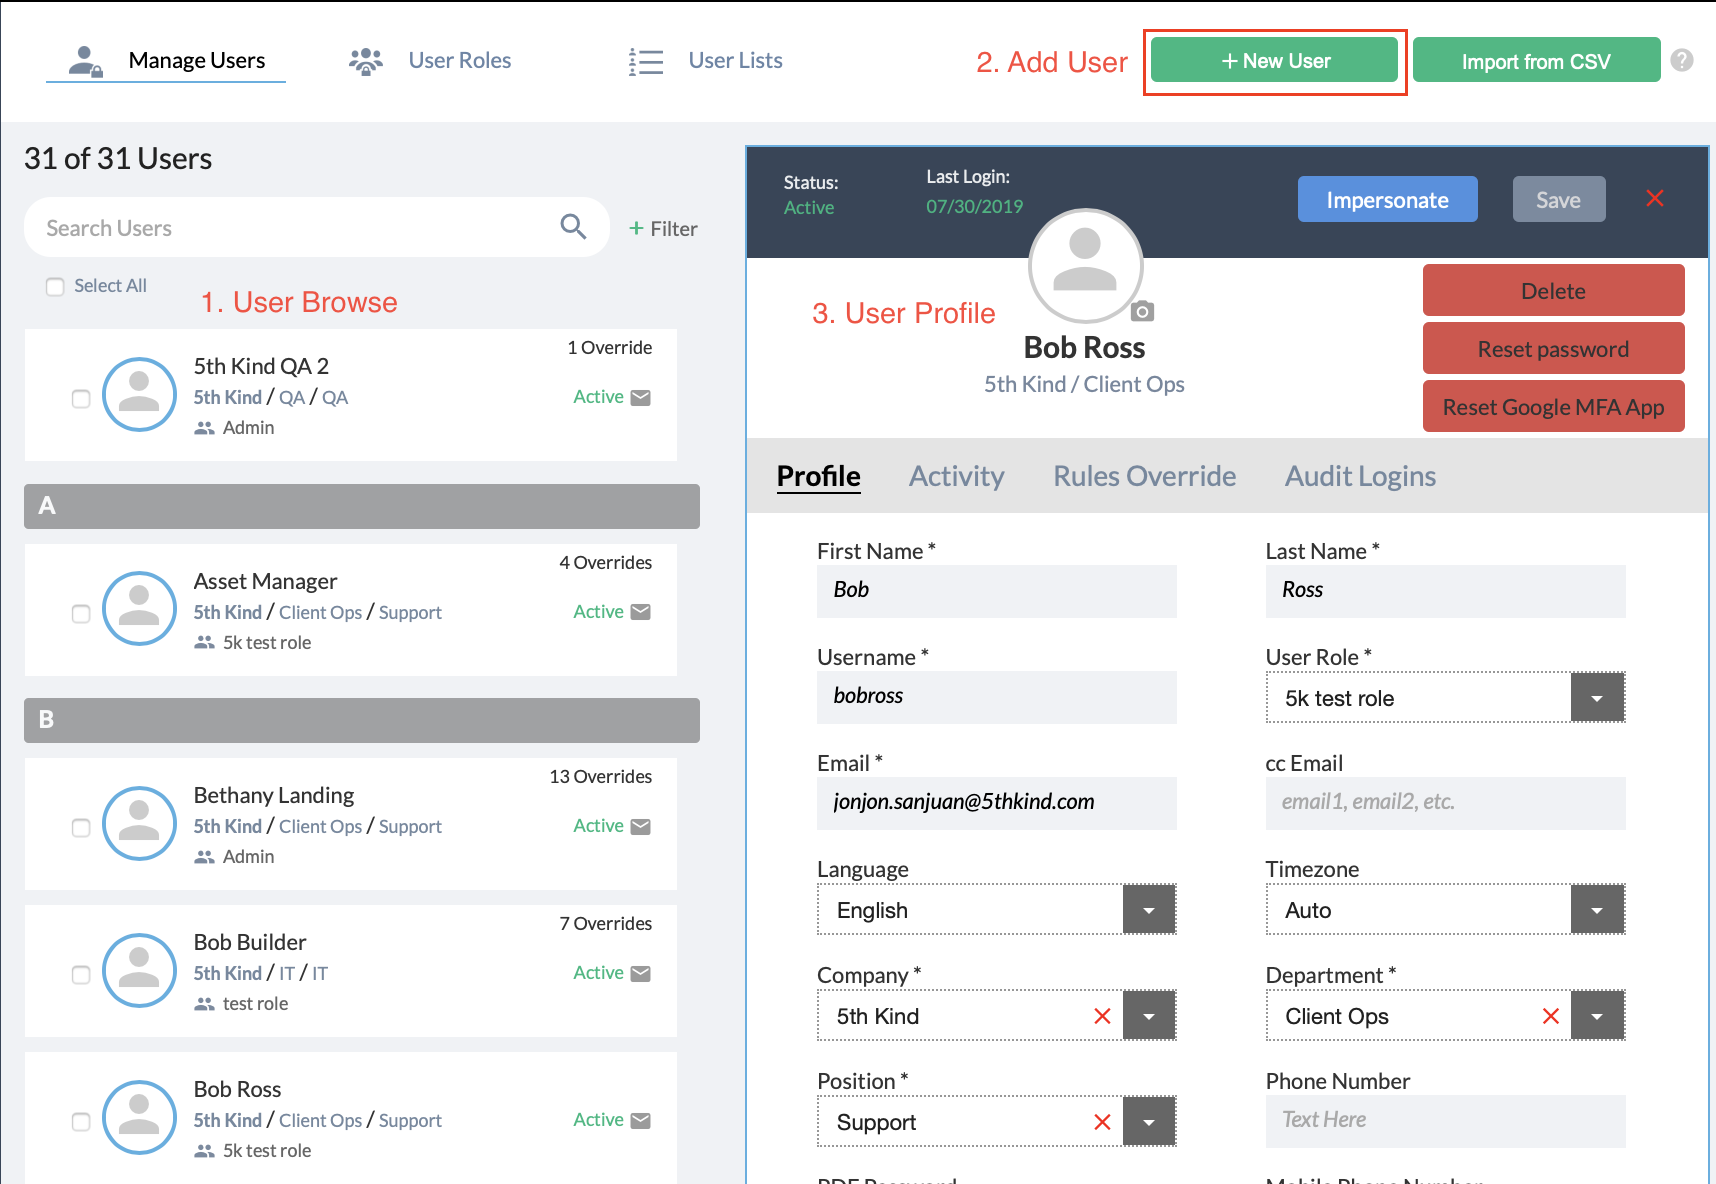
User Profile
When you select a User in User Browse, the person’s User Profile will open on the right side. Here you can view it, or edit it, if you have the proper permissions.
Profile Tab
This is where a User's account is set up when adding a New User for the first time or when Editing an existing user.
- First Name - The User's First Name
- Last Name - The User's Last Name
- Username - The User's account name. This is what a user uses to log in, and must be unique.
- User Role - What User Role the user is assigned to in CORE. User Roles determine what permissions a User has within the system, and which files, if any, they are allowed to access. User Roles must be created before they can be applied. If you do not know which Role to apply to a User, contact your system Administrator.
- Email - The email address linked to the account. This is where notification emails from the system will be sent, including welcome emails for a new account, password reset notifications, and notifications of received packages, ingest notifications etc.
- cc. Email Addresses - cc.email addresses. This option is included so that another user can receive a CC of notifications that are sent to the main email addres associated with the account. Most often used by assistants.
- Language - Currently English is the only language available. Future enhancements will allow the system to be displayed in other languages to the User.
NOTE: Changing the language of the entire system requires additional Administrative adjustments. - Timezone -If the timezone is set to Auto, it is set to your browser timezone. Admins can adjust user’s timezone if necessary. Timezone is set to UTC time. You can find your UTC timezone here.
- Company - The Company the User works for. This field is used for filtering when searching for Users. If the User's Company does not exist in the list, type it into the space at the top of the list of companies and click Add New Value.
- Department - The Department the User works in. This field is used for filtering when searching for Users. If the User's Department does not exist in the list, type it into the space at the top of the list of departments and click Add New Value.
- Position - The Position or title of the User within the company. This field is used for filtering when searching for Users. If the User's position does not exist in the list, type it into the space at the top of the list of departments and click Add New Value.
- Phone Number - The User's phone number
- PDF Password - PDFs can be sent to a User with password protection. Set the password that will be able to unlock any of these PDFs here.
- Mobile Phone Number - The User's mobile phone number.
- SSO ID - If your organization uses Single Sign-On, enter the User's SSO ID here.
- Requested By - If a User's account has been requested by another User, you can enter the Requesting User here.
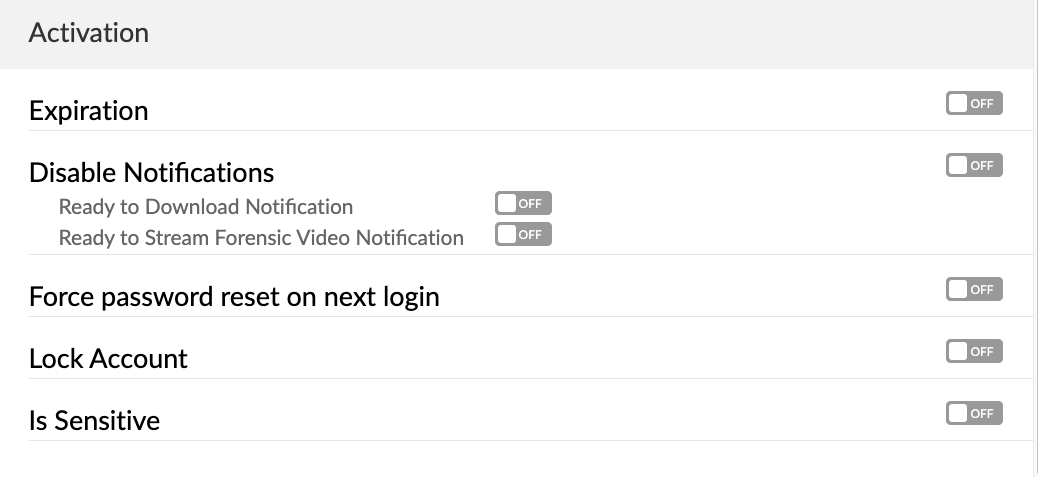
Profile - Activation
Below the main profile is the Activation section, which contains settings related to the account itself.
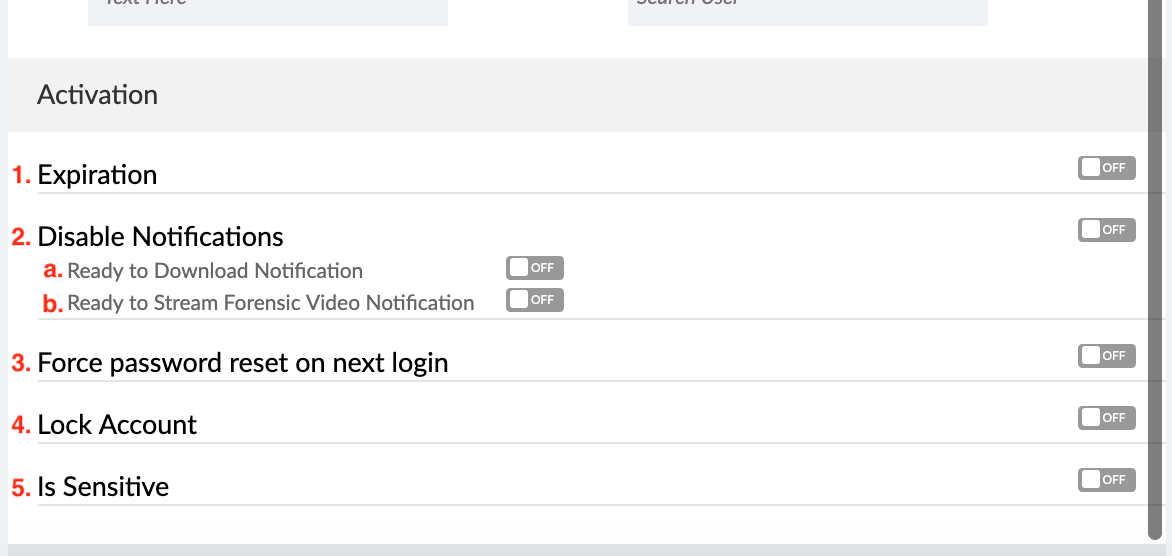
- Expiration - When ON, administrators can set a date for a user’s account to expire, which will deactivate the account. Accounts can be turned back on as needed. Especially good for contractors or temporary employees.
- Disable Notifications - Activating this turns off all email notifications.
a. Ready to Download - When ON, a user will not receive notifications that their package is ready to download
b. Ready to Stream Forensic Video - Stops notification emails for forensically watermarked videos that are ready to stream - Force password reset on next login - User must reset their password the next time he, she, or they log in
- Lock Account - Locks out the user of the account. Typically used when someone is terminated.
- Is Sensitive - Marks the user’s account as “Sensitive” which means other users cannot see them except for Administrators. Used notably for celebrities, well-known executives, etc.
Add New User
To add an individual user,
Select +New User button.

Enter at minimum the required fields which have red test*
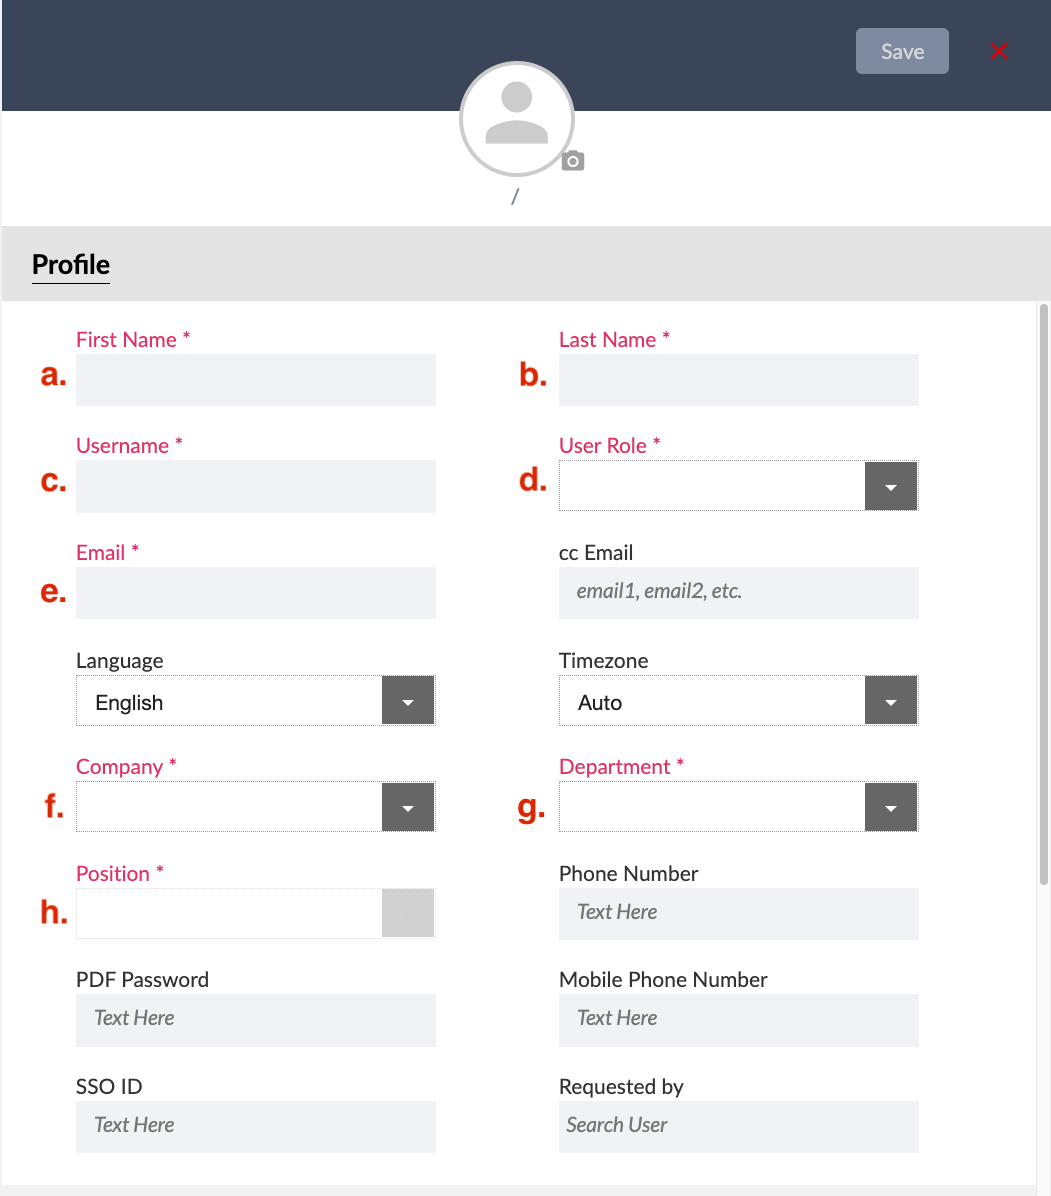
a. First Name
b. Last Name
c. Username
d. User Role (Learn how to create User Roles )
e. Email
f. Company
g. Department
h. PositionScroll to Activation, and turn on any requirements needed for the user.
Go back to the top, hit Save. Or Cancel if needed.

Page will refresh to an Existing User Profile
If your user needs additional access not provided by their user role or another role in the system, and the rules are unique such that another user won’t need them via a new User Role, then go to Rules Override and make any needed changes. (Learn about overriding rules ) or learn about creating User Roles )
Save before leaving any tab where changes are made, i.e. Access Override, View Access Override, Edit Access Override, etc.
When changes are complete hit Save again as a safety measure.
If you want to enter more than one new user at a time, you can upload them via CSV. Go to Adding Users via CSV .
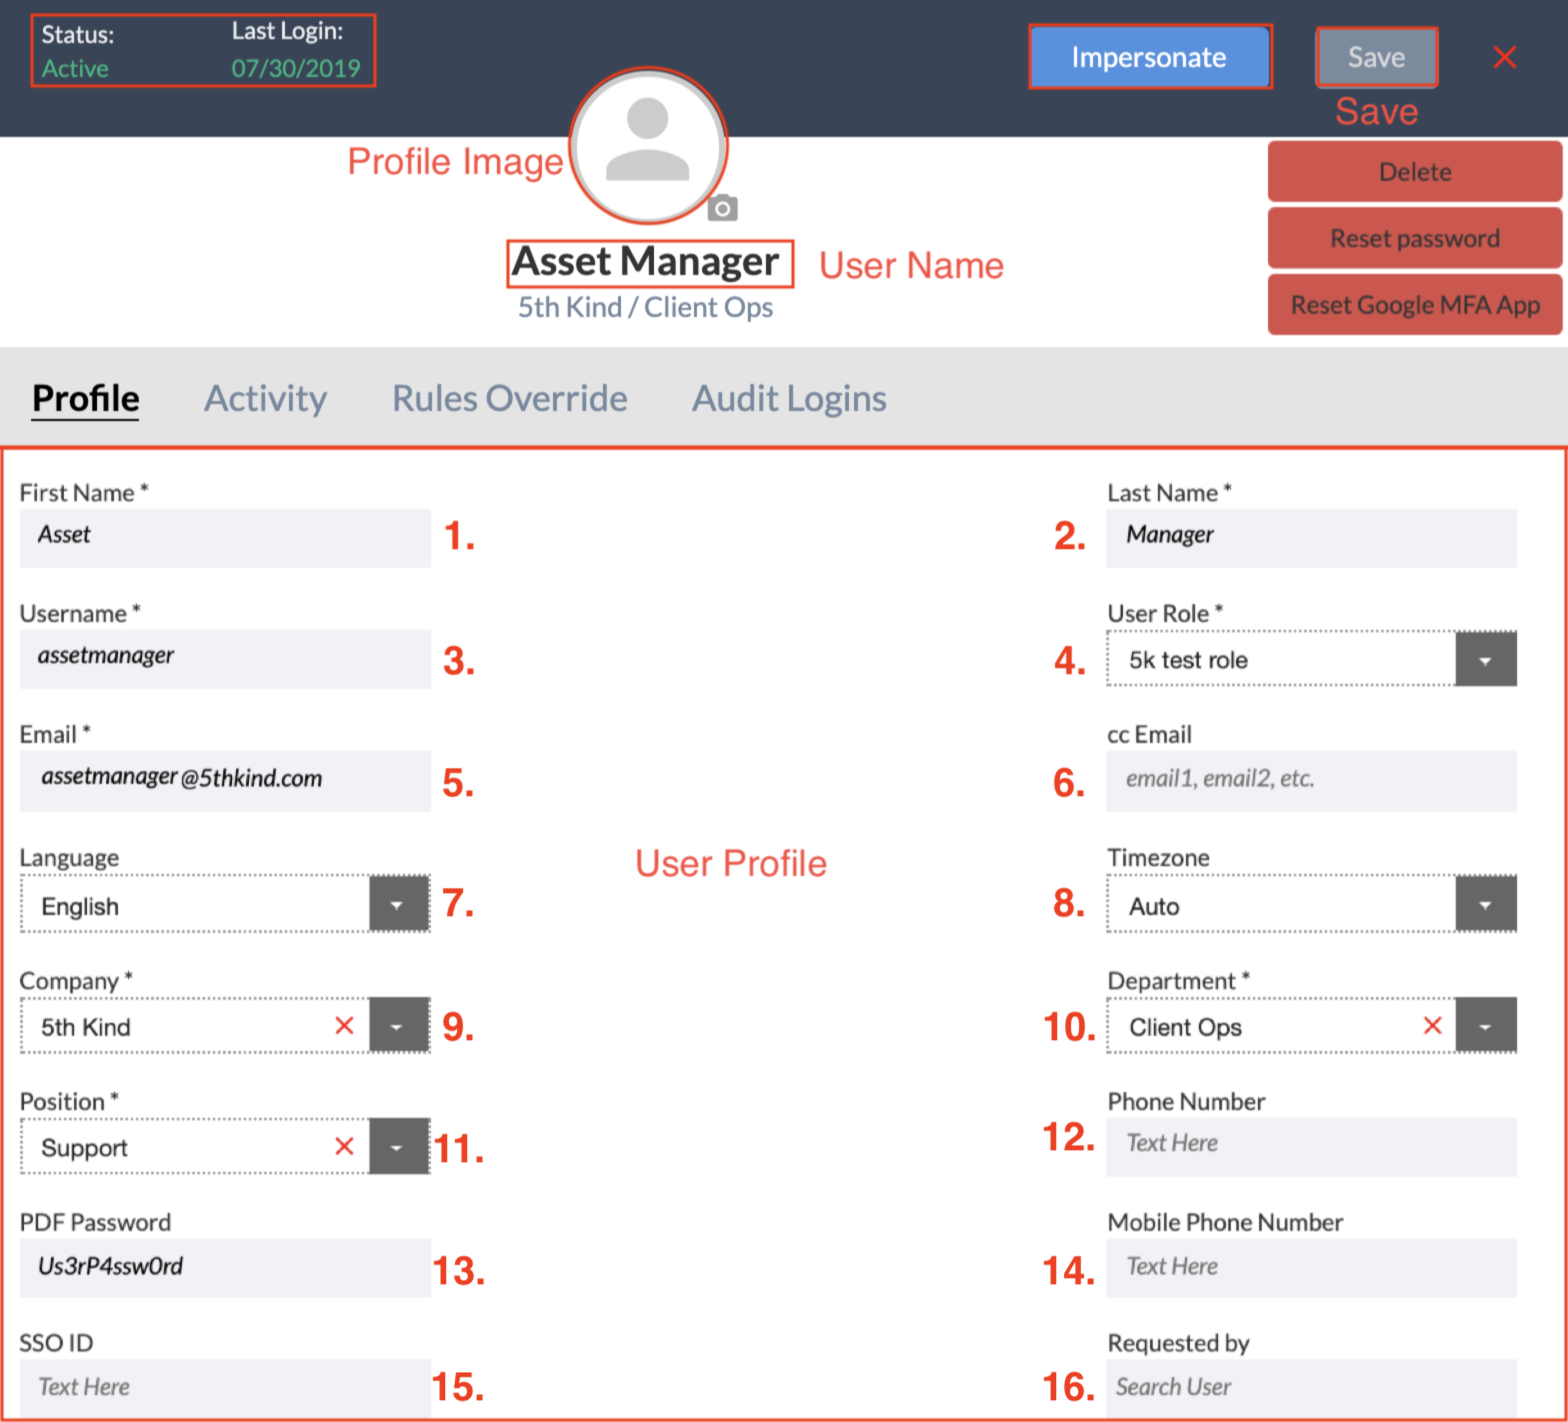
Existing User Profiles
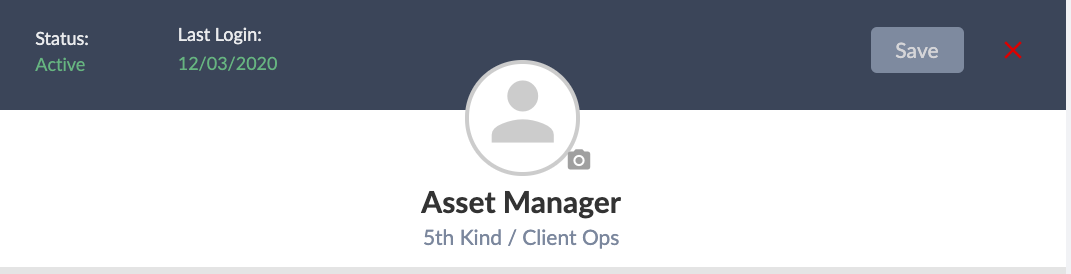
Status
Whether the User's account is Active or not is displayed here, along with their most recent login date.
User’s Full Name
This displays the User's Full Name (First and Last) as well as their Company and Department.
Profile Image
Set an image for your profile. Select the blank avatar and the Profile Image Editor will open.
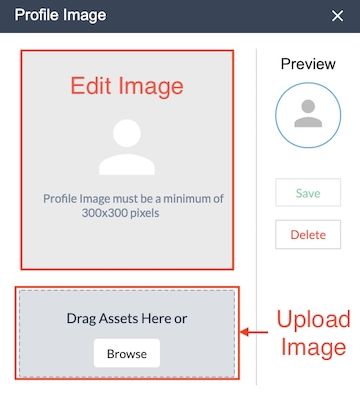
Upload Image
Click Browse to select an image, or drag an image onto this area to upload it.
Edit Image
Once an image is uploaded, click and drag the to position your image. Click and drag the corners to shrink or enlarge the area being used.
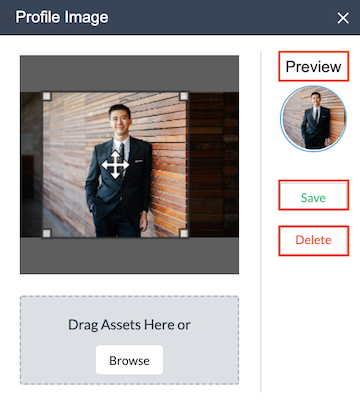
- Preview - A preview of your Profile Image will appear here.
- Save - Click to save changes to your Profile Image.
- Delete - Click to remove your profile image.
Once you’ve saved your image, the Profile Image Editor will close and your new avatar will appear. Your user profile does not need to be saved again in order to save the image.
Save
Click this to save changes to the profile. You may be asked to re-enter your password
Cancel / Close
The X. Close the Profile without saving.
Profile Admin Tools
Impersonate, Delete, Reset Password, and reset Multi-Factor Authentication by using these tools. These options are available to Admins only.
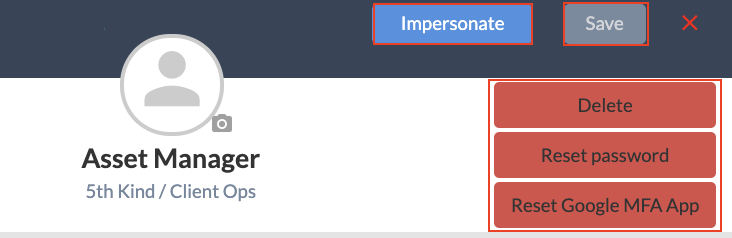
- Impersonate User - Click this to view as selected CORE User. You will see exactly what the user would see in the CORE interface.
- Delete - Delete User
- Reset Password - Click this to reset the User's password, forcing them to create a new password the next time they try to log in. Close the Profile without saving.
- Reset Google MFA App - Reset the User's Google Multi-Factor Authentication code. The User will receive a new QR barcode from their Google Authenticator app and will need to scan the new QR code in order to log in again.
NOTE: Users who get a new Mobile device will need their Google MFA app Reset.
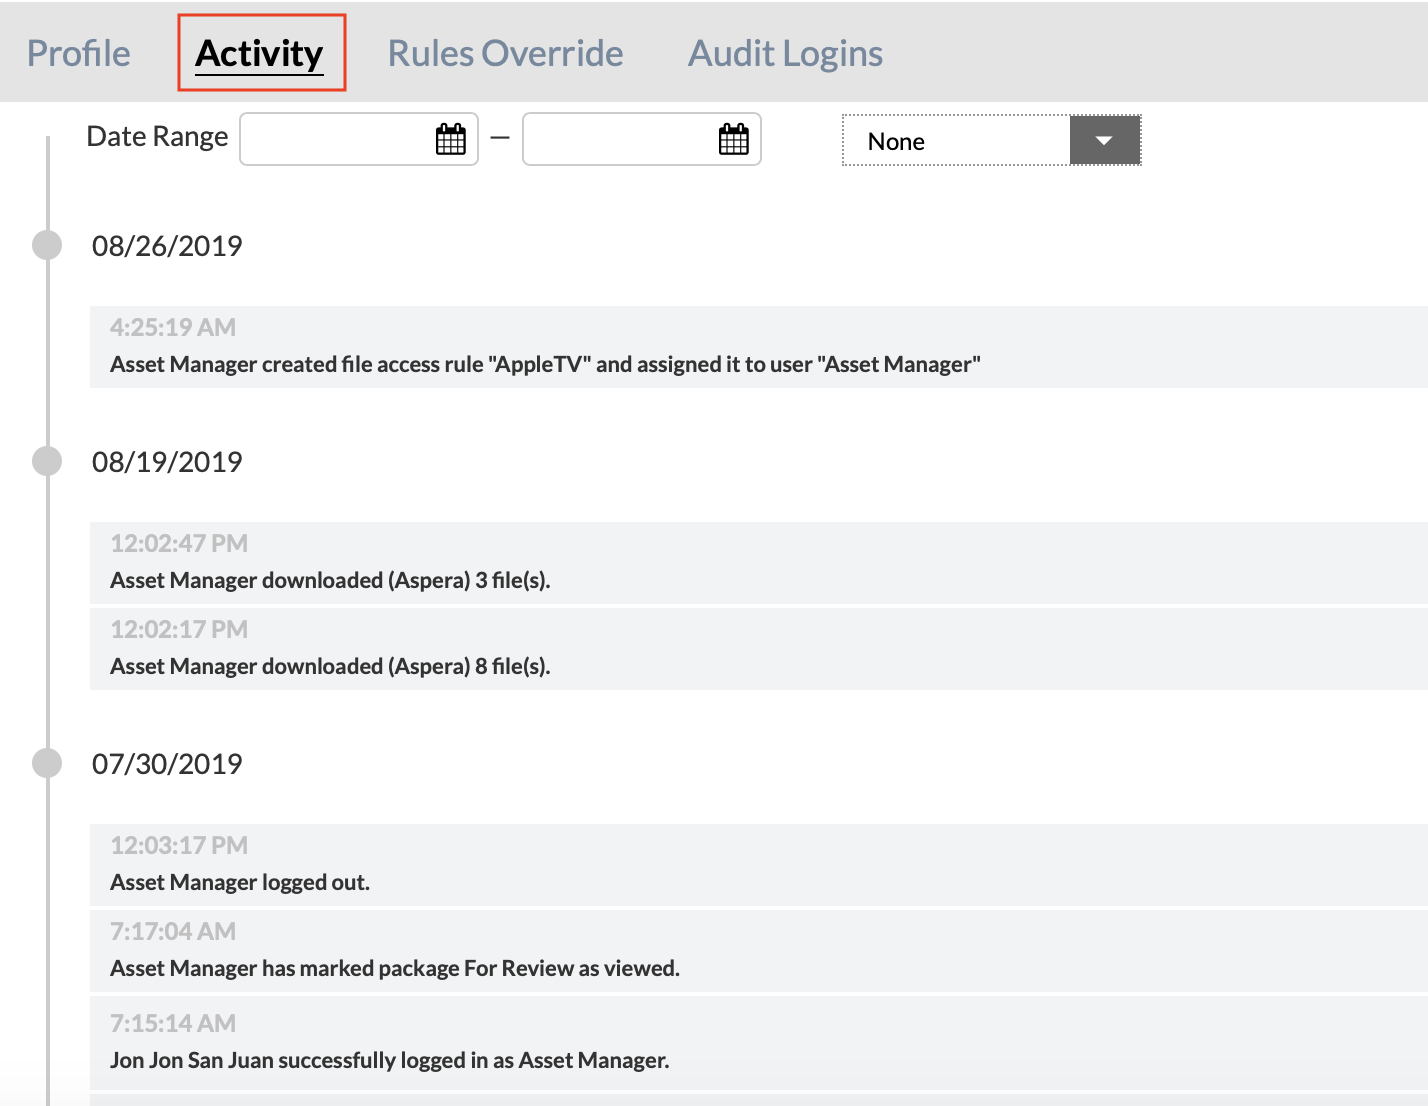
Activity Tab
View activity of the User. Most actions taken by a User are logged in the system and displayed here. The actions can be filtered by the pull down on the right or limited by the date range.
Rules Overide Tab
In some cases, you may wish to alter a User's Permissions, but not those of anyone else in their User Role. Rather than create a unique User Role just for them, you can override permissions in their role, which will apply just to them
Access Override
Access Overrides are general permissions overrides, such as edits to Administrative Settings, Device modifications, how users can send and receive packages, or what Productions they can navigate.
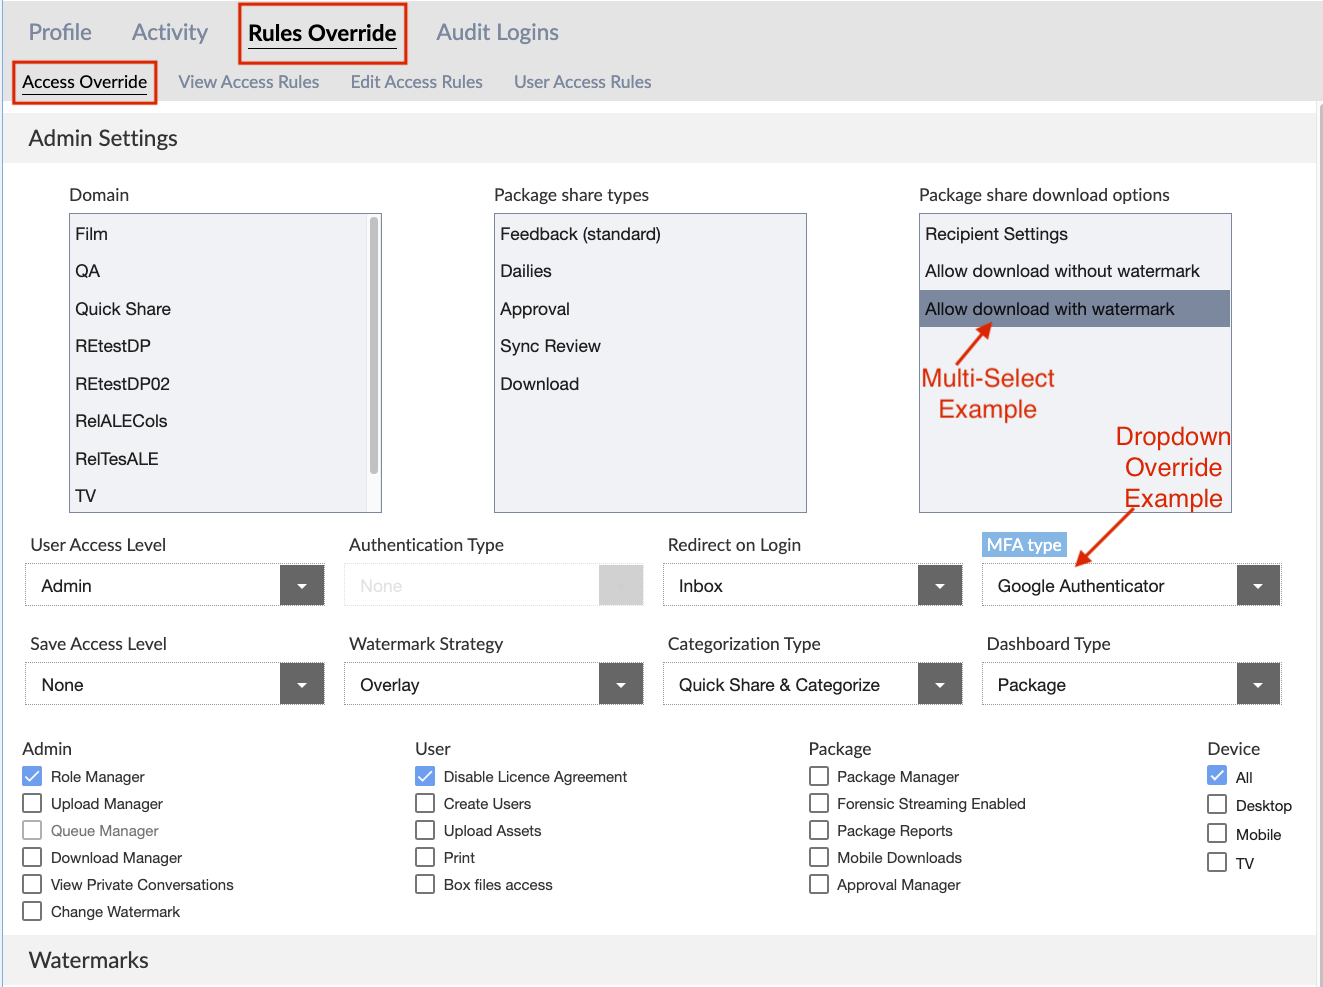
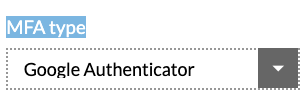
Dropdown Override Example - MFA Type
In the example shown above, the MFA type (highlighted in blue) has been changed to Google Multi-factor authentication , overriding the User’s original login settings, which were None.
Multi-Select Example - Allow Download With Watermark
When an edit is made to the Multi-Select fields, red dotted lines show up around the item that has been added as an override.
Note: You cannot change another User's Permissions to give greater access than what you already have. This means if you are an Asset Manager with limited Administrative overrides, you can’t give yourself or anyone else full Administrator capabilities. See User Roles topic for more information.
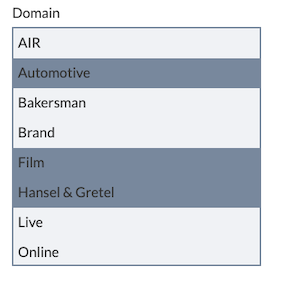
Multi-Select Fields
In these boxes, you can multi-select fields to override the user’s original access to these fields granted in their User Role.
Available Multi-select field options for Overrides:
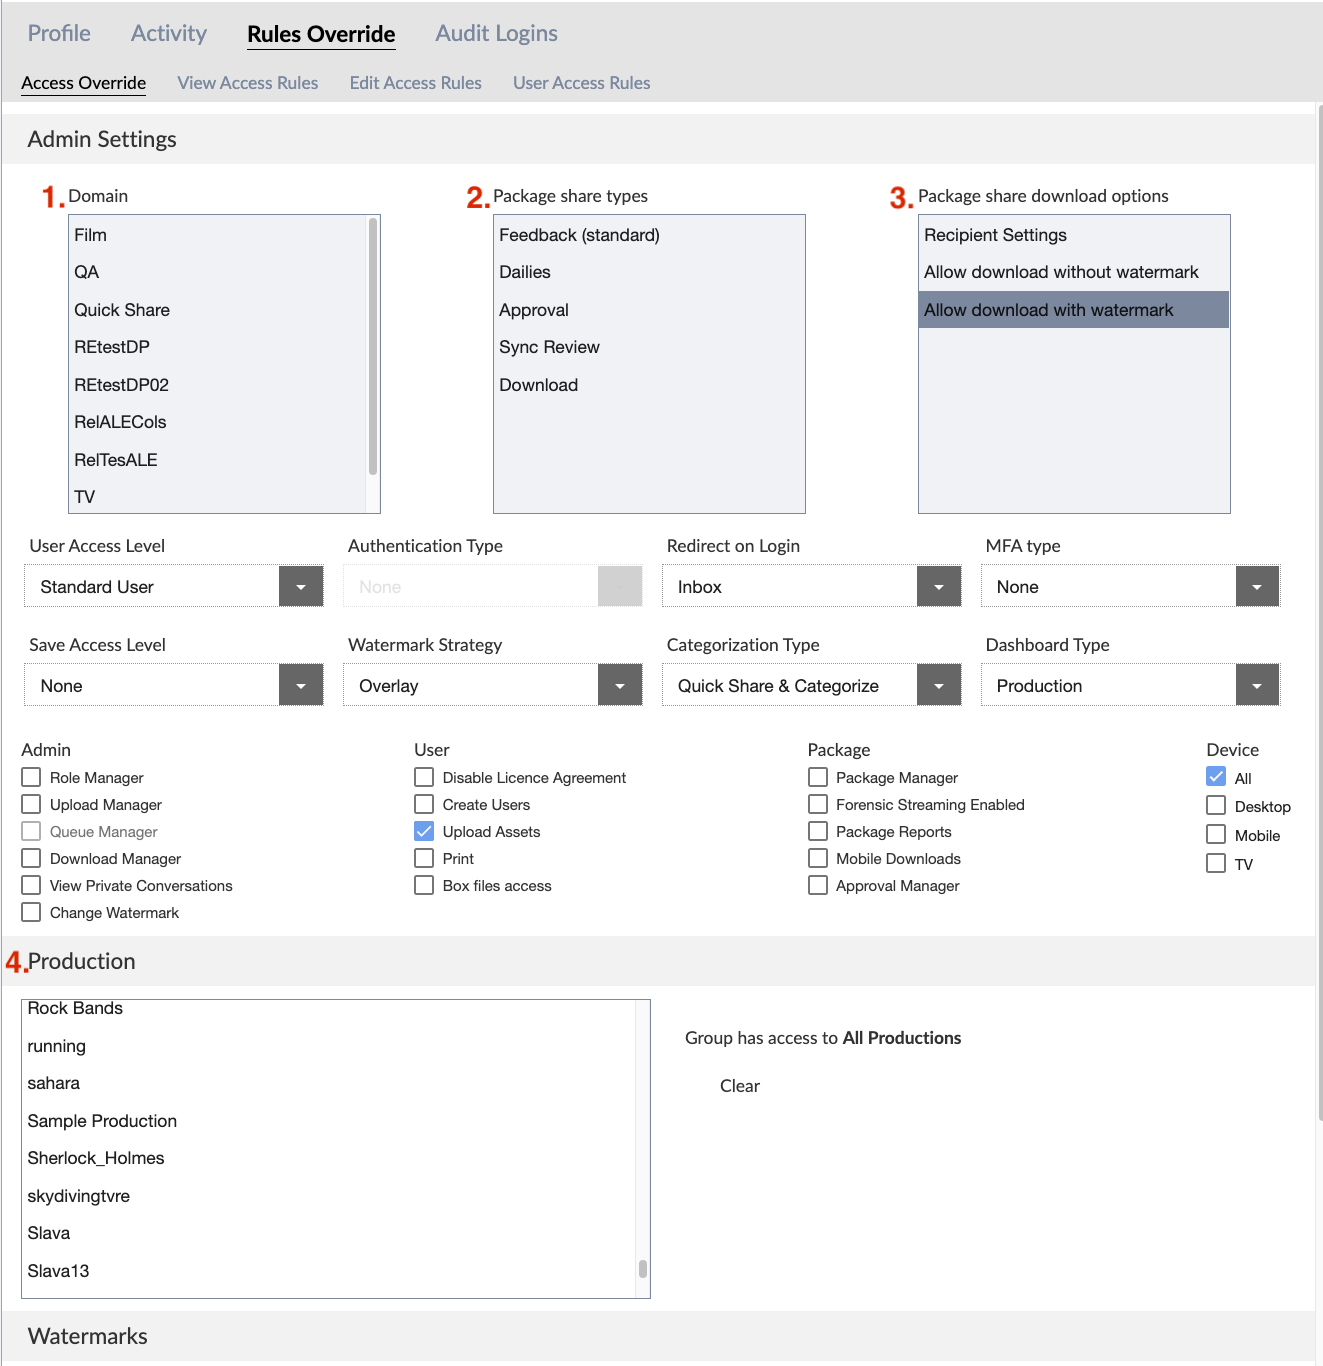
- Domain - Select which Domains will be available to the user when categorizing files
- Package share types - Select which package share types will be available to the user: Feedback (standard), Dailies, Approval, Sync Review, and/or Download options
- Package share download options - Choosing Recipient settings, view only and/or allowing download with or without watermarks
- Production - Select which Productions will be available for User
Dropdown Fields
The Override options available in these fields will be those you have permission to assign. If the option selected is different from that of the User's Role, the name of the field will be highlighted in blue, to indicate that you have made a change and overridden that user’s User Role.
Available Dropdown Fields for Overrides:
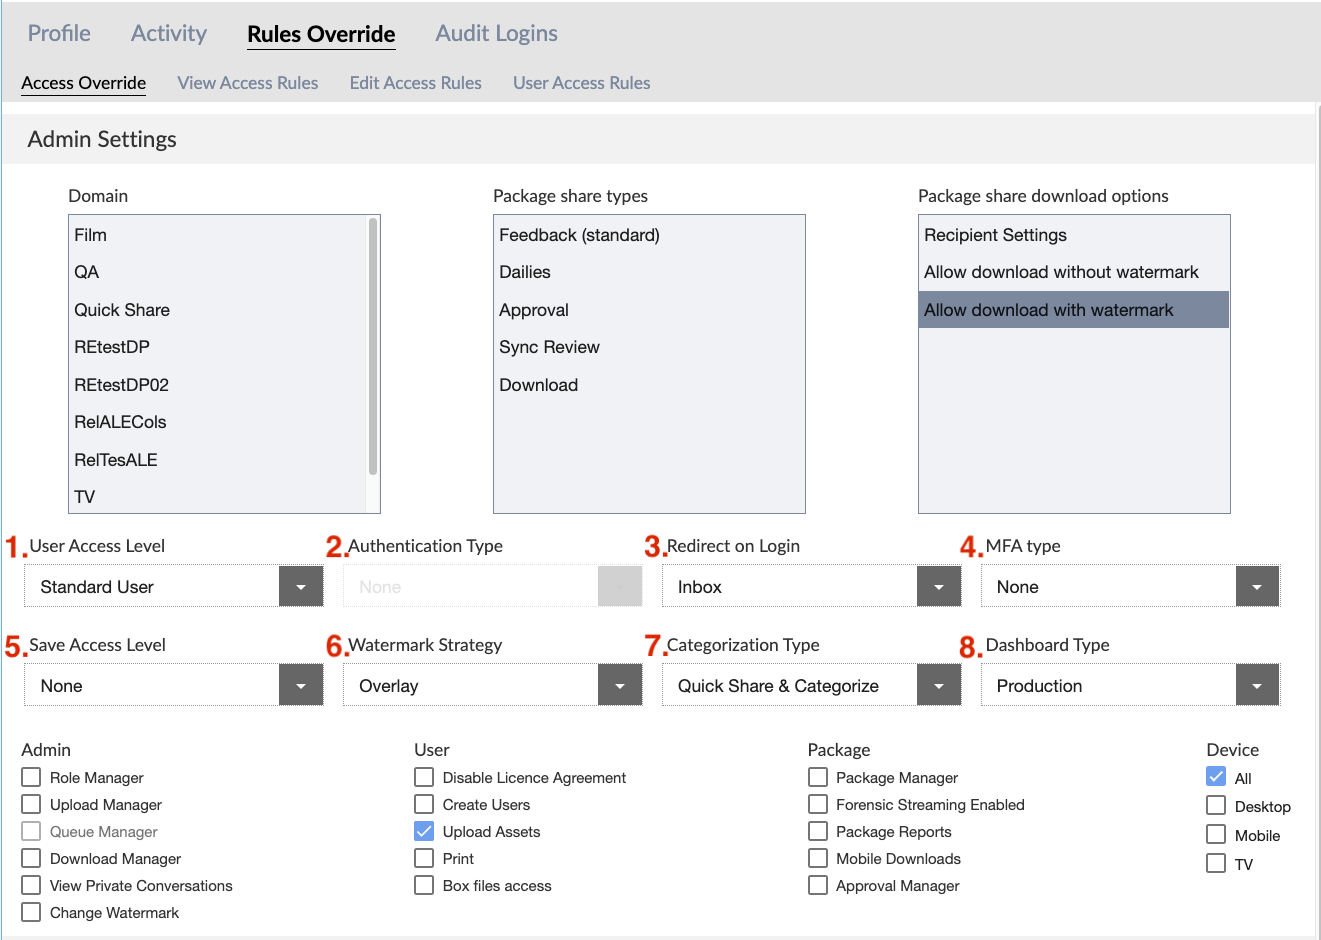
User Access Level - The primary determinant of what permissions and abilities the User has in the system
- Important: All users are Standard Users with additional permissions added from there. The Admin choice is only able to be chosen by other Admins. Admins do not need additional permissions added as overrides as they have access to all domains, productions and assets in the system. Exception to this rule is Mobile Download which must be enabled as an option for any user level.
Authentication Type - - If your organization uses Single Sign On, select it here
Redirect on Login - Select which view the User will see when they first log in either their Inbox or if File Search is an option for the user they can be directed to either.
MFA Type - If you would like to Override the setting in the User’s role regarding Google Authenticator for Multi-Factor Authentication you can adjust it here.
Save Access Level - Important: Controls whether the User can download files from the system. Proxy, which are duplicate files of the original source that are lower in resolution and smaller in file size. Or Source and Proxy where the original source file and proxy are both available.
Watermark Strategy - For trusted Users choose Overlay option, and for non-trusted Users choose burn-in option. Categorization Type - Select which type of asset categorization the User will be allowed to perform when uploading assets into CORE, if User will be allowed to Quick Share & Categorize, Categorize Only, Quick Share Only, or None.
Dashboard Type - Select which Dashboard type the User will see when they first log in, either Production or Package. Categorization Type - Select which type of asset categorization the User will be allowed to perform when uploading assets into CORE, if User will be allowed to Quick Share & Categorize, Categorize Only, Quick Share Only, or None.
Dashboard Type - Select which Dashboard type the User will see when they first log in, either Production or Package.
Available Dropdown Fields for Watermarks
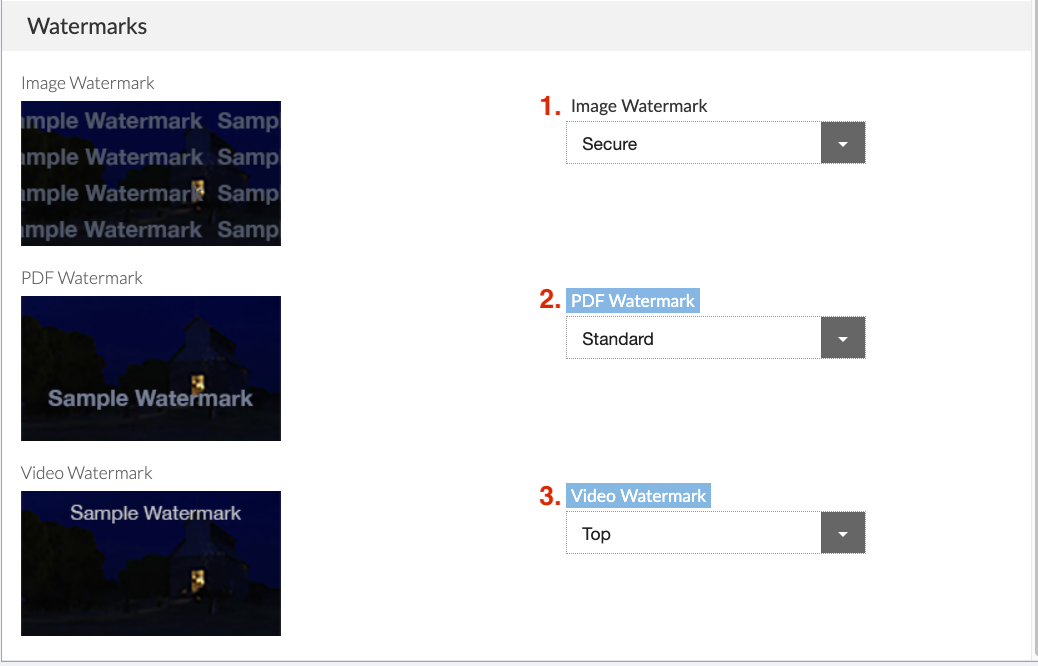
- Image Watermark - Toggle between standard or no watermark. Custom watermarks are available upon request to CORE from the system Administrator.
- PDF Watermark - Toggle between standard or no watermark. Custom watermarks are available upon request to CORE from the system Administrator.
- Video Watermark - Toggle between standard or no watermark. Custom watermarks are available upon request to CORE from the system Administrator.
Checkbox Fields
You can change any fields in this section that you have permission to access. If you change the default, the name of the field will be highlighted in blue.
If you do not have permission to change a field, it will be grayed out.

Available Checkbox Fields
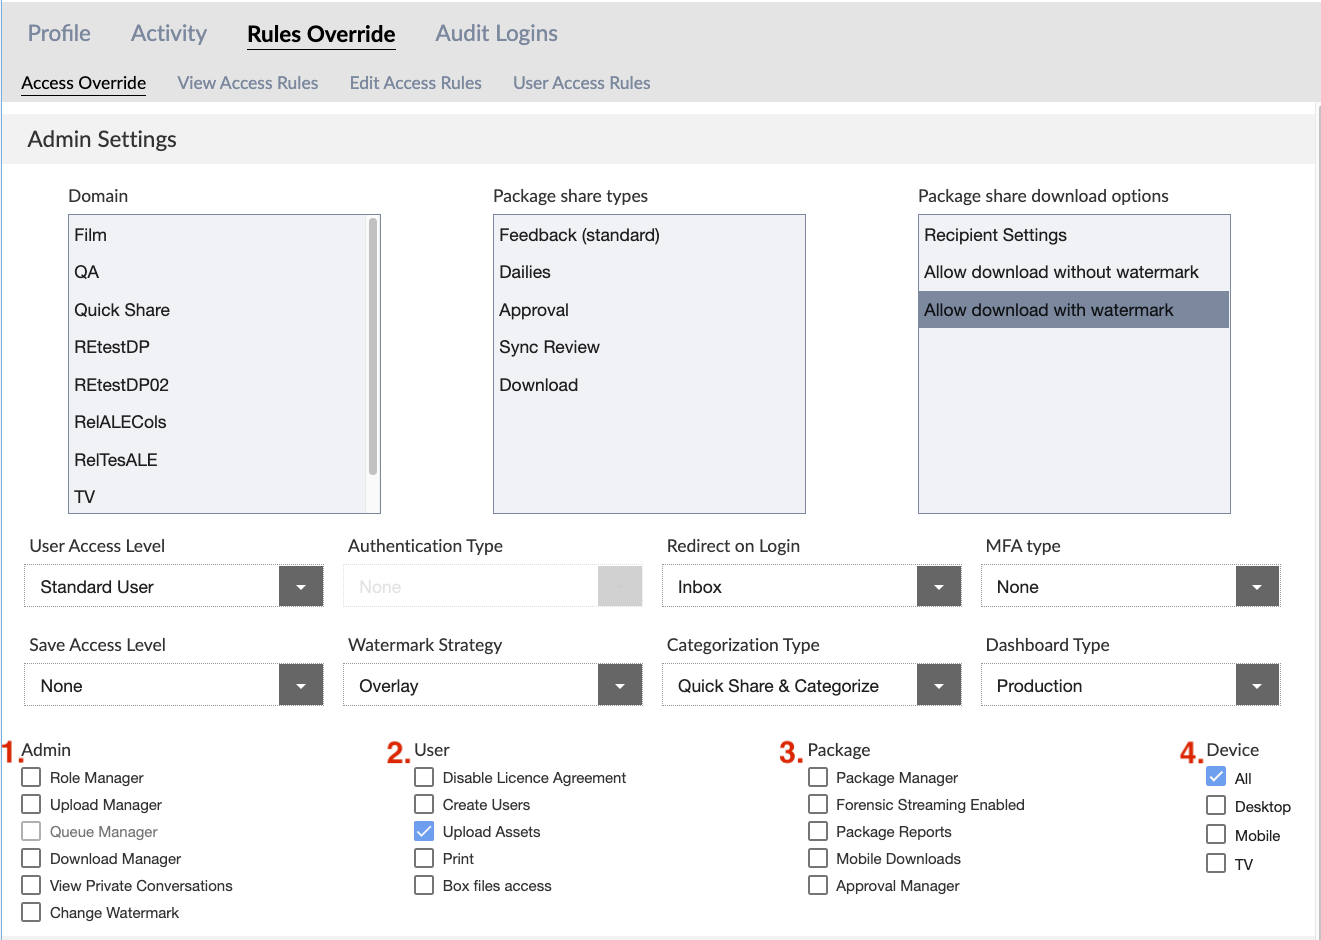
- Admin -
- Role Manager - Create new Roles, and modify existing Roles. A user can never create another account or Role with higher permission that they themselves have
- Upload Manager - View and categorize uploads made by other Users
- Queue Manager - View and re-prioritize jobs in the Processing Queues. (not yet available)
- Download Manager - View and download items assigned to other users
- View Private Conversations - View all Comments on files that you have access to, even if they are marked private
- Change Watermark - Ability to change the watermark when downloading ffiles. With this enabled, Users can change the watermark style, and also the Username on the watermark.
- User -
- Disable License Agreement - Users are required to agree a License agreement when logging in but clicking this box can disable this option for a user.
- Create Users - Allows user to see the + New User button in the Manage User area. User will be able to add new Users for the same permission level or below that they are in the system. Additional User Access Rules are necessary to limit the user further.
- Upload Assets - Allows users to upload assets into the system. Additional Edit Access Rules are necessary to limit the user further.
- Print - Allows users to print assets in the system that are printable like PDFs.
- Package -
- Package Manager - Packages shared with a Standard User who has this additional permission do not have any restrictions that a sender may have put on the package. The exception to this rule is expiration dates or views allowed for the package.
- Forensic Streaming Enabled - Forensic watermarking is only offered through a 3rd party integration and will require a license for users to enable this option. Forensic watermarking places an ‘invisible’ watermark on assets in order to track their location and provides the highest level of trackable security available for assets being shared outside of CORE. Forensic watermarking can work in conjunction with visible watermarks in the CORE system.
- Package Reports - Allows user to run reports on package access, views, downloads etc.
- Mobile Downloads - Allows users who are sent a package, with download with or without watermark permissions, to store packages/files offline on their mobile device for viewing with no wifi access.
- Device -
- All - Allows user to access CORE from Desktop browser, iOS app or AppleTV app.
- Desktop - Allows user to access CORE from Desktop only.
- TV - Allows user to access CORE from the AppleTV app only.
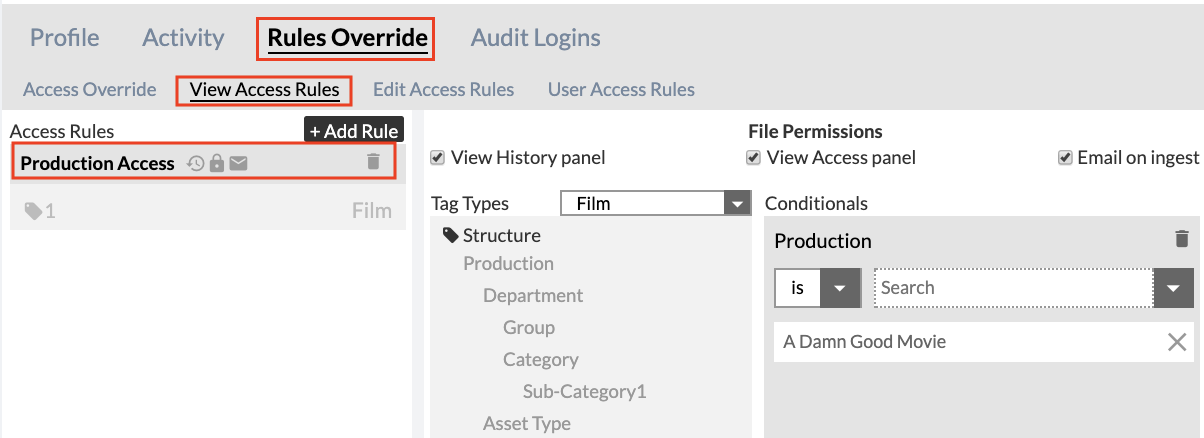
View Access Rules
View Access Rules control what Files a User can view, and optionally, what additional information about them they can view.
Important: If you make overrides to the View Access Rules in this section you will be overriding the Rules set up for the user in their assigned User Role.
For steps on how to edit ‘View Access Rules’ see: View Access Rules
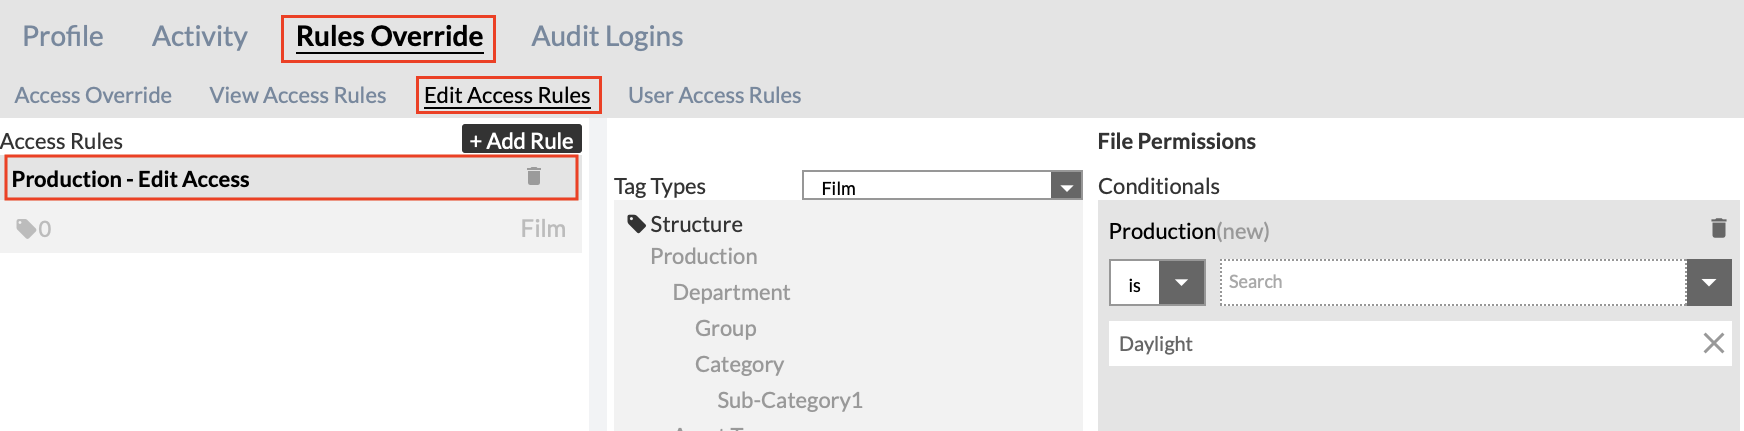
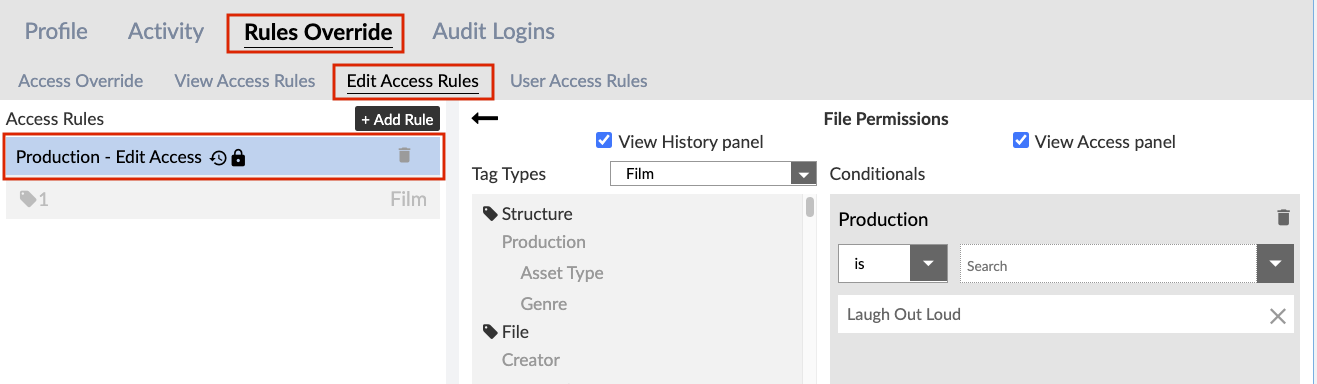
Edit Access Rules
Edit Access Rules control what Files a User can edit. Files matching an Edit Access Rule will be both viewable and editable by Users assigned to the Role.
Important: If you make overrides to the Edit Access Rules in this section you will be overriding the Rules set up for the user in their assigned User Role.
For steps on how to edit ‘Edit Access Rules’ see: Edit Access Rules
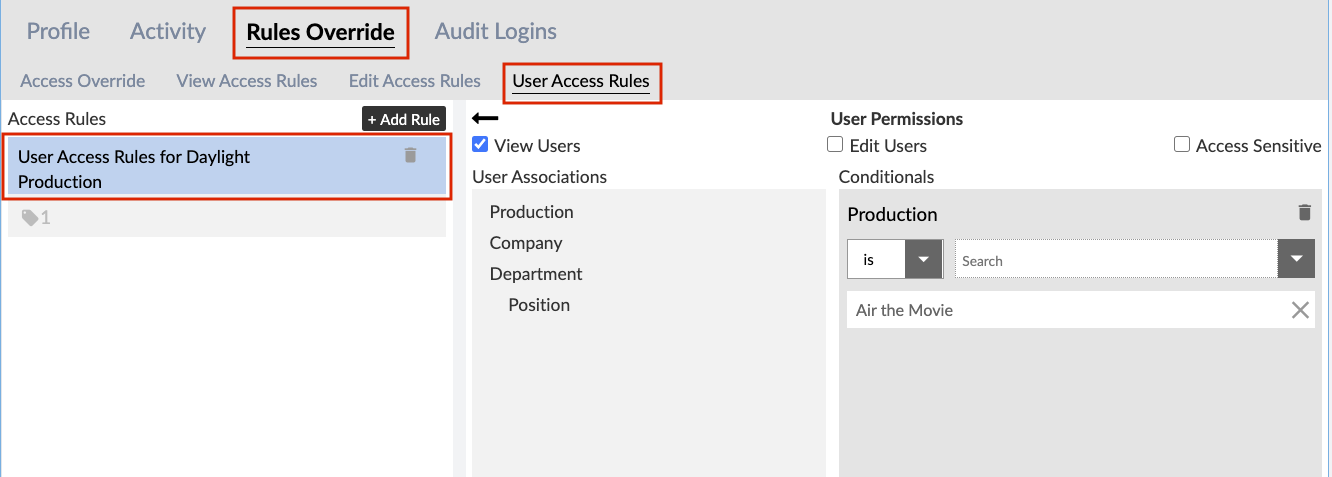
User Access Rules
User Access Rules control which other Users in the system a User will be able to see and/or modify. They allow you to make it so that a User may only see others in their own department, for instance.
Important:If you make overrides to the User Access Rules in this section you will be overriding the Rules set up for the user in their assigned User Role.
For steps on how to edit ‘User Access Rules’ see: User Access Rules
Audit Login
Audit and monitor detailed user sessions with this tool
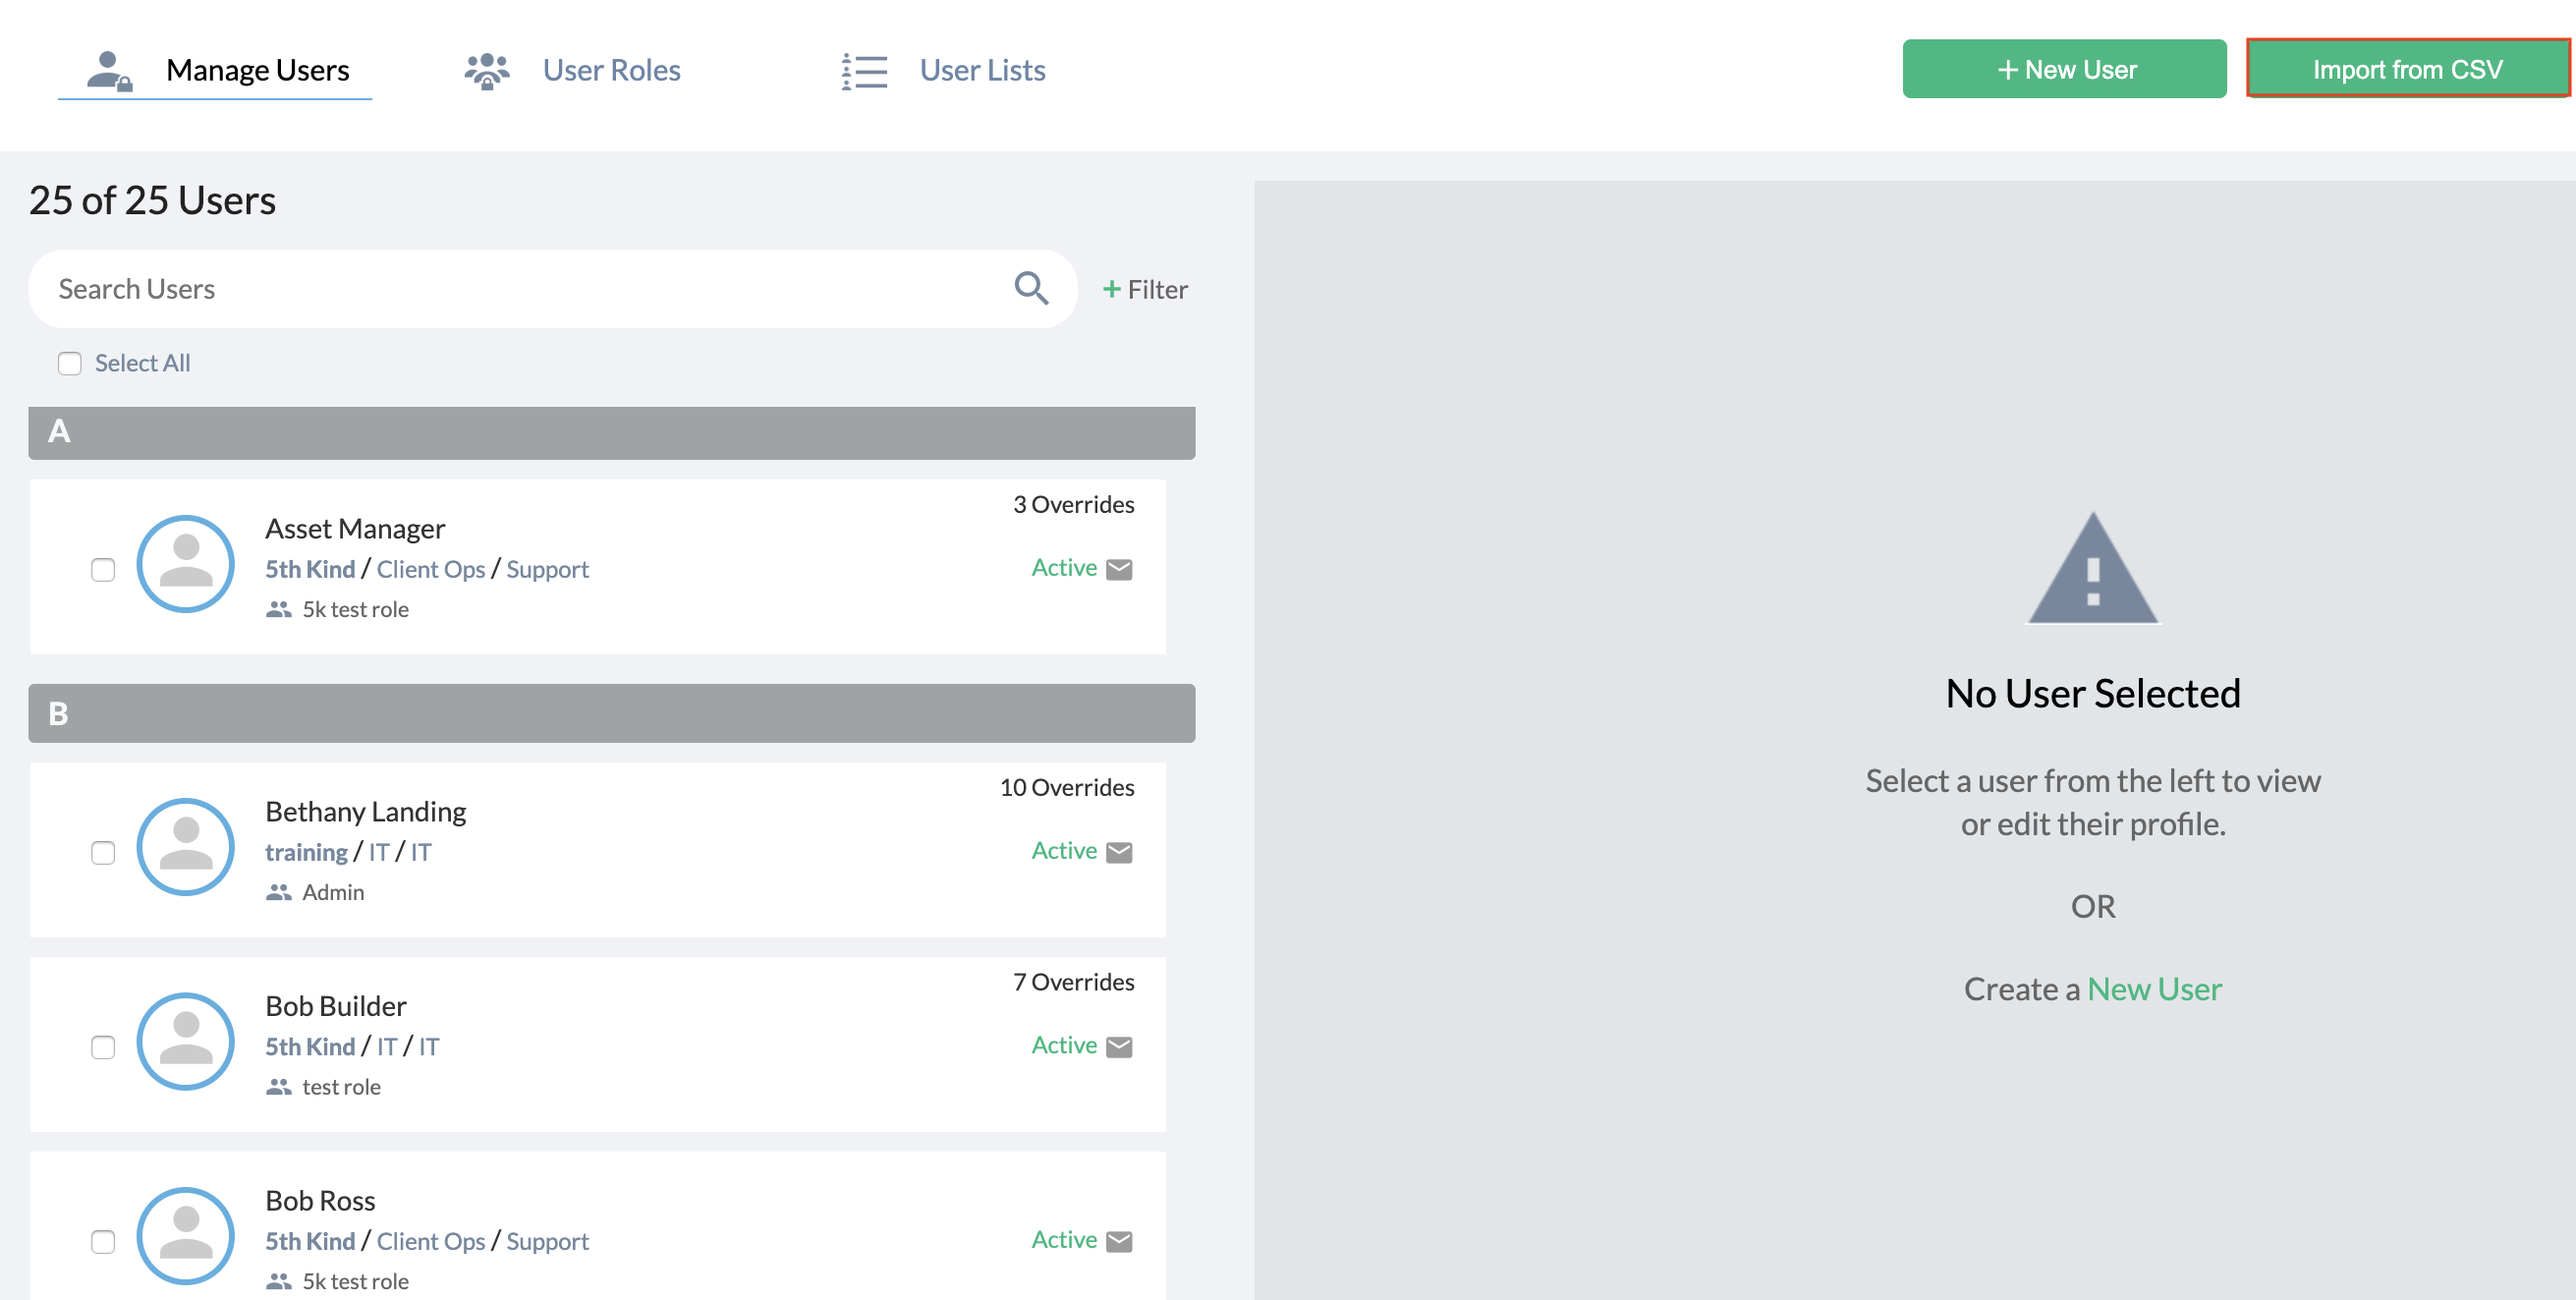
Adding Users via CSV
To batch import Users, you can use the Import from CSV option. This feature allows you to create a CSV file containing the important details of multiple Users at once, and add them simultaneously.
Creating a CSV
The CSV file you upload must contain the correct field names, and must be encoded as comma-delimited.
 Click here to download the CSV template.
Fields
Fill out the fields below for each user you would like to add. *Indicates mandatory field
- *username - The User's name in the system. This must be unique.
- *firstName - The User's first name.
- *lastName - The User's last name.
- *email - The User's email address.
- *company - The company the User works for.
- *department - The department the User works in.
- *position - The User's position in their company.
- *role - The User's Role in the system. See User Roles topic for more information. This must match the name of an existing role EXACTLY, and is case-sensitive.
Importing from CSV
Click the and select the CSV file from your file system.
Editing Existing Users via CSV
You can use the Import from CSV option to batch edit account information for existing Users in CORE. For example, you can batch edit Department, Company, or Roles for your Users.
- Fill out the CSV template with the existing Users whose information you want to change.
a. The username should match an existing user.
b. Make sure all the fields are filled out completely and correctly, including any changes you’ve made.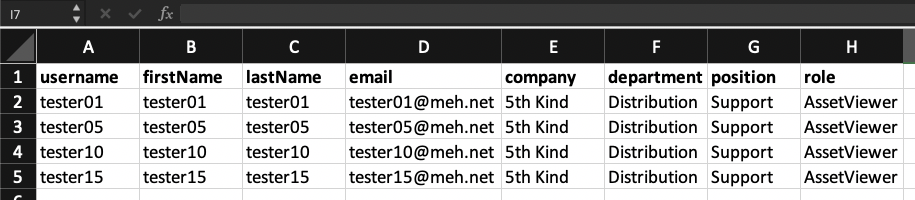 Click here to download the CSV template.
Fields
Fill out the fields below for each existing User you would like to update. *Indicates mandatory field
- *username - The User's name in the system. This must be unique.
- *firstName - The User's first name.
- *lastName - The User's last name.
- *email - The User's email address.
- *company - The company the User works for.
- *department - The department the User works in.
- *position - The User's position in their company.
- *role - The User's Role in the system. See User Roles topic for more information.
This must match the name of an existing role EXACTLY, and is case-sensitive. Please make sure to remove any unnecessary spaces in all of your filled-out fields.
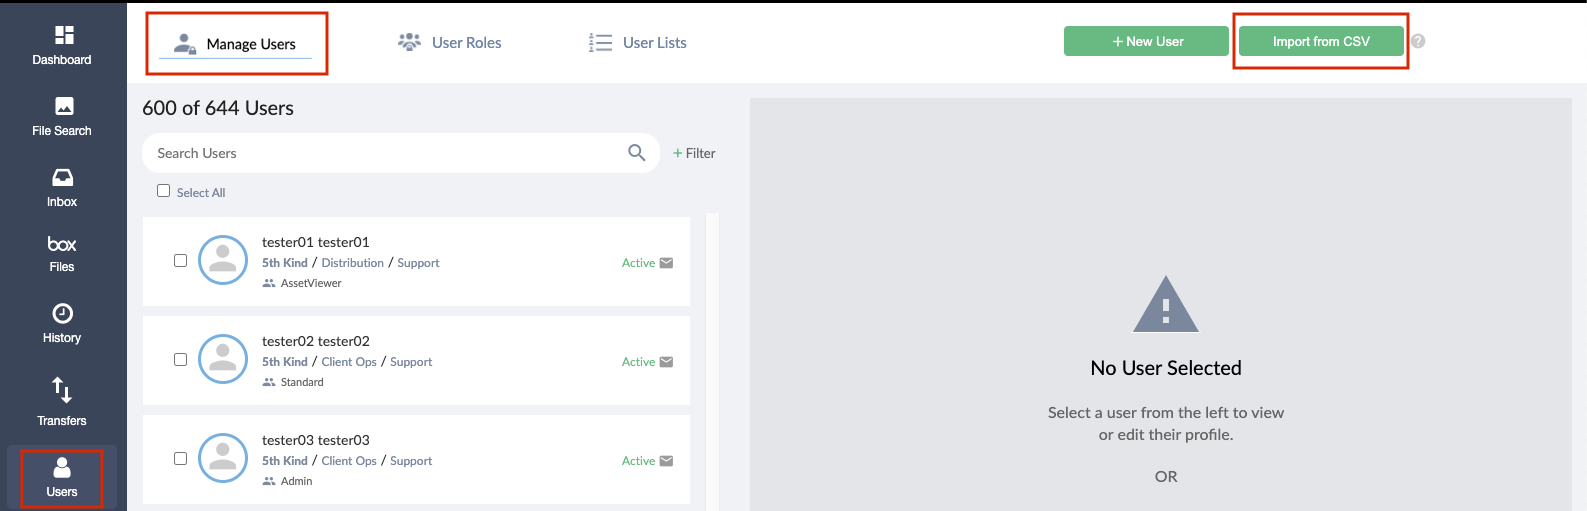
Once your CSV template is completely filled out including new or changed information for your Users, navigate to the Manage Users page
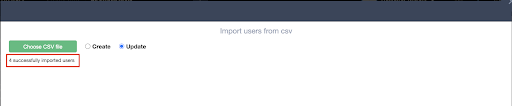
Click on ‘Import from CSV’ button located at the top right corner of the page.
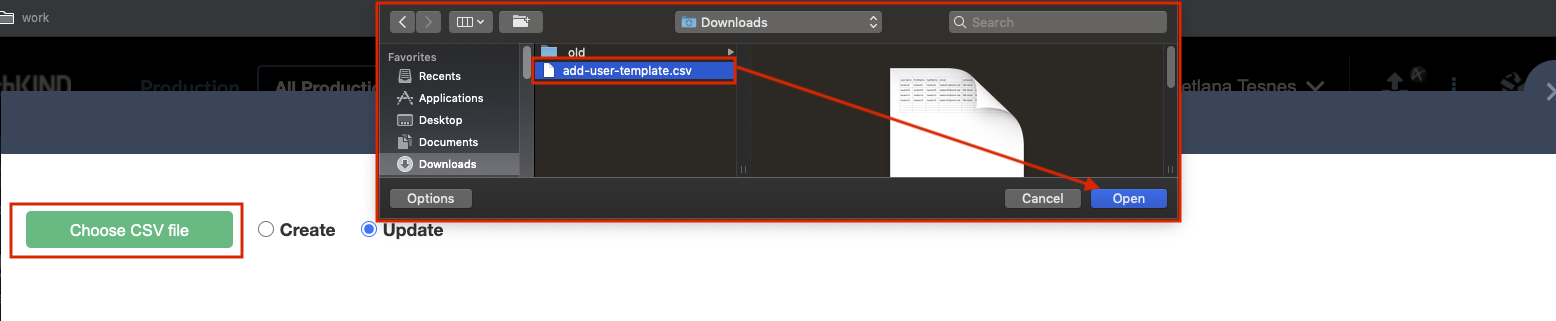
In the CSV Import menu, select the Update option by clicking in the circle next to the option. Update option means that you will be updating existing Users in the system and not creating new Users.

Click on the green ‘Choose CSV file’ button.
Select your filled-out CSV from the file window that will appear
Click on Open. The system will start the import as soon as you click on Open.
Lastly, once the import completes, the system will confirm how many Users it has imported successfully.
a. Also, if there were errors with the import, the system will show those as well. In that case, you should review your list to ensure all fields are properly formatted.
b. After checking your document, re-import the CSV.
c. The successful confirmation will reflect only the number of those names whose information didn’t update during the first import.